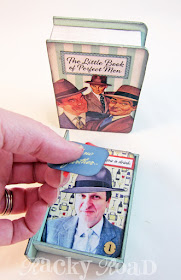
Ever wish you had the perfect man? What would he be like? Perhaps a little like the perfect men in this perfect little book! This month, Alpha Stamps is featuring men- wonderful images from the 50's and 60's. They're perfectly sized for ATCs, and the ATC sized Hidden Drawer Book Box is the perfect place in which to store those cards portraying that perfect guy.
I was lucky enough to find the perfect scrapbook paper for the pages of the book. It almost looks real. I used stripey scrapbook paper for the front and back cover of the book. The inside of the cover and the secret drawer of the box are painted with paint I mixed to match the color of the stripes, and then ink from an almost-dried up ink pad was applied with a stiff brush to get
the distressed look.
Here you can see the secret drawer, opened and filled with ATCs. The red ribbon is attached to the bottom of the box, which makes it easier to remove the cards.
To access the cards, just lift up on that ribbon and they pop right out.
You can see here how the ribbon is attached at one end of the box, and then is threaded up to the top so that the cards lie on top of it.
Lots of these guys look like they might enjoy a nice smoke, so I colored a pipe from the Dapper Gents shape set and glued it to the back of the tab.
I used precut Chipboard ATCs to make the cards sturdy. They were on the large side of 2 1/2" by 3 1/2" and fit too tightly, so I trimmed about 1/16" off of two sides. They're still the correct size; they just hit on the left side of the ruler line. I also used a punch to round the edges. I found it difficult to punch the corners when the scrapbook paper was already on the blank, so I punched out the blank, adhered the paper, and then punched the corners again. Easy peasy!
I had so much fun going through my collage sheets finding perfect men
and imagining what sort of things they might say. Here are all my
perfect guys together. #1 is the ultimate perfect guy for me; that's
actually my husband there, saying "Here, let me bring you a drink." No,
that's not his real hat: it's from the 50's Floating Heads collage
sheet.
The little book comes flat in pieces, but it's very easy to put together. Using the photo below, #1 is the front cover, and #3 the back. There are three pieces that fit in the slots on the back to form the pages of the book. #4 shows the tray of the drawer, and #2 is the spine of the book. It is glued to the long edge of the inside of the drawer. I used Aleene's Tacky glue to adhere all the pieces and they are nice and sturdy.
To make sure the spine of the book was in the right place in relation to the covers, I put the already painted drawer into the constructed book, and then added glue. I did not paint the sides that will be adhered together, thinking that might help with the bond.
Once the spine was lined up correctly, I gently removed the tray with the spine attached and used clothespins to hold the spine in place until the glue set.
Little tip for doing a collage: I used three different images of men for the front cover of the book. To get an arrangement I liked, I cut out several images and played with them until I got something I liked. I took several photos during this process. Here is the "almost right, but still not quite" photo. Ack, too many men! Once I decided to keep it to three, things looked better. Having reference photos of your work in progress is great in case you decide to go back to a previous look. Once I settled on the three men for the front cover, I used tracing paper to trace the men in position. This made it easier to glue them on exactly where I wanted them.
And here they are, my perfect men. I will say, they are certainly a handful!
For a complete list of supplies,
click here.


