Design team member of Alpha Stamps, lover of ephemera and junk.

Welcome! Grab a cold one, kick off your shoes, and have a look around.

Saturday, September 30, 2017

Halloween Row House Countdown Calendar

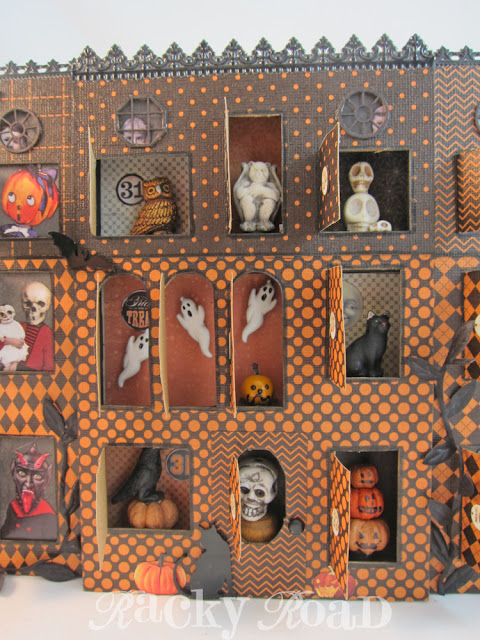
Tomorrow is October 1st, so it's time to start the official countdown for Halloween! I was inspired by those Christmas advent calendars that count down the days in December. You know the type: open a little door each day and get a waxy piece of chocolate. I wanted something similar, but no chocolate, just Halloween fun. I used a couple of chipboard haunted houses and lots of spooky images from Alpha Stamps to make this, my Halloween Row House Countdown Calendar. It stands 8" tall and almost 17" across.

If you stick with me here, I'll show you lots of pictures, including some in progress photos and a bit of a tutorial. Meanwhile, here's what they will look like a few days into the month of October. There are some scary things in those houses!

Bats are flying around, and scary black vines are growing. The residents have put out their jack o' lanterns in anticipation of the big day. A black cat waits by the door of the center house. A couple more days have passed, and more creepy guys are showing up!

It's hard to see all the details, but you sure don't want to miss the kids trapped in the upper attics. Here are a few of them. Poor little dears.

On the 30th of October, the countdown is done. It's Halloween eve!

The center house has a shadowbox back to it, so it holds 3D Halloween fun: ghosts, skulls, goblins, owls, cats, and gargoyles, oh my!

I had fun figuring out how to make this all work. Here are some photos I took while I was constructing the houses. I began with the two houses on the sides. I covered the chipboard back of the house with black paper, and then took several of the collage sheet images I had cut out and placed them in the windows for position. Once I liked where they were, I took a photo for reference. You can see that several of these photos need to be cut down to fit correctly. After this photo was taken, I covered the front with a heavy paper, and cut out the windows.

Now the cut out photos are in position. It helps to place each one with the window panel on top so you can make sure you like the position of the character. You may notice that I wrote "NO!" on the back of the window side of house. That was to keep me from checking the position of the figures with the wrong side of the front, and to make sure I glued the paper on the correct side. If you look closely, you'll see that there's also a black line on the right side of each window. That is so when I cut out the window flap, I would remember to leave that side attached. I didn't want to make any stupid mistakes!


Here's the middle house. I painted all the sides of the box black, and after determining where each figure would go, chose a background paper to show it off. Here again, you can see my warning to myself and the black lines showing where not to cut. I also wrote under each window what would be behind it, so I didn't have to figure that each time I placed the 3D elements. The two squares up by my "NO!" warning are the backs of the background papers for the kids in the attic windows. Those windows have to be completed before the house facade is attached to the shadowbox.

I used white glue on the shadowbox, and held it together with rubber bands until it dried.

Depending on what you put in those cubbies, the floor can be a little low for some of the windows. I used small pieces of scrap wood and a few wooden spools to help give my guys a little boost. Here I am trying them out for size. The three ghosts are buttons, so I used a dab of hot glue to hold their shanks into place. It looks like they are flying.

Once the three houses were done, it was time to figure out how they go together. For some it might have been "past" time, but hey, I like to live dangerously. I was going to try to have them stand up with a small bit of fence between them, but in the end decided it would be way more sturdy to make them row houses. I cut off the right roof point of the first house, the left point of the third house, and both points from the house in the middle.

I used a piece of wood to attach the three houses together. The end houses are not very thick, so they needed something a little wider to attach them too. The wood is not set flush with the edge of the center house, so the front of the row has a bit of a staggered effect. At the bottom of this photo, you can see the wood piece glued to the side. I painted it black behind the roof line, in case my cuts weren't exactly straight. The rest of the wood is natural, because because I know that side won't show; the other sides are black. In this photo, I'm patiently holding the top house tight while its glue dries.

Here's the back of the completed row, with the two wood pieces keeping the flanking houses firmly attached.

I'm in love with my countdown calendar, and will be excited to use it this Halloween.

For a complete list of supplies, click here!

Thursday, September 28, 2017

Flashback: For The Birds

Here are some more photos of projects I rescued from Photobucket's money grubbing clutches. This time, birds! I fell in love with some bird themed paper a while back, and used the sheets on a couple of bird projects. First, these two nesting lovebirds. Someone was inspired by these to teach a class on them, but he did give me credit for the design, so it's all good.

And then, a collage. I still have some of that paper left. I should pull it back out.

And one for the road, this one shown in (and on!) a mat. It fits in a nice square frame.

Thursday, September 21, 2017

Flashback: Chunky Houses

Thanks to Photobucket's new fees, I'm retrieving my old photos from there and posting them here. Here are a set of chunky houses I made a few years ago. I really enjoyed putting these together, using a number stamp, and finding interesting objects to serve as chimneys. My photography skills needed work, though; this photo is terribly out of focus! It actually looks better at this smaller size.

Here are individual shots of the houses, though. Thankfully, they're a little clearer. A clown and his true love:

A skeletal newsboy:

A reluctant janitor:

And a secretive clown:


Saturday, September 9, 2017

Halloween Cat Bat

Here's a little paper clay cat bat I made for the Vintage Halloween swap on Craftster. I don't often work with clay, so each time I try, it's a real adventure. He stands about 6" tall, and is dressed to go trick or treating. To help him stand, I bent a wire hanger into a U shape, turned it upside down, and built his body onto the wire with the two ends of the U becoming his legs.

The open polka dots on his costume were the result of a happy accident. When I first painted them, I wasn't happy with the color, so I attempted to wipe them off. They had already partially dried, so I was left with a little ring of color that I happened to like. I did the rest of the dots in that same way: putting dots in a small area, and then wiping out the centers. Once he was all painted, I used some ink to dirty him up, and then painted him with glaze to make him shiny.  

My partner in the swap said she liked a bit of humor, so oops! cat bat has lost a button and his little rear end is exposed.

Ready for my close up, Mr. DeMille.


Wednesday, September 6, 2017

The Magic of Christmas

Last time we visited my brother-in-law, he gave me the cutest picture ever of my two and a half year old husband visiting Santa. I don't think I can adequately convey how much I love that photo. I needed a way to display it each year, and this is what I came up with. See how Santa is instructing him not to reveal the secrets of Christmas? It's the cutest!

The box is a wooden cigar box. It seemed the perfect size. I covered the back and sides with paper, and ran some red ribbon around the edge of the front. The Tim Holtz tag reads "believe in the magic of Christmas". Perfect! I planted three bottle brush trees at the bottom, added a vintage dancing Santa to the top, and strung up some miniature Christmas lights.

I toyed with the idea of covering the back, but it won't usually show, and I like the fact that it's stamped with information about the cigars, one of my husband's infrequent guilty pleasures.

The hubby wasn't sure about the disk with "24" on it, but that's when Santa arrives: on Christmas eve! I'll enjoy using this as one of my Christmas decorations this year. Ho ho ho!

Saturday, September 2, 2017

Halloween Night ATCs

I'm loving these new Alpha Stamps ATC cards with their gothic gate and spiderweb frames! Those, along with some spooky new collage sheets, inspired me to make up a set of Halloween ATCs. I painted the gate frames black, and added an orange accent using Liquid Pearls. Then I filled two cards with googly-eyed pumpkins, and two with some spooky trick or treaters.

Oh, the horror! These two kids are dressed up wearing funny half masks. I used Copic markers to color their clothing to match their masks; the cat is not amused. To make a little extra room for the kiddos, I cut part of the fence back on the top of this frame.

Here's another group of trick or treaters. These guys came fully costumed on their collage sheet. I gave the skeleton a fun jack o'lantern and added a festive hat.

Pumpkins! I just could not resist giving them all googly eyes. They're not so scary now, are they? Bunch of goofballs.

Want to make some fun ATCs? Here's a list of supplies I used.

Related Posts Plugin for WordPress, Blogger...