Design team member of Alpha Stamps, lover of ephemera and junk.

Welcome! Grab a cold one, kick off your shoes, and have a look around.

Wednesday, December 5, 2018

"He Sees You When You're Drinking"

I'm so in love with some of the tags on the new Alpha Stamps "Snarky Christmas Tags", that I finally quit procrastinating on altering a vintage ornament box I've had for a couple of years. A turquoise background of happy Santas from the "Jingle" 6"x6" paper pad was the perfect background for the last of my turquoise plastic deer.

I couldn't help but put a tiny wine bottle up in that left hand corner and add a lovely Cosmopolitan inside the box, for that deer. He no doubt needs a little warmth, standing on that snow covered ground.

A thin line of Stickles (glitter in a tube) sets off the opening of the box. It wasn't hard to make that Cosmo using a miniature cocktail glass, a polymer clay lime cane, and a sugar rim made from glitter. A tiny log makes the perfect table. If you are in need of a tiny Cosmo in your life, click here for a post that contains a tutorial.

One more photo for scale. I have to wonder: just how many of these boxes of ornaments did one have to buy to decorate their tree? No matter, I'm in love with their tiny selves. I have one more left to alter. No telling when I'll finally get around to that!
For a complete list of supplies, click here.

Saturday, December 1, 2018

Snowy Day

The Alpha Stamps December kit is titled "Christmas Nostalgia", and oh boy, do I have some nostalgic artwork for you today: using the 2" by 3" Mini Shadowbox and lid, I made the sweetest little winter scene. It reminds me of a vintage Christmas card. A swag of tiny holly leaves frame the inside of the opening, some Stickles (glitter in a tube) frame the outside, and glittery snowflakes finish off the top.

I used two copies of the same image to achieve a 3D look inside. I glittered up the background of the full image, and then cut out the girl and her dog and glittered only the snow. I attached the figures on top with foam tape so they stand out from the cold and snowy background. Aren't they the sweetest?

I used a stripey paper for the sides of the box on the inside, and there's some cream colored rick rack trim around the outer sides of the box.

Sides and back, with a little contrasting paper for fun.

So much glitter and sweetness in such a small box! Here's a little better idea of how small it really is.
A very merry Christmas. For a list of supplies, click here.

Wednesday, November 28, 2018

"A Visit From Santa" Altered Tin

Tim Holtz has a line of tins that are not only deeper than Altoids tins, they're holiday themed! Of course I had to get my hands on the Christmas set. The outside of the tin was so perfect and retro looking that I toyed with the idea of just leaving it "as is", but at the end of the day, I couldn't help but add just a few silver snowflakes.

On the inside, I used images from the "Christmas Trees" collage sheet (from Alpha Stamps) to create a sweet little scene. I used foam tape to give the scene dimension, and added a couple of tiny wrapped packages (tutorial here). Silver tinsel frames the scene nicely.

The images on the left of the tin came from separate collage sheets, which are included in the supply list below. Ho ho ho, little girl- better get back to bed if you want Santa to leave something under that tree!
For a complete list of supplies, click here.

Friday, November 23, 2018

A Matchless Christmas

What looks like it holds matches, but is even better? Christmas matchbook and matchboxes that contain art! I have definitely caught the Christmas crafting bug, and here are two fairly quick projects I just completed.

The first is a Peaked Roof Matchbox. This little house shape is so cute! I toyed with the idea of covering the outside with scrapbook paper, but the color of the cardboard was just the same shade as gingerbread, so I decided to make a gingerbread house using dimensional paint to mimic frosting, and some polymer clay canes that look like candy. I used the paint to hold the "candy" on, just as one would decorate with frosting.

Imagine how sweet this roof would be if this were a real gingerbread house!

Just for fun, there are a couple of gingerbread cookies on the back side.

When you slide out the matchbox drawer instead of matches, there's a little Christmas scene inside. I love that teeny vintage plastic Santa! The bottle brush tree is decorated with seed beads.
For a list of supplies to make the gingerbread matchbox, click here

The second project is a little matchbook.

Back:

Like the gingerbread matchbox, this matchbook does not contain matches. Instead, it houses a little folding book.

Wouldn't these be great stocking stuffers?
For a list of supplies to make the Santa matchbook, click here. For the gingerbread house, click here.

Wednesday, November 14, 2018

Special Delivery Christmas Matchbox with Tiny Package Tutorial

Here's another Christmas shadowbox, this one made with a 2" by 3" Chunky Matchbox with Window from Alpha Stamps. It's got a little of everything: kids with stars, a bottle brush tree, a sweet pink puppy, silver snowflakes, and Santa! There are also some teeny wrapped packages.

I used papers from the Jingle 6x6 Paper Pad to wrap the tiny boxes (tutorial below) and the chunky matchbox itself. I used red striped paper on the ends because it reminds me of a candy cane.

The chunky box allows for lots of items to be displayed inside. Isn't the tiny silver tree charm so cute?

I love the tiny pre-wrapped packages you can purchase, but they were a little too large for this matchbox, and I did want to feature packages wrapped with paper from the same pad I used in making the box. Here's how it was done:
First, you need a box to wrap. I happened to have a bit of gray linoleum (for carving stamps), so that's what I used. Other things you might use would be a rubber eraser or some foam core. Cut to size with an x-acto knife.

Cut some paper squares large enough to wrap around the top and sides of the box. No need to cover the bottom as it will be glued to the matchbox. Center your package on the square and glue down with a little white glue.

Cut the corners out of the paper as shown below, carefully fold the flaps around the side, and glue. You'll probably need to hold the sides down for a bit to let the glue take hold.

Cut a long length of embroidery floss for the ribbon. I separated and used two strands for my package. Put a tiny drop of glue on the top of the package and lay the center of the floss down. This helps keep that ribbon in place as it's wrapped up around the box.

Wrap the floss around the bottom of the box and tie it in a knot on the top of the box. See how long that floss is? You're going to need it long to tie a bow in it.

Tie your bow! Once you get it tied, pull on each end one at a time until you get the loops to the size you want. Alternate pulling the ends and then pulling out the loops a bit to keep the knot tight. 

Once you're happy with your bow, put a tiny drop of glue on it so it won't come untied. Trim the ends of the floss, and there you have it: a teeny tiny wrapped package.
Ho ho ho! For a list of supplies used, click here.

Saturday, November 3, 2018

Kitschy Christmas

Be still my heart: PINK bottle brush Christmas trees! When I saw these trees I just had to do something with them! Using the new "3" by 5" Chunky Matchbox with Window" from Alpha Stamps, I made a little kitschy Christmas scene. The pink tree looks great with my favorite color combo of turquoise and red, and of course I had to line the box opening with some pink pom poms. A little turquoise deer I had got a new set of eyes (spot of black paint) and a shiny red nose (tiny red crystal). I tied a little bit of baker's twine around his neck to make him dapper, and used a few layers of foam tape to attach him to the back of the box. 

The box top is flat when purchased. I find it easiest to cover by gluing paper to just the part of the box with the opening first, making sure you have enough paper to wrap around the sides and the back. Then, cut out the opening with an x-acto knife before constructing the box top and then wrapping the paper around it. I chose a red and white striped paper for the top and bottom of the slide out box because they reminded me of a candy cane.

This box is nice and deep, so for a better fit, I used scissors to flatten out the back of the tree a bit. Here's one more shot of the inside.

Just for fun, I put a jolly little Santa on the back. Best wishes for a Merry Christmas and a Happy New Year!
You can find most of the supplies I used here. And please come back next week, when I'll feature a smaller chunky Christmas matchbox.

Wednesday, October 17, 2018

Altered Costume Boxes

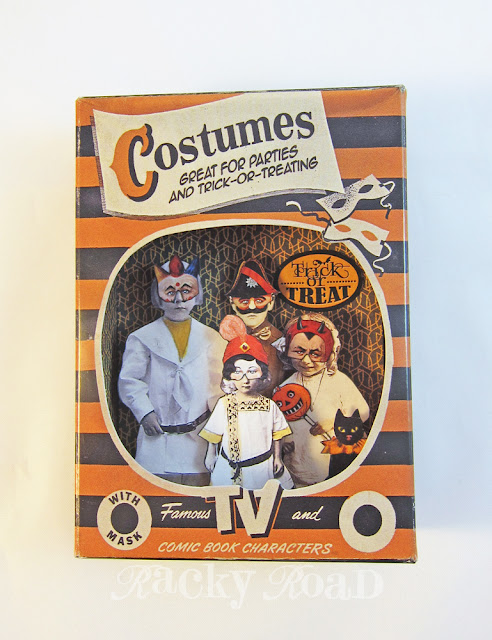
I'm a big fan of making art in vintage Christmas ornament boxes (like these here and here), so when I saw these new Tim Holtz reproduction Halloween Costume boxes, it was love at first sight. Halloween is my favorite! These small boxes (the cat box below is 2" by 3") look great on their own, so it doesn't take much to create cute little Halloween decor. What fun!

For the smallest box, I covered the back of the box with orange and black scrapbook paper, black alphabet beads (boo!) and a vintage image of a girl with a pumpkin. I used foam adhesive dots to raise her up from the back. Rick rack trim and a little pumpkin was added to the box top.

On this next box, I used some vintage kids from one collage sheet and masks from another to make a group of tiny trick or treaters. Foam adhesive was again used to give the group more of a 3D look. C'mon now, give them some candy!

Here's the largest box. It got a background of orange with black polka dots and some fun orange tinsel around the opening. The inside features a flying bat and a ready-for-a-party plastic skeleton holding a black cat shaker. The skeleton was, of course, too tall to fit in the space like that, so I took some heavy duty clippers and removed his pelvis and the bottom part of his arms to fit. Sounds ghastly, but look how happy he is; he doesn't mind a bit!

I love the details on these boxes, and the fact that they look so real, despite their size.

What a fun addition to my Halloween decor! These are going to look great on my mantel.
  For a list of supplies, click here!

Saturday, October 6, 2018

Tiny Haunted House, with Tombstone Tutorial

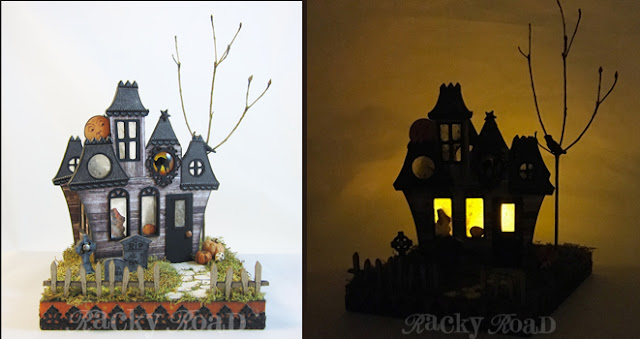
I love the new Tealight Haunted House Kit from Alpha Stamps, and am really excited about how my final project turned out. The kit comes with a chipboard house, a 6"x 6" base, four tombstones, and a run of rickety fencing. It's so fun to construct and decorate. Beware! I took a ton of pictures.

I covered the sides of the house with a wood plank scrapbook paper, and the roofs with spiderwebs. Dresden trim accents the roof lines. 

The "stone" path in the front is cut from a cardboard egg carton. It's got the perfect texture for pavers.

Tombstones litter the front yard. The kit comes with four; I chose to use three. Buried in the front yard are "Al B. Bach" and "Ima Goner". Sadly, no one knows who lies beneath the cross. I have created a tutorial for how I made the tombstones, and you can find it at the bottom of this post.

The windows in this little house are actually thin sheets of mica. Here in the front,  I put the image of the child behind the mica, so it looks like she's inside. The pumpkin is in front of the mica so it looks like it's outside, sitting on the windowsill.

I used mica in the window because the house is designed to accommodate a tea light. When it's dark, you can light it up and it looks so spooky!

Here you can see the back of the house. I wanted the inside to be as light as possible when the tea light is lit, so I did not paint the walls or floor. You can also see all the mica in the windows. Believe it or not, it's really easy to cut the mica to size with just a regular pair of scissors. (But not your good paper cutting scissors; use the cheap pair!) I used a little white glue to adhere the mica to the back of the house.

The tree is made from a branch of an azalea bush. Perfect! I punched a little hole in the base and just fed the bottom of the branch in. The crow sitting in that tree used to be a bluejay. I filed down the tuft on his head and painted him black. He prefers life as a crow.

Next to the door are a couple of tiny pumpkins and a skull.  Although the house is designed with three windows across the front, I decided to include a door. It's just a piece of painted cardboard, with a window cut into it so the light can shine through. The doorknob is a brad.

The sides of the house are solid. I used some window frames backed with mica to make it look like there were windows there.

I had so much fun making this haunted house! I love that it looks good both in the daytime and at night.
For a complete list of supplies I used, click here! And now, the tombstone tutorial:

(I put together this tutorial after this house was complete, so these are not the tombstones seen above. The tombstones shown here are larger and from another set, but the same process was used.)
Items needed:
Chipboard tombstones
Ratty old paintbrush
Black, white, and grey paint
Straight edge (optional)
Very fine black pen. I used .1 and .05 Copic Multiliner pens (above)
N4 Grey Copic Marker (not shown above)

Dip your paintbrush into each of your three colors and dab it onto the tombstone at random. It's best to use an old stiff brush that's pretty wrecked already.

Keep dabbing on the mixed paints until you are happy with the results. Once I get the mottled look I like, I often dip the brush in just the white paint for some contrast.

Make sure you also paint the back and sides of each piece. If you're making a little graveyard, it's nice if some of the stones are lighter than the others.

Using a straight edge and a .1 black pen, draw thin lines to give the tombstone a 3D effect. If you have a steady hand (or you need to go around a curve, like the stone at top below, just freehand it.)

Use the .05 pen to draw tiny cracks in the tombstones. I also used a grey Copic marker (N4) to give some shadows and dimension. For the tombstones in the haunted house project above, I hand lettered the gravestones, but for these two, I found some odd bits of rub on type that added detail. Either way works great. Now that I've got some new tombstones to play with, I need to do another Halloween project. Hmm....
For a complete list of supplies I used in the Haunted house, click here, and for the set of tombstones used in the tutorial, click here. Happy haunting!
Related Posts Plugin for WordPress, Blogger...