Design team member of Alpha Stamps, lover of ephemera and junk.

Welcome! Grab a cold one, kick off your shoes, and have a look around.

Saturday, December 9, 2017

Crown Me!

Sometimes, you just need a crown to brighten up your day. I just got a lovely package of goodies from Alpha Stamps, perfect for making a sparkly gold crown. One of the items, a fancy gold Dresden Diadem, was the perfect size and shape for a crown base. All I had to do to make it regal was to add the bling! Gold on gold on gold, and lots of jewels; I feel like the queen of everything.

I attached ribbons to the back and sandwiched the stick pins and large stars in behind some pretty scrapbook paper. Brads on each side to help secure the ribbons.

This was such an easy and fun project, and it looks great on.

Here's the work in progress. I just moved things around until I liked where they landed.

One more photo of the queen.
Hope you like it, Your Majesty. For a complete list of supplies, click here!

Saturday, November 11, 2017

Tinsel Rain Christmas, with mini tutorial

I'll admit it: I have a love for vintage packaging, and vintage Christmas ornament boxes hold a special place in my heart. Maybe you remember the dioramas a friend and I did a couple of years ago?

You may not have access to a vintage ornament box, but here's how you can get the the same look of one with some supplies from Alpha Stamps: a Tiny Diorama Box and "A Very Merry Christmas" paper pad. I used paper from the pad for both the inside and outside of the box, fussy cutting elements of some of the paper to create logos and box design. In the photo below, the two boxes in back are vintage; the one in the front is a fake.

Stack 'em up! I used a nice golden brown ink pad to dirty up the imposter a bit.

The diorama box I used is cardboard, so even though it's a one piece box, I left the bottom "as is", and only glued the decorated sides at the corners so it looks like a box with a lid. (Check out those staples; I love that little detail. More about those later.)

The interior of the box features a wee little elf admiring the decorated Christmas tree.

There's plenty of room for Christmas fun in this box!

Here's how it was done: glue the paper on the top of the box, and cut out the opening. The paper in the pad I used was not big enough to cover the four sides of the box, so I used red stripey paper around the bottom edge of each side. Glue in your patterned background paper. Glue beads and a star onto a bottle brush tree, and make a cardboard ledge to raise up the floor of the display area so the elf and tree are easily visible. The tree I used was a little too tall, so I cut a hole in this new false floor to sit the wooden base of the tree into.

Use Snow-tex to create "snow" for the bottom. Once the snow is good and dry, glue the elf in place and set the tree down into its hole.

Glue the cardboard base to the back of the wall, and put a line of glue on its front cardboard flap to adhere it to the box front when the box is closed. My floor is slightly tilted toward the front, so you can see the elf a little better. *Plan ahead! If you want some tinsel around the opening, now's the time to glue that in. Trust me, it's not easy to add tinsel if your box is already sealed. My problem: it wasn't until my box was "finished" that I felt adding the tinsel was necessary.* Now would be a good time to put the wreath up, too. Once your interior is finished, tuck the flap of the box lid on the inside the of box, leaving the decorative paper outside, and glue the flap in place.

I was so happy how real my little box was looking, that I just had to add staples on the ends just like my two actual vintage boxes had. I used a sewing needle to punch holes in the box, and pushed the staples in with my fingers.

The front of the box was decorated with elements cut out from the paper pad. I used a silver Sharpie to add the dots of snow to the plain green paper. Oh my, look how tiny and cute!

For a complete list of supplies, click here.

Saturday, October 28, 2017

Christmas already? Time for some kitchy ornaments!

If you're a crafter, you know you have to get ahead of the holiday rush. Therefore, it's time for Christmas crafting in October/November! Here are a couple of kitchy ornaments I made with this month's Alpha Stamps kit.

First, a holly jolly snowman on sweet pastels. This fellow is the perfect size for the opening in the chipboard ornament, even if his hat does stick out a bit. I adorned him with a glittery sprig of holly, surrounded him with an assortment of snowflakes, and embellished the side with more holly and pine cones.

Metallic Dresden trim makes such a nice frame around our jolly snowman friend. It was easy to curve the trim to fit: just snip between each half circle, leaving the bottom part of the trim intact. Curve as you go! It just so happened that the trim fit this inner circle perfectly, but just in case, I started gluing at the upper right, so that if there did happen to be an awkward place where the ends met, it would be under the snowman's hat where it wouldn't show.

Check out Santa! He's looking mighty fine on this star shaped ornament. This ornament features gold tinsel, a holly wreath with bead "berries", faux Christmas lights, ribbons and a pair of jingle bells. Nothing's too festive when it comes to Santa!

Here's a little hint for making this ornament: when you're applying tinsel, it's best to cut the tinsel in smaller pieces that meet at the outer points of the star. This will give you nice sharp points. If you use one long piece of tinsel, the points will appear rounded. Tacky glue works well to adhere the tinsel.

Each of these ornaments is backed with coordinating paper. The back of Santa's ornament has a cute collage of children's wishlists.

Ho ho ho, stay tuned for more Christmas coming up. Meanwhile, for a complete list of supplies for these two ornaments, click here. Happy Christmas crafting!

Tuesday, October 10, 2017

Random Act of Kindness: Inspirational Bookmarks

We just celebrated my mom's 80th birthday. In lieu of gifts, she requested that each of us do a Random Act of Kindness in her honor and then send her a card telling her what we did. We sent out letters to all her friends, and she got more than 200 cards back with all sorts of wonderful RAKs! It was a very happy birthday for her.

I decided for my RAK that I would make some inspirational bookmarks and leave them in library books for people to find. I took a piece of thin cardboard, and using paints, stamps, tissue paper, glaze, and pages from old books, created one big sheet, which was then cut down to bookmark size. The inspiration came from my ever-growing collection of fortune cookies. I placed the bookmarks in books where I felt the inspiration fit. For example, the bookmark that said, "When one door closes, another one will open" went into a book for women defining their dreams at the prime of their life. "You are loved" went into a book for Caregivers, and "This is your day to call the shots" was placed in a book about dealing with bullies. I included a note on the back of each bookmark telling why I made the bookmarks, and encouraged the recipient to go do a RAK of their own. Hopefully, Mom's idea will continue to generate kindness for quite some time.

Some of the bookmarks:

This one, which says, "You will bring sunshine into someone's life", I included in with the birthday card I sent to Mom.  I think she deserved it.

Saturday, September 30, 2017

Halloween Row House Countdown Calendar

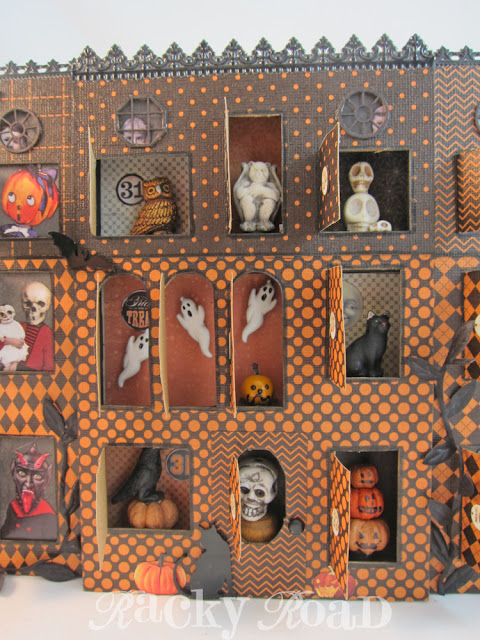
Tomorrow is October 1st, so it's time to start the official countdown for Halloween! I was inspired by those Christmas advent calendars that count down the days in December. You know the type: open a little door each day and get a waxy piece of chocolate. I wanted something similar, but no chocolate, just Halloween fun. I used a couple of chipboard haunted houses and lots of spooky images from Alpha Stamps to make this, my Halloween Row House Countdown Calendar. It stands 8" tall and almost 17" across.

If you stick with me here, I'll show you lots of pictures, including some in progress photos and a bit of a tutorial. Meanwhile, here's what they will look like a few days into the month of October. There are some scary things in those houses!

Bats are flying around, and scary black vines are growing. The residents have put out their jack o' lanterns in anticipation of the big day. A black cat waits by the door of the center house. A couple more days have passed, and more creepy guys are showing up!

It's hard to see all the details, but you sure don't want to miss the kids trapped in the upper attics. Here are a few of them. Poor little dears.

On the 30th of October, the countdown is done. It's Halloween eve!

The center house has a shadowbox back to it, so it holds 3D Halloween fun: ghosts, skulls, goblins, owls, cats, and gargoyles, oh my!

I had fun figuring out how to make this all work. Here are some photos I took while I was constructing the houses. I began with the two houses on the sides. I covered the chipboard back of the house with black paper, and then took several of the collage sheet images I had cut out and placed them in the windows for position. Once I liked where they were, I took a photo for reference. You can see that several of these photos need to be cut down to fit correctly. After this photo was taken, I covered the front with a heavy paper, and cut out the windows.

Now the cut out photos are in position. It helps to place each one with the window panel on top so you can make sure you like the position of the character. You may notice that I wrote "NO!" on the back of the window side of house. That was to keep me from checking the position of the figures with the wrong side of the front, and to make sure I glued the paper on the correct side. If you look closely, you'll see that there's also a black line on the right side of each window. That is so when I cut out the window flap, I would remember to leave that side attached. I didn't want to make any stupid mistakes!


Here's the middle house. I painted all the sides of the box black, and after determining where each figure would go, chose a background paper to show it off. Here again, you can see my warning to myself and the black lines showing where not to cut. I also wrote under each window what would be behind it, so I didn't have to figure that each time I placed the 3D elements. The two squares up by my "NO!" warning are the backs of the background papers for the kids in the attic windows. Those windows have to be completed before the house facade is attached to the shadowbox.

I used white glue on the shadowbox, and held it together with rubber bands until it dried.

Depending on what you put in those cubbies, the floor can be a little low for some of the windows. I used small pieces of scrap wood and a few wooden spools to help give my guys a little boost. Here I am trying them out for size. The three ghosts are buttons, so I used a dab of hot glue to hold their shanks into place. It looks like they are flying.

Once the three houses were done, it was time to figure out how they go together. For some it might have been "past" time, but hey, I like to live dangerously. I was going to try to have them stand up with a small bit of fence between them, but in the end decided it would be way more sturdy to make them row houses. I cut off the right roof point of the first house, the left point of the third house, and both points from the house in the middle.

I used a piece of wood to attach the three houses together. The end houses are not very thick, so they needed something a little wider to attach them too. The wood is not set flush with the edge of the center house, so the front of the row has a bit of a staggered effect. At the bottom of this photo, you can see the wood piece glued to the side. I painted it black behind the roof line, in case my cuts weren't exactly straight. The rest of the wood is natural, because because I know that side won't show; the other sides are black. In this photo, I'm patiently holding the top house tight while its glue dries.

Here's the back of the completed row, with the two wood pieces keeping the flanking houses firmly attached.

I'm in love with my countdown calendar, and will be excited to use it this Halloween.

For a complete list of supplies, click here!

Thursday, September 28, 2017

Flashback: For The Birds

Here are some more photos of projects I rescued from Photobucket's money grubbing clutches. This time, birds! I fell in love with some bird themed paper a while back, and used the sheets on a couple of bird projects. First, these two nesting lovebirds. Someone was inspired by these to teach a class on them, but he did give me credit for the design, so it's all good.

And then, a collage. I still have some of that paper left. I should pull it back out.

And one for the road, this one shown in (and on!) a mat. It fits in a nice square frame.

Thursday, September 21, 2017

Flashback: Chunky Houses

Thanks to Photobucket's new fees, I'm retrieving my old photos from there and posting them here. Here are a set of chunky houses I made a few years ago. I really enjoyed putting these together, using a number stamp, and finding interesting objects to serve as chimneys. My photography skills needed work, though; this photo is terribly out of focus! It actually looks better at this smaller size.

Here are individual shots of the houses, though. Thankfully, they're a little clearer. A clown and his true love:

A skeletal newsboy:

A reluctant janitor:

And a secretive clown:


Saturday, September 9, 2017

Halloween Cat Bat

Here's a little paper clay cat bat I made for the Vintage Halloween swap on Craftster. I don't often work with clay, so each time I try, it's a real adventure. He stands about 6" tall, and is dressed to go trick or treating. To help him stand, I bent a wire hanger into a U shape, turned it upside down, and built his body onto the wire with the two ends of the U becoming his legs.

The open polka dots on his costume were the result of a happy accident. When I first painted them, I wasn't happy with the color, so I attempted to wipe them off. They had already partially dried, so I was left with a little ring of color that I happened to like. I did the rest of the dots in that same way: putting dots in a small area, and then wiping out the centers. Once he was all painted, I used some ink to dirty him up, and then painted him with glaze to make him shiny.  

My partner in the swap said she liked a bit of humor, so oops! cat bat has lost a button and his little rear end is exposed.

Ready for my close up, Mr. DeMille.


Wednesday, September 6, 2017

The Magic of Christmas

Last time we visited my brother-in-law, he gave me the cutest picture ever of my two and a half year old husband visiting Santa. I don't think I can adequately convey how much I love that photo. I needed a way to display it each year, and this is what I came up with. See how Santa is instructing him not to reveal the secrets of Christmas? It's the cutest!

The box is a wooden cigar box. It seemed the perfect size. I covered the back and sides with paper, and ran some red ribbon around the edge of the front. The Tim Holtz tag reads "believe in the magic of Christmas". Perfect! I planted three bottle brush trees at the bottom, added a vintage dancing Santa to the top, and strung up some miniature Christmas lights.

I toyed with the idea of covering the back, but it won't usually show, and I like the fact that it's stamped with information about the cigars, one of my husband's infrequent guilty pleasures.

The hubby wasn't sure about the disk with "24" on it, but that's when Santa arrives: on Christmas eve! I'll enjoy using this as one of my Christmas decorations this year. Ho ho ho!
Related Posts Plugin for WordPress, Blogger...