Design team member of Alpha Stamps, lover of ephemera and junk.

Welcome! Grab a cold one, kick off your shoes, and have a look around.
Showing posts with label Easter. Show all posts

Saturday, April 9, 2022

Animal Family Album

It's been a while since I've done any real crafting, but this family album project had me remembering why I love it so much. Using collage sheets and a black Mini Photo Album Accordion book from Alpha Stamps (supply list featured below), I made a little photo album with a slipcase. Just 3" tall! 

I used two copies of the Photo Album Covers collage sheet to make the cover of the book and the front of the slipcase. The collage sheet has a front and back image of the book covers. I used one image of the front covers for the front of the book, and cut the center part of the same front image out to place on the slipcase.

One copy of the back of the book was used for the actual back of my book, and part of the second one was used to cover the book's spine. I had a little scrap left, so I cut out one of the small flowers and a strip of the embossing and glued them on to the spine to give it more texture.
I used heavy cardboard for the covers of the book, and thin cardboard covered with scrapbook paper for the slipcase. There's a tutorial on how to make the slipcase below.
Let's look inside! The first page is the Duck and Goose family. Hey, wait a minute...what's that goat doing there? Surely that's a mistake.
Let's go on to page two. I love these colorful photo frames with the the flowers and birds, and the beautiful bunny sisters all dressed up in their Easter finest. Dangit, it appears that the same goat is photobombing the rabbit on the right.
And, the final page, with more sweet bunnies. Hey, now. This can't be right! What a rascal that goat is.
The spine of the book is only attached to the front cover. This way, the book can be opened out into an accordion, to view all the photos of the Easter family (plus several pics of that danged goat). The first and last pages are glued to the insides of the covers.
Here's a sample template for making the slipcase. I didn't include measurements, because this will vary depending on how thick you make your book. Once my book was constructed, I used it to make the template. I laid it down on the cardboard and traced around it for each side and the back, and left the top and bottom flap long so I could trim them to fit when the slipcase is assembled. Remember to allow for a little give wherever you have your folds, so the book will be able to slide in and out with ease. Here's what the cardboard looked like when it was all cut out. The dotted lines are fold lines. I scored the fold lines on the cardboard using a ballpoint pen and a ruler. That makes it much easier to make a nice crease.
Fold all your pieces in, and glue the tabs to the top and bottom. White glue works just fine for this. Once your box is constructed, wrap the outsides with scrapbook paper.
A circle template is a great way to make nice semi-circle cutouts on the sides of the box. I cut the semi circles out of the sides after I had constructed my slipcase, and I also painted the inside black after it was already put together, but you can learn from my process and do both of those things before you glue anything. It'll be way easier; trust me on this.

I hope you enjoy this little project. For a full list of supplies used, click here. Happy crafting!

Saturday, February 29, 2020

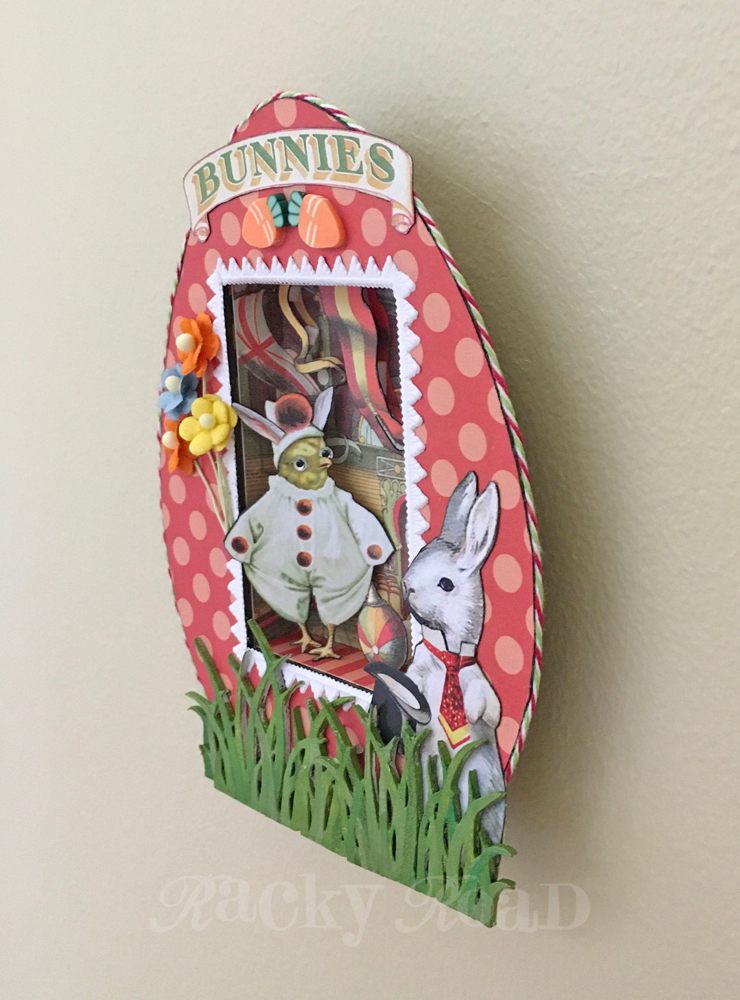
The Bunny Circus Eggstravaganza

The March kit from Alpha Stamps is here! So many chicks and bunnies; spring is on the way, which means Easter is not far behind. I love some Easter art, but I found a collage sheet entitled "Circus Chicks", and you sure can't go wrong with that! I made my Little Niche Egg shrine into a tiny springtime circus, because why not?

I fell in love with the little chick in its clown costume, and decided to work around him. Sure, he's not a bunny, but he is, at least, now sporting the bunny ears. For the background, I found the perfect circus image from the Big Top Circus collage sheet, and made it the background of my niche. I used two copies of the circus collage sheet so I could cut out the flags and banners and attach them with foam tape for added dimension. I also cut out the ball, and attached it with two layers of foam tape to bring it to the forefront.

Every circus needs a ringmaster, but the rabbit image I wanted to use had his head facing away from the action. I cut out the body of that rabbit and used the head from a different rabbit from the same collage sheet. Now he's paying attention!

The chick on the collage sheet appears to be wearing an eye patch, so I colored the patch yellow to match his head, and added a couple of crazy eyes. The eyes I used are designed for fishing flies; they were the perfect size for this crazy little clown chick. Because the eyes are plastic, it was easy to trim his left eye so it looks like it sits behind his beak. I also gave him some bunny ears, cut from the original head of the ringmaster bunny. Now he fits in with the other rabbit performers.

Here are a few photos of how this project came together. I first chose the image of the chick, and the circus background, and then the perfect piece of scrapbook paper from the Echo Dot Summer Dots and Stripes 6x6 pad that coordinated with those colors. The dotted paper was glued to the egg, and then carefully trimmed with an x-acto knife. Some baker's twine was glued around the outer edge. The circus image was adhered to the back and sides of the cardboard niche, which was then glued together with white glue. Clothespins work great for holding things together while the glue dries.

The niche was put in place and the flaps glued to the back of the egg. Masking tape held down the flaps during drying time. The hanger was also glued on at this time.

White Dresden trim around the opening reminds me of those sugar eggs with the scene in them that I used to love as a kid. I tried it out to make sure I liked it before gluing it down. In the photo below, the flags in the circus background have not yet been doubled up. That was my next step.

See how the flags pop, now that there's an extra layer? After the egg was put together, the outside was decorated with all the elements. The chipboard grass was greened up with a combo of paint and colored pencils. I used three clusters to make the Easter grass that the egg sits in.
Thanks for visiting the bunny circus! For a complete list of supplies, click here.

Saturday, March 2, 2019

A Tisket, A Tasket, A Checkered Easter Basket

After reading the title of this project, do you have that old children's song in your head? I do. Sorry about that.

But how cute is this new Mini House Front Box from Alpha Stamps? Never mind that I put the house on the back; I wanted the goodies within to show! Here it is with a painted Easter egg, and there's room to spare for candy.

A tiny white rabbit rests on the front lawn (above), and a mischievous rabbit appears in the back. He's gotten into the tiny carrot patch and helped himself to a treat. At least he left a few for later. I used wire cutters to cut the tops off of three tiny clay carrots so they look like they're still partially buried in the ground under the window.

The butterflies were cut from scrapbook paper. On the paper, they're the pale yellow color shown in the photo above. I used Copic markers to color the other three light pink, dark pink, and blue. The butterflies were folded and glued only down the center fold line, so they look like they're actually perching on the house.

The outside of the house is covered with a gingham check paper, but I used a different black and white print on the inside. Mixing prints is fun!

I know this box doesn't consist of your typical Easter colors, but that makes it great for other uses. How about an ATC caddy?

Or perhaps even better, how about a tiny liquor bottle carrier? Now that's a fun Easter surprise!

This little house front box is easy to put together, and doors and windows are also available. If you use paper to cover your base, be sure to leave the cardboard uncovered where the walls are to be inserted into the slits on the base. Red Dresden trim picks up the colors in the windows and door. A little white glue is all you need to keep things together.

The sides of the house come with small holes at the top so you can easily add a handle. I was not sure I was going to add one, so before I covered both sides of the cardboard with paper, I made a template to make the hole easy to locate.  The tinsel I used as a handle has a thin wire that goes through it, so I first punched out the hole with a needle, and then threaded the wire through. You can simply twist the ends of the wire together, and it's hardly noticeable. Here I am using the template to locate the hole. Can you tell I use a piece of tracing paper as many times as humanly possible before getting a new sheet?

Although using this basket as a tiny liquor bottle caddy is tempting, I believe I'll end up using it as an ATC holder. The painted egg I used in these photos has already been cracked and pealed and deviled for last night's dinner. It was delicious.
For a complete list of supplies, click here!

Saturday, March 10, 2018

Easter and Bunnies and Chicks, Oh My!

Spring is almost here, Easter is coming, and it's time for spring crafting! Alpha Stamps has some great new shadowboxes, and nothing says Easter like bunnies and chicks, so I made a shadowbox for each.

There were four sizes to choose from. I love the smallest box (2" by 3"), with the egg shaped opening, so I started with that. I lined the egg on the lid with teeny tiny flat backed pearls to invoke the feeling of a sugar egg.

Here's a detail. Hint: there is no way I could place these tiny stones without the help of a wax pencil. I use mine all the time to help place tiny stones or even tiny paper cutouts.

The larger bunny in the background is glued to the back of the box, while the smaller bunny is attached with foam glue dots to give some dimension. The "Bunnies" banner on top is also adhered with foam dots.

I love the tiny basket, but it was a bit too wide to tuck back into the corner of the box, so I took some heavy duty scissors and cut the back part out. It was also a little bit too tall, so I cut the bottom part off as well (after this photo was taken). Once the basket was cut to size, I glued it to the back and bottom of the box with some white glue. When it's filled with a little Easter grass and some eggs, you can't tell it's been cut.

Alpha Stamps just started carrying these mini pin stands that make it so easy to place things like the eggs and little yellow duck. Just a tiny dab of glue holds them on, and you can stick those items down into the Easter grass and have them stay put. Love these!

Once the box was assembled, I painted wooden feet to add to the bottom, and added bright plaid ribbon around the sides and a bow at the top. Yay, bunnies!

Now on to the chicks... 

There were so many adorable images of chicks on the collage sheets that I just had to fill this box with them. I put the smallest chicks in the back, and then started stacking larger and larger chicks up with foam glue dots. White dresden trim adds a lacy feel. I made a little banner out of pink cardstock to put in the left hand corner. A few pearled flowers, and done!

Happy Easter, happy spring! For a complete list of supplies, click here.

Thursday, March 5, 2015

Tin of the Month Club, March

Is it March already? Then it must be time for this month's tin. I went a little Eastery with this one, even though most of the time Easter falls in April. I think I just needed to feel like Spring is on its way! Here's a cute little fellow and his friend the Easter bunny.

Here are the first quarter tins so far: January, February, and now March. I already feel like this year is flying by!

My friend cackle, over at CackleAndHoot is also in the Tin of the Month Club. Check out hers here!

Saturday, March 23, 2013

Beyond the Bunny Dome

Alpha Stamps is now carrying cute little plastic domes. They're actually meant to be snow globes, but I made something Easter-y out of mine: two little rabbit pals chatting it up, surrounded by spring flowers and little chickies. The rabbits were made by lopping off the heads of some vintage images of children and adding heads from some German scrap. A little vicious, perhaps, but occasionally one must suffer for art.
Isn't that little picket fence the cutest? Just about all the supplies to make this can be found at Alpha Stamps. I might need to stock up on those domes and make some circus- or Halloween-themed scenes.

Sunday, March 10, 2013

Altered Easter Egg

What do you do when someone hands you a paper maché egg and asks you to make something out of it? I cut a little door into mine and then covered it and the egg with Russian text tinted with Copic Markers. I added few flower sequins, some tiny pearls, and a lovely golden crown to top it off.
The egg is resting in a little nest I've had for a while, and sitting on a painted and embellished candle cup.

What's inside?
I couldn't resist sticking some of those chenille chicks I remember from my childhood in there. Peep peep!

Most of the supplies I used, including the egg, the wooden stand, and the sequins and ribbons, can be found at Alpha Stamps.
Related Posts Plugin for WordPress, Blogger...