Here's the whole gang, standing in front of their opened trunk.

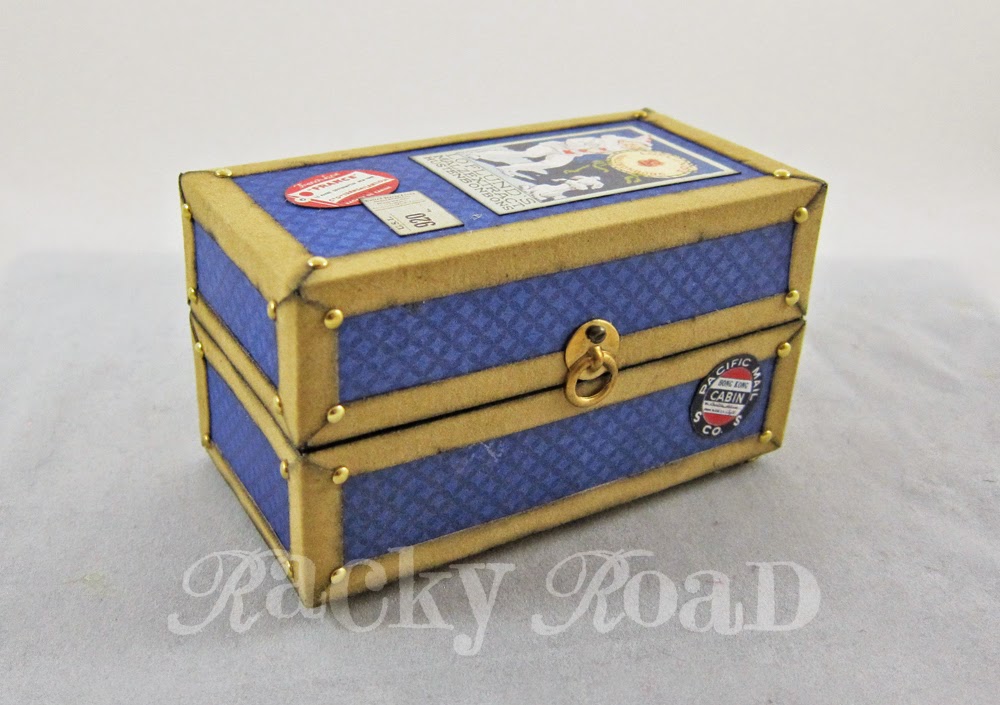
First, the trunk. I made this from the same 4" by 2" by 2" chipboard steamer trunk kit I used to make the Tiny Traveler. This one's a little brighter in color, because hey, it's a circus.
Opened up, you can see that five of the circus performers fit in the lid. Behind them, the flags for the ticket booth and the ringmaster's whip are stored. The three drawers on the right hold things like barbells for the strongman, knives for the knife thrower and his assistant, and a rubber chicken for the clowns. The bottom drawer also serves as the ticket booth, once it's slid out and turned around.

And here comes the circus! First up, there's the daring knife thrower. His revolving wheel and sign are found on the bottom of the trunk. That is one brave assistant he's working with; look how close those knives are. I think the sign should read "Daring Knife Thrower's Assistant"!

On the other side of the opened trunk, you can see Pete the ticket seller, manning the bottom drawer/ticket booth, Magnificent Mighty Max and his 500 lb. weights, and Red, who sells cotton candy. That cotton candy is actually pink packing peanuts, cut down and stuck onto toothpicks. Mmm, only two treats left, better get 'em while you can!

Clowns! You gotta have clowns at the circus. Here's Bingo and Twinkle with a big red ball and a rubber chicken. I hear their act is hilarious.

Finally, here's the act that broke out of the trunk: the Amazing Lion Act. The ringmaster seems to have things well in hand with that whip of his. It's made from a thin piece of wire wrapped with black embroidery floss. The lion's hoop is made from a plastic ring and a 1 inch dollhouse hat stand with the "head" removed.

Here's the gang all together. I'm excited to announce that I made a special Tiny Peg Circus collage sheet for Alpha Stamps featuring circus signs and costumes that you can wrap around wooden pegs to make a circus of your own. Each of these circus performers was made using that collage sheet. Wrapping the pegs is relatively easy. I'll show you how.

First, carefully trim out the desired costume, and then paint the face, hair, and shoulders of your peg person. I used Delta Ceramcoat AC Flesh color for the people's faces. Once the paint is dry, apply a nice coat of Mod Podge all around the body part of the peg.

Take your trimmed costume, and center it below the face. Make sure the bottom of the costume is perfectly lined up with the bottom of the peg.

Wrap the costume, making sure it's on straight and that there are no wrinkles.

Once the costume is secured all around the peg, it's time to wrap the neck. I found it best to add more Mod Podge around the neck under the tabs before this step. Get it good and wet!

Starting with the front, work your way around, pushing the tabs in as you go. There may be a little bit of a sharp point where the tab comes together and the peg begins to curve, but you can push that in when the Mod Podge is still wet underneath and it will pretty much smooth out. Once you're happy with the way the costume looks, give the entire peg, including the head, one more coat of Mod Podge.

Mount extra parts, like the bow tie and lion's mane, to some thin cardboard to give them some weight. Coat them with Mod Podge and then cut them out with an Xacto knife. On the collage sheet, there are tabs on the lion's mane (see arrows below), but you don't really need them. The mane fits well around the face and a thin line of Tacky Glue adheres it nicely.

Here's the lion, with his mane freshly glued and waiting to dry. I like my pegs shiny, so once the Mod Podge and glue was dry, I gave each of the pegs a final coat of clear glaze. Helpful hint: I used a removable glue dot to adhere the peg to a plastic drink stirrer. That way, I could glaze the entire peg without worrying about stickiness or fingerprints. What a time saver!

Customization is possible: I used the same costume for the knife thrower and the ticket taker. To make them a little different, I gave the ticket taker a red bow tie and a little red pocket square. To make a female lion, I cut out just the ears and a tiny bit of connecting cardboard from the lion's mane. It's a circus; have fun with it!
One more photo of some of the gang before they pack it all up and move on to another town. I hope you enjoyed the show!

Need supplies? Click here!
pleasant and funny
ReplyDeleteSuper cute!!!
ReplyDeleteI LOVE these so darn cute. Wish I could paint I would make some too.
ReplyDeleteomgoodness, I love your circus guys and their trunk! The clowns are the cutest ever!
ReplyDeleteWow! Absolutely wow! This is so creative and adorable. I love the way you planned it all out. The collage sheet you created for it is wonderful.
ReplyDeleteThis is absolutely the cutest thing. Love it!!!
ReplyDeleteYou are amazing. Plus... cotton candy. Yay!
ReplyDeleteSo stinkin' adorable! And I love your collage sheet!
ReplyDeleteToo cute! I want to take it everywhere with me!! A person would never have a blue day with a traveling circus in their pocket. Well done!! xo
ReplyDeleteI would love to know what the dazzle sheet was used on
ReplyDeleteHi Linda! The Dazzle Black Thin Line Stickers were used to outline the signs for the individual acts: Magnificent Mighty Max, the clowns, the knife thrower, and the lion act.
Delete