Design team member of Alpha Stamps, lover of ephemera and junk.

Welcome! Grab a cold one, kick off your shoes, and have a look around.
Showing posts with label advent calendar. Show all posts

Saturday, September 30, 2017

Halloween Row House Countdown Calendar

Tomorrow is October 1st, so it's time to start the official countdown for Halloween! I was inspired by those Christmas advent calendars that count down the days in December. You know the type: open a little door each day and get a waxy piece of chocolate. I wanted something similar, but no chocolate, just Halloween fun. I used a couple of chipboard haunted houses and lots of spooky images from Alpha Stamps to make this, my Halloween Row House Countdown Calendar. It stands 8" tall and almost 17" across.

If you stick with me here, I'll show you lots of pictures, including some in progress photos and a bit of a tutorial. Meanwhile, here's what they will look like a few days into the month of October. There are some scary things in those houses!

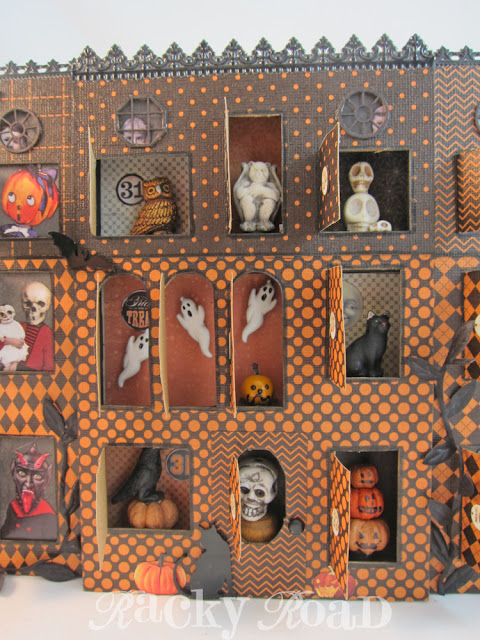
Bats are flying around, and scary black vines are growing. The residents have put out their jack o' lanterns in anticipation of the big day. A black cat waits by the door of the center house. A couple more days have passed, and more creepy guys are showing up!

It's hard to see all the details, but you sure don't want to miss the kids trapped in the upper attics. Here are a few of them. Poor little dears.

On the 30th of October, the countdown is done. It's Halloween eve!

The center house has a shadowbox back to it, so it holds 3D Halloween fun: ghosts, skulls, goblins, owls, cats, and gargoyles, oh my!

I had fun figuring out how to make this all work. Here are some photos I took while I was constructing the houses. I began with the two houses on the sides. I covered the chipboard back of the house with black paper, and then took several of the collage sheet images I had cut out and placed them in the windows for position. Once I liked where they were, I took a photo for reference. You can see that several of these photos need to be cut down to fit correctly. After this photo was taken, I covered the front with a heavy paper, and cut out the windows.

Now the cut out photos are in position. It helps to place each one with the window panel on top so you can make sure you like the position of the character. You may notice that I wrote "NO!" on the back of the window side of house. That was to keep me from checking the position of the figures with the wrong side of the front, and to make sure I glued the paper on the correct side. If you look closely, you'll see that there's also a black line on the right side of each window. That is so when I cut out the window flap, I would remember to leave that side attached. I didn't want to make any stupid mistakes!


Here's the middle house. I painted all the sides of the box black, and after determining where each figure would go, chose a background paper to show it off. Here again, you can see my warning to myself and the black lines showing where not to cut. I also wrote under each window what would be behind it, so I didn't have to figure that each time I placed the 3D elements. The two squares up by my "NO!" warning are the backs of the background papers for the kids in the attic windows. Those windows have to be completed before the house facade is attached to the shadowbox.

I used white glue on the shadowbox, and held it together with rubber bands until it dried.

Depending on what you put in those cubbies, the floor can be a little low for some of the windows. I used small pieces of scrap wood and a few wooden spools to help give my guys a little boost. Here I am trying them out for size. The three ghosts are buttons, so I used a dab of hot glue to hold their shanks into place. It looks like they are flying.

Once the three houses were done, it was time to figure out how they go together. For some it might have been "past" time, but hey, I like to live dangerously. I was going to try to have them stand up with a small bit of fence between them, but in the end decided it would be way more sturdy to make them row houses. I cut off the right roof point of the first house, the left point of the third house, and both points from the house in the middle.

I used a piece of wood to attach the three houses together. The end houses are not very thick, so they needed something a little wider to attach them too. The wood is not set flush with the edge of the center house, so the front of the row has a bit of a staggered effect. At the bottom of this photo, you can see the wood piece glued to the side. I painted it black behind the roof line, in case my cuts weren't exactly straight. The rest of the wood is natural, because because I know that side won't show; the other sides are black. In this photo, I'm patiently holding the top house tight while its glue dries.

Here's the back of the completed row, with the two wood pieces keeping the flanking houses firmly attached.

I'm in love with my countdown calendar, and will be excited to use it this Halloween.

For a complete list of supplies, click here!

Saturday, October 31, 2015

Christmas Advent Tag Box

Now that Halloween is over, it's time for Christmas crafting! I love this new box from Alpha Stamps. It's the perfect size for holding Christmas cards, or in this case, numbered tags to count down the days until Christmas. It's bigger than it seems in the photos; without the feet, this box measures 8" by 4" by 4".

The metal tag on the front on the front of the box reads, "it's the most wonderful time of the year". Love that! I used some vintage looking papers with a traditional design to cover the outside of the box, so I thought it fun to use a bright polka dot for the inside and some green pom pom fringe around the top of the box. The swirl on the front is two part laser cut cardboard. I colored the back part red with a Copic marker, and then glazed it before adhering the front part, which I left in the cardboard color. Then I accented the swirl with some red crystals. Lastly, I added metal handles to the sides of the box and little feet that look like cherubs.

The box holds 25 tags in envelopes, one for each day counting up to Christmas. I kept the envelopes simple, just using a bit of washi tape or stamping on each. I coordinated each tag's colors with the tape on the envelopes, so to help put the tags in the right order in the box, I stamped the date on the bottom corners of the envelopes. I like the way it looks library-esque with the stamp on that pocket. All the images I used on these tags came from Alpha Stamps collage sheets.

A few of the tags in front of the empty box:

Here are some photos of some of the tags and envelopes, with some inspiration for how to decorate them. The tags pictured below are made with collage sheet images, scrapbook paper, and fun things like ball fringe, tiny wreath stickers, photo corners, floral picks, and washi tape. I colored several of the hole reinforcers with a Copic marker to better match the colors in the tags.

I can't get enough of those glittery red stars!

These paper clips are a great way to add some accents. The one on the left uses scrapbook paper in the tab and has a snowflake charm, while the one on the right had a wooden snowflake (covered with Stickles for a glittery effect) and some cute silver mittens. 

I also liked using these Tim Holtz clips. It's easy to just tie a bit of ribbon around the top, but you can also use them to hold a floral pick, like the holly sprig on the left.

If you use a little washi tape on some wooden clothespins, you can remove the tags and hang them on a ribbon for a fun advent calendar.

For a complete list of supplies used in the project, click here. Happy Christmas!


Sunday, March 22, 2015

Halloween Countdown

I just participated in another Craftster swap, one in which you send one awesome item to your partner. One thing about my partner, she is a huge Halloween fan. I love working on Halloween crafts no matter what time of year it is, so I decided to make her an October calendar that she can use every year.

The calendar consists 31 ATCs, bound together with a Bind It All, and mounted on a collapsible cardboard frame. I also included a little costumed rat, to keep her company.

The back cover folds up to create a triangular stand for the pages. Each day in October, she can flip one over as Halloween approaches. I used playing cards for the bases of the ATCs. They're just the right size, and it's easy to quickly cover them with scrapbook paper and then cut them out. I didn't cover the backs because I don't mind the way they look, and the cards would be way too fat with all that extra paper involved.

Here's the calendar on October 1:

on the 5th:
And on the Halloween itself:

I really had fun making a card for every day of October. Here are all the cards before they were bound:


I hope this gives her many years of Halloween joy.

Monday, December 5, 2011

Advent Calendars for My Girls

My good friend Amy from Craftster.org made the most fantastic Steampunk advent calendar last year around Christmastime. After seeing that, I got a huge bee in my bonnet about making a more traditional version for each of my girls. Although I found the paper maché boxes in November of 2010, I didn't finish these up until this fall.

I did my best to make them similar, but different enough so the girls can tell whose is whose. Here's what I made for my older daughter: 

And here's the calendar for my younger daughter:

The background papers are all from Graphic45, and the images are mostly from Alpha Stamps

I kept the sides and back simple, just using coordinating papers:

Hopefully the girls will use these for many years to come.
Related Posts Plugin for WordPress, Blogger...