Design team member of Alpha Stamps, lover of ephemera and junk.

Welcome! Grab a cold one, kick off your shoes, and have a look around.
Showing posts with label tutorial. Show all posts

Wednesday, September 23, 2020

Halloween Tableaux

It's Halloween season! Because I can never have too much Halloween decor, or do too much Halloween crafting, I had a blast making these tableaux to celebrate my favorite spooky holiday. Large Spiderweb Mirrors with Frames are the perfect backdrop for each scene. All they need is a little stand; easy to make with some foam core and tissue paper. I'll show you how at the end of this post.

The first tableau is a little on the spooky side. There's a witchy woman, a graveyard, pumpkins, a skull, and a black cat. A crescent moon shines down on the scene as a bat flies into the night. The gravestones are cardboard shapes; there's a tutorial on how to paint them at the end of this post. The cat is a cupcake pick. If you leave a little of the pick attached when you cut it off, it's easy to stick down into the foam core to make the cat secure. I gave this one some funny eye stickers. He looks scared! 

Side view, so you can see some of the 3D elements. The large pumpkin in the back was too fat to fit on the base, so I cut it in half with a box cutter. That made it easy to glue it onto the background. Another alteration I made is in the image of the woman. She was originally wearing a very cool bat hat, but it was a little hard to see on the background, so I gave her a new witch's hat with a bright orange band. The "boo" sign and the little pumpkin girl were attached with foam tape, and the cat banner was glued only at the ends so it pops out a bit.

What's Halloween without candy and costumes? You're invited to a Spook Party! I layered a cat head image on top of a black medallion and a gold medallion, and then could not help but add an extra paper medallion (tutorial on making the paper medallion can be found here). I wanted this scene to be busy and fun, so it features some happy kids, lots of candy, a couple of jack o'lanterns, and a colorful witch's hat.

Side view. The cat head is attached with foam tape, and the paper medallion is attached to the back of the scene for extra depth. The little clown with the pointy hat is also glued to the back of the scene, and his other clown and the witch are attached with foam tape, as are the paper pumpkins. In order to display the witch's hat at a jaunty angle, I glued a toothpick to its back and stuck it into the foam core. A little dab of glue at the bottom of the hat helps keep it secure. The red cape of the little witch flared out on both sides of her, but I trimmed it back on the side where she's holding the cat so it doesn't cover too much of the ghost. Don't be afraid to alter those collage sheet images to fit!

Of course I didn't manage take any photos while these were in progress, so here's a dramatic re-creation of how the stands were made. The backgrounds on the art above are 5" tall. The one I'm using for this tutorial is smaller, around 3 1/2" tall, but the technique is the same. Cut your foam core to the size and shape you want. Mine is just enough to allow for some 3D decorations in the front of the scene. Cut a piece of tissue paper to the right size to wrap your base. I adhered mine with Mod Podge. Tuck the ends in like you're wrapping a present.   

Once the base is wrapped, position your background where you want it, and holding it steady, trace around the bottom with a pencil. *Hint: cover and/or paint your background and frame before you do this step, as adding extra paper and paint will make the stand a little thicker.*


Use an x-acto blade to cut out the slot. See the two red arrows in the photo below? That bottom part of the frame will fit into the slot you have just cut.

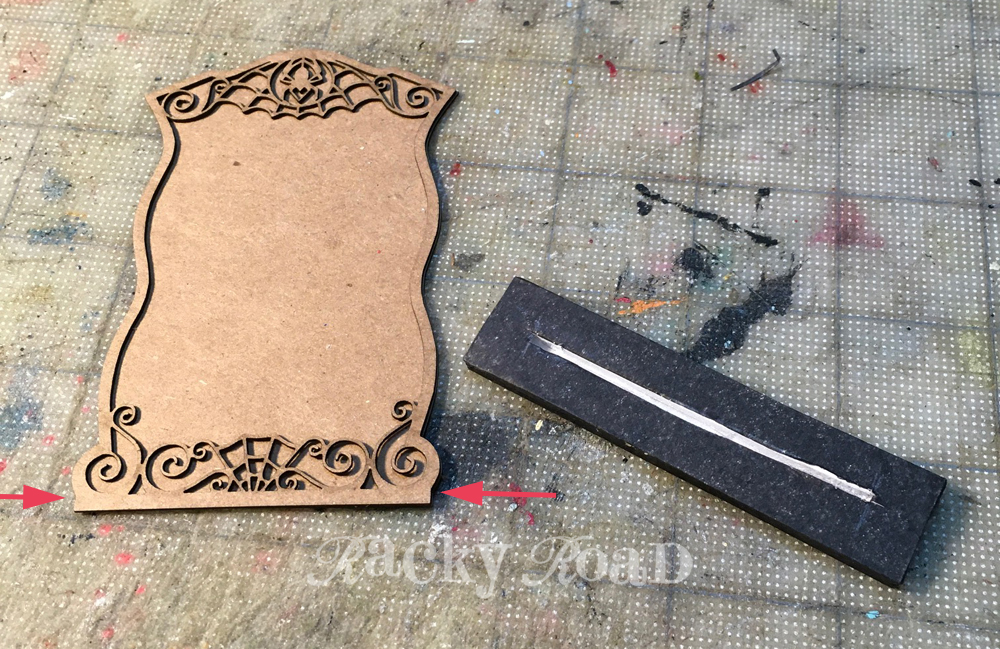
Set your background in your stand. If you've cut the slot a little too wide, insert a slip of cardboard to help secure the background. Now you're ready to decorate! For a complete list of supplies, click here.

 Happy Halloween!


Wednesday, September 2, 2020

Welcome to the Nut House

Hello, and welcome to the Nut House. A squirrel lives here! This whimsical mushroom house kit from Alpha Stamps almost made me forget how effed up 2020 is. Almost. At least it was a fun distraction.  

The house comes with a niche, so it's easy to make a front room. A little sugar glider has moved in, and he brought a large acorn along with him.

The squirrel is very happy in his new home. The staircase is designed with two steps; I added a little landing at the doorway. 

This squirrel appreciates a nice garden. The yard is made with a combo of Field Grass, Green Turf Grass, Leafy Green Underbrush, and Clump Foliage, which makes for beautiful red flowers along the path. The path is composed of Miniature Brown Path Pebbles and "stones" made from egg cartons (click here for a tutorial on making egg carton stones).  Oh look, there's some mail!  

The mailbox pretty easy to make. The bottom of the box was made from a rectangular shutter that was included in the door and window set made especially for the mushroom house. I painted it black and then glued a strip of black card stock to each side to make the rounded top. Once the top was in place, I put a thin bead of glue on the back of the box and set it on the card stock. Once that glue was dry, I carefully cut around the edge to make the back of the box. In the photo on the right, you can see how the door was made: a piece of the card stock is trimmed to fit the opening, with extra paper to go up under the bottom. This will allow the door to open and close. The flag was attached with a tiny brad.

The mailbox stands on a painted wooden spindle. The enclosed letter is written with a .05 pen on typing paper, and the envelope was made with the same. The "postcard" is a label from a collage sheet, mounted on thin cardboard and trimmed. That's a teeny tiny letter! It's pictured below on a 1" grid.

A little bit about how the house was made: once it was decorated front and back, and the niche was in place, I cut strips of paper to finish the sides. All it takes is a thin line of glue on the sides of the cardboard to attach those pieces. It's best to do a little bit at a time, so you can hold the paper in place while the glue dries. My house isn't exactly uniform, and some parts were wider than others, so I cut the strip a little wider than necessary and lined it up with the front of the house. After the glue was dry, I carefully trimmed the excess paper in the back with an x-acto knife.

Here's the house in position on the base. It's easy to put the mailbox in place, as the spindle it stands on has little pegs at each end. I punched a little hole in the base to insert the peg. A dab of glue holds it tightly in place. This is the time to draw the sidewalk in, so you know where to put down your stones. I made the sidewalk before gluing the mushroom down. Once the sidewalk was done, I glued on the mushroom and  the yard was "planted" using white glue.

I hope you enjoyed looking at the Nut House. Need supplies? Click here!


Saturday, February 1, 2020

KCTV, Altered Tin, with Tutorial

It's February,  and who's ready for some valentines? Me and Alpha Stamps, that's who! Let's tune in to KCTV (KittyCat TV, of course) for some good old-fashioned Valentine's Day fun. I love the vintage charm of these cheerful kittens; they remind me of my elementary school days, and valentines from my classmates.


The new retro tv, designed for use with Altoids sized tins, is perfect for this sweet kitty scene. And these cats know how to celebrate! Some happy sprinkles make this Valentine's party extra festive. I pulled a few hearts out of the sprinkles for little dimensional accents behind the kitten's heads, and on the front of the television.

Even the back of the tv is full of feline love.

Here's how KCTV was built. After deciding the theme of the program, I first decorated the tin. The cats were all cut out, then layered with foam tape to give dimension. A thick layer of glue was applied to the bottom of the tin, which was then sprinkled with... sprinkles! In the photo below, you can see the speaker vents in the upper corner of the tv. I wanted to preserve those, so I colored that area with a red marker so they will match the red paper that will be used on the front.

To cut the paper where the vents will show through, I traced the tv on the wrong side of the paper, and used a pencil to mark where the vents are. I then used an x-acto knife to cut out one hole for the vent area.  I used a red marker to draw around the opening. This will help this area blend in with the red paper. Then, the front of the tv was glued down and cut out along the edges with the x-acto.

Below you can see the finished front of the tv, and the back of the back. I did not put paper on the entirety of the insides of the tv, as the back of each piece won't show once it's fully constructed. The "brass" bottoms of the legs were painted with gold metallic paint, and a silver Sharpie was used for the antenna. A grey Copic marker was used on the red legs to make them look like they're set back a bit from the tv cabinet. I used a red Copic marker around the lip of the tin, in case any showed through once the tv facade was attached. A little bit of the turquoise paper is glued behind the speaker.

Here's how to make sure your tv is sturdy: glue the tin to the front of the tv first. Once that's good and dry, put lots of glue on the back of the tin and sandwich the two parts together. While the glue is wet, use some blocks (or whatever you have handy that will work) to make sure the back and front are exactly lined up. Let dry.

Once it's completely dry, you can add the antennas, paint the knobs and add any other embellishments to the front and call it a day. I did want to add some sides, though. A 12" long piece of the same red scrapbook paper is just enough to go from the outside of one leg, all around the top and other side of the tin, to the outside of the other leg. Cut the paper to the width of the side. I cut a notch in the paper to accommodate the antenna, so I glued the paper at the top of the tv first. Then one side at a time, I glued the paper around the curves. Be patient and hold that paper in place for a bit while it dries! You'll have to trim the paper a bit when it gets to the legs. I went ahead and cut another piece to finish the bottom. That piece was notched for the legs as shown below.

Now sit back and enjoy the show! 💕 For a complete list of supplies, click here.

Tuesday, December 17, 2019

Flashback: Cute Gift Bag Tutorial

Here's a tutorial for cute, eco-friendly gift bags. This tutorial was first posted on Craftster in 2009, well before I had a blog, and well before we renovated our kitchen and got rid of that fruity wall paper! Sadly, the parent company that owns Craftster is no longer supporting the forum, so I decided to move this tutorial over here.

It's easy to make these little gift bags out of newspaper. Plus, it's a great way to recycle! Pick a good section of your paper (the comics are always fun), or use a foreign language paper for added interest. If you're wrapping a small housewarming gift, it would be fun to use the real estate section of the paper. Here are a couple of examples I made:


And here is how they're made.
Supplies needed:

PVA glue. This is a bookmaker's glue and can be found at most art supply stores. Elmer's will work as well.
Newspaper. For the example bags above, I used a Japanese paper that measured (when folded) 11 1/2" wide and 15" tall, and the comics of my regular paper, which were folded and cut down to 11" by 11".
A hole punch and a grommet setter or a Clikit tool. I found my Clikit tool at a discount store. If you google "Clikit" there are several entries.
Grommets
Ribbon or string

Here's how they're made. For this example, I used the Japanese paper:

1. Take the folded paper and fold the already folded side down about 1".


2. Run a line of glue on the top of that folded area and fold down again. This will make a sturdier base for the grommets so the bag won't tear when filled. This folded side is the TOP of your bag.


3. Next, glue down one SIDE of the bag. You are going to open out the two layers on the opposite side and insert this glued side in, making a paper tube of sorts. Glue and insert about 1" so it will be sturdy. Make sure you insert the side so it's straight. Glue this both inside and outside.


4. Fold your tube flat, using the glued side as a guide. The glued side should be straight down on your fold.

5. Now we'll make gussets on the narrow sides of the bag. Determine how wide you want your gussets to be. They can be as wide or as narrow as you wish. Once you determine how wide you want them to be, fold the bag flat again and crease the second side of your gusset. (The gusset will be the area between your folds.) When you open your bag up, it should be box-like.
6. Bring both edges of each gusset together and crease so the bag will be able to fold flat. 
Once you have done this step, your bag should look like this:
7. Measure how wide your gusset is, and fold the BOTTOM of the bag up that same measurement. Remember, the bottom is the side that is NOT folded. On the bag shown, the gusset is 2" wide, so I have folded the bottom up 2". After you fold it once, turn the bag over and fold it up the other side as well so you get a good crease there.

8. Now you're going to create the bottom of your bag. Fold both of the gussets in as if you were wrapping a box. Use your previously made fold lines as guidelines.


9. Glue the flaps well. Put one of your hands into the bag to give you something to fold against, and fold each glued flap in to form a square bottom.


10. Here's a Clikit tool. It's great for punching holes and setting grommets. If you don't have one of these, though, you can punch holes with a hole punch and then set your grommets with a regular setter.


11. After your grommets are set, thread a coordinating ribbon through and tie knots on each end. String, yarn, or raffia would work as well. Done! Now you have a cute little gift bag.


The final product:
Wasn't that easy?

Wednesday, December 11, 2019

Quick and Easy Ornaments, with quick and easy tutorials

Need more ornaments? These wood ornaments from Alpha Stamps are so quick and easy to decorate! I'm going to use mine for gift tags, so it will be like giving two gifts in one!

For the first snowman couple, paint the ornament holder silver, then cover the circular part with scrapbook paper and an image from the Silly Snowman collage sheet. Layer on a "Merry Christmas" greeting from the same collage sheet. Glue a beaded trim around the edge. Add some holly, some tiny snowflakes, and a pretty ribbon, and you're done!

The second snowman couple is made in the same way, just using a bit of a different palette.  Its Christmas greeting came from the Small Retro Xmas Tags & Labels collage sheet.

I love this mitten! Covered it with a patterned scrapbook paper, with red paper at the top and bottom. Use a grey Copic marker to draw ribbing around the cuff. Glue on a loop of pretty red ribbon and a paper rose, and you're done. Easy peasy!
For a complete list of supplies, click here!

Saturday, February 2, 2019

Mini Mermaids, with a Mini Tutorial

I'm not sure why, but I really like to work small. So when I had my choice of projects this month from Alpha Stamps, I chose to work on a Matchbox Sized Faux Book Box (only 2 1/4" tall!) It's the perfect size for a tiny shrine. The papers in this month's kit made me think "beach", and "beach" made me think mermaids.

The outside of the box was wrapped in a lovely shell and seaweed paper, and then covered with a tiny beach poster advertising Mermaid Oysters. I used a couple of charms, a tiny pinch of sheet moss, and some flat back pearls to give the lid a bit of dimension.


The sides of the box have a fun coordinating pattern, and some Dazzles thin line gold border stickers around the edges. I'm sad to report that those stickers have been discontinued, but if you want a little splash of gold, this thin line stripe tape should do the trick.

For the inside of the box, I found a great image of mermaids that coordinates nicely with the new papers. I used three copies of that image to create dimension. Moss, tiny seashells, and a few more pearls were added to the bottom of the box. A brief tutorial is below.

Tutorial:
1. Mix acrylic paint to match the colors of the paper you will be using to cover the box. In the photo below, the box is painted and ready to construct. Note that I didn't bother painting the entire cardboard on the sides of the box, because I knew I was going to cover that with paper. I did paint the entire underside of the lid, because I was worried that if that were covered with paper, it would not lay flat when the box is closed. (The middle panel is also not painted, but that's because I forgot about it. Oops. I did go back and paint it later.)

2. You can build up your mermaids using as many images as you wish. Two will work fine, but the box was deep enough to use three, so I decided to go for it. Cut one image out to fit the back of the box, one image of just the mermaids, and one of the two mermaids in the foreground.

3. Put foam tape on the backs of the mermaid images.

4. One at a time, adhere the images to the background. Make sure you do this before you put the background into the box, because you want to make sure your images are lined up perfectly.

5. (See, I did go back and paint that one piece!) I didn't have any cloth bookbinding tape on hand, so I used masking tape to attach the sides and top of the cover to the box. Tape first, making sure the box closes correctly, and then add the scrapbook paper to the top, sides and bottom of the box to hide the majority of the tape.

I wanted a little of the patterned paper on the inside cover, so in order to assure that the box would close correctly, I made sure that the paper was in an area that would fit inside the box part when the lid is closed. 

6. You can leave your box as shown above, but I prefer the box to open more like a book, so I used some white glue to glue the spine to the side of the inside box. Now my box looks like this when opened:

7. A little note on the starfish charm on the front, and the seashell charm on the inside: because they are charms, they each came with a loop. I clipped the loops off with small wire cutters and then used a metal file to smooth down the rough edge a bit.

Here's the final project: a little bit of mermaid magic that fits in your hand.
For a full list of supplies, click here!
Related Posts Plugin for WordPress, Blogger...