Design team member of Alpha Stamps, lover of ephemera and junk.

Welcome! Grab a cold one, kick off your shoes, and have a look around.
Showing posts with label Halloween. Show all posts

Saturday, August 24, 2024

31 Spook Street

Spooky season is here! Let's visit one of the houses on Spook Street, number 31. I love the new Houses and Tombstones set from Alpha Stamps; they inspired me to make this tin. The houses are perfect for a scary facade on an Altoid's sized tin, especially if you add in some Tiny Scalloped Shingles and the Mini Window for Haunted Houses (for this project, I trimmed the six pane windows down to 4 panes). I cut a door out of the "Signage & Doors for Tin Covers" collage sheet, and used some foam tape raise it up a bit from the house. The stones on the house are made from a cardboard egg carton, painted and cut up, then glued down individually onto the house facade. A full tutorial for this technique can be found here. 

 
It's obvious that the spooky family in this house has been getting ready for Halloween: they have carved some jack o'lanterns, and invited a little rat friend to come visit. A skeleton waves from the roofline, and a bat has fluttered by to check out the fun. Inside, a friendly ghost announces a fun spook party, and you're invited! Hooray for Halloween!

Let's trick or treat! While the ghost on the left is glued to the top of the inside of the tin and is flat, the elements on the right are layered with different heights of foam tape, giving lots of dimension, which unfortunately does not show well in photographs. 

When I went to attach the facade to the front of the tin, I had to have the tin lean a little in order for it to stand up on its own. From the side, it looks like this:
 
I hope you enjoy this spooky little tin. New to altering tins? Here's a tutorial on how I do mine. Happy Halloween! For a complete list of supplies, click here!


Saturday, September 16, 2023

City's Superior Snake Venom Stand

Well, it's certainly been a while since I last posted. Thanks for dropping back in; you know I couldn't go through a Halloween season without making something! Here's a quick altered tin that was fun to make. Welcome to City's Superior Snake Venom Stand, where many of your Halloween necessities can be found. There are pumpkins, skulls, and various potions. And don't forget those green jars of snake venom!


Most of the supplies used for this tin came from Alpha Stamps: all the jars and labels, the skulls, the pumpkins, and the jack o' lantern. Plus, that fun little shelf that fits right in the tin. I covered the entire tin with scrapbook paper, and added the shelf. It's perfect for displaying all those spooky jars. 

The little pumpkin headed girl was inspired by one made by the marvelous Bella Ayers of Alpha Stamps (her tutorial can be found he. I painted a spooky face on a styrofoam pumpkin, and made a body using an armature of pipe cleaners covered with tape and painted white, with black stripy legs. Her skirt is made from a faux flower, with a ribbon belt. Bella posted a great tutorial for making the doll here.

I didn't glue any of the merchandise down in this shop, so things can be moved around and added later just for fun. For a list of supplies, click here. Happy Halloween!


Wednesday, September 7, 2022

Halloween Produce Stand

Halloween is near, and it's my favorite time of the year! I made a little produce stand to celebrate. The vendor also seems to enjoy Halloween; he's selling more than just fresh produce! I used a 3" Tall Display Base and a Stairstep Tabletop Display from Alpha Stamps to build the perfect stand in which to sell his wares. It's fully stocked with fall goodies: everything from apples to pumpkins to Halloween decor. I'm sure his black cat is not for sale, but you never know!

I assembled the Base and covered it with scrapbook paper, then did the same with the Stairstep Display. They're both easy to put together with a little white glue. I ended up changing the top of the cabinet base later, as the pumpkin pattern was too busy once I started adding the merchandise.

Thin cardboard was used to make the sign for the stand. To keep it sturdy, I glued a couple of toothpicks to the back of the supporting posts. The stripey paper and the sign came from the Fall Market Signage and Labels collage sheet.


Lots of the goods for sale are just as they came: the skull, the jack-o-lantern, the black cat, and the pumpkins, for example, but some got a little extra treatment: I simply removed the corks from the clear bottles, but added labels to the green and the amber bottles. The clear bottles are filled with a Halloween Polymer Clay Mix. Looks like delicious Halloween candy!


The amber bottles are filled with seed beads.

I also added tiny labels to the crates. So cute!


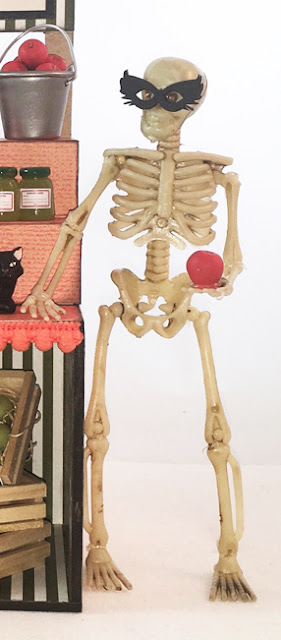
The proprietor is offering you an apple (I hope it's not poison!) This skeleton comes with stiff arms and legs, but it's easy to cut them apart at the joints and, using hot glue, give him a different pose. I cut this guy's arms at the shoulders, elbows, and wrists, and then pieced him back together. Now he can lean on his stand in a jaunty manner.


This stand was so much fun to make and stock up with Halloween What will your stand sell? For a list of supplies I used, click here!


Saturday, October 9, 2021

Spookytown, USA

I recently received a set of Cabana Row Mini Houses from Alpha Stamps, and I knew right away that a Halloween village was in order. Hello, Spookytown! Kids are frolicking, cats are guarding pumpkins, and someone has used a skull as a seasonal decoration.

Here are some closeups:

I started out by covering each chipboard house with scrapbook paper; one type for the house itself, and a contrasting paper for the roof. Each got a Halloween motif on the front, and all but one got Halloween "windows" on the sides.


Spookytown needed a home base, so I made one out of foam core. It's covered with black tissue paper; I just wrapped it like a present and glued it down. Orange ric rac helps finish off the edge.  

 After the foam core was covered and the ric rac was applied, I wanted to add some texture on the ground. This would have been best to do before the ric rac was glued on, but sometimes I do like a challenge. The only way I could think of to apply the "grass" was to use spray mount, but I definitely didn't want to get that grass all over the sides and into the ric rac, so I made a cardboard template to protect those areas. I measured the base, and cut the template 1/8" less on all sides, so there's a little black edge around the border.

I drew crop marks so I could position the base in the center of the template. Once the template is ready, tape the base on face down, so you can spray the top and apply the ground cover. Make sure you do this part outside! I used washi tape because it's easy to remove.

The great thing about using foam core is that it's easy to construct a scene. To attach the tree silhouette and the fence posts, I glued thin wire to the back of each element. Once the glue is dry, I used a straight pin to make a little hole in the foam core and then inserted each piece.

It's so easy to build a fence this way. I also used wire to allow some Halloween figures (a black cat, a couple of pumpkin heads, and a boy with a jack o'lantern) to stand. Wire allows the bats to fly, and holds up the skull bead so it doesn't topple down. I chose not to attach the houses or the pumpkins or fall leaves. Maybe I'll want to rearrange things some time.


I hope you enjoyed Spookytown! For a complete list of supplies, click here.


Saturday, September 11, 2021

The Halloween Special on BTV

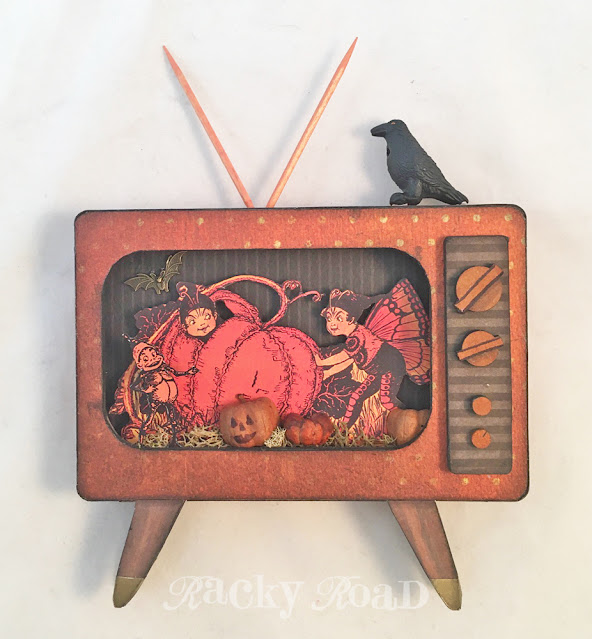
Let's see what's playing on BTV (Brownie TV). I am a huge fan of Palmer Cox's illustrations of Brownies, so I am totally in love with Alpha Stamps' new collage sheet featuring them at Halloween. Those Brownies should be on TV! For this project, I used an Altoids Tin TV, and covered it with scrapbook papers. A couple of toothpicks make the perfect antennas.


I used a thin strip of sturdy scrapbook paper to make the TV 3d. The Brownie images are attached to the background with foam tape, and a mossy ground and some pumpkins were added. To fit the pumpkins in, I cut them in half with a box cutter. If you apply slow gentle pressure, they divide fairly easily. They're attached with white glue. I made one into a jack o' lantern using a thin tipped Sharpie.

It's always fun when Halloween specials are on TV. Bring on the Brownies! For a list of supplies to make this or other scary programing, click here. And stay tuned for more Halloween crafts. 


Saturday, July 31, 2021

Halloween Scary Book

It's never too early to start up on Halloween crafting! I used some Solid Moon Book Pages from Alpha Stamps to make a spooky Halloween book. A Haunted House overlay was the basis for the perfect cover art for the book. I painted the overlay black, and added scrapbook papers plus a moon and pumpkins from collage sheets to set the spooky scene. You can just see the tiny skeletons peaking through the windows. This book was bound with a Zutter Bind-It-All.

It was fun to mix and match Halloween papers to make each page different. Once each page was covered, I used lots of individual images from collage sheets to fill the space. I kept moving everything around until I was happy with the layout. For the really busy pages, it helped to take a photo before removing everything for gluing.  


The first page is a clowder of cats. Black cats, to be specific. I love the vintage look of these frightful  felines.

Next up, some jack o'lanterns. That background paper has to be my favorite.


Witch, please! It's so nice that this coven got together for a group photo. Better look behind you, witches.

These shady fellows are obviously up to no good. Are those the ghosts of past victims of this poison dealer?

The penultimate page features happy trick-or-treaters. Witch better have my candy!

I found the perfect image for the final page. It fits beautifully, and it makes me laugh to think that of all the scary things featured in this book, Medusa seems to finds the fun loving children on the adjacent page to be the most horrifying.


For a list of supplies, click here!

Saturday, October 24, 2020

Scary Halloween Sweets and Treats Stand

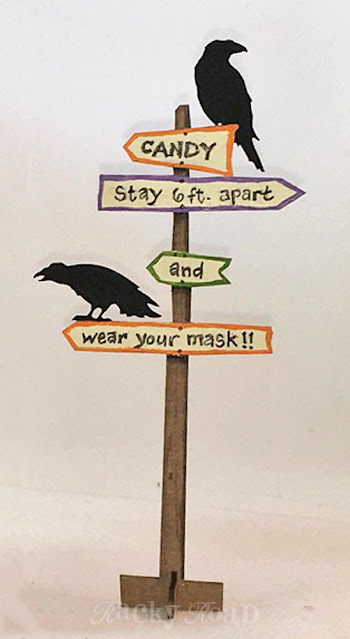
One last Halloween project for the season: how about some fun mail? My mom mentioned the other day that she never got anything but bills in the mail anymore, so I thought I'd send her a little Halloween treat. Welcome to Alpha Stamps' "Scary Halloween Sweets and Treats" stand. Please be aware of the handy candy corn stickers on the floor that indicate where to stand when ordering your favorite spooky treats; you know we're still in a pandemic.

 
Never mind that the proprietors are deceased; they're still being careful to wear masks and enforce social distancing. Aren't their little candy bags adorable? Those bags are so easy to make using the Retro Halloween Bags collage sheet. A couple of toothpicks hold up the striped awning. I used an awl to punch small holes in the stand and awning for each end of the toothpicks. Once the card is assembled, a little dab of glue will help keep the toothpicks in place.


The beauty of this little scene is that it folds flat, so I can mail it off in an envelope.
 
A lot of people plan out an entire project before starting it. I am not one of those people. Lots of what I do is trial and error and finding things that work at the last minute. For that reason, before I even started this project, I painted the entire thing black. I know I would be covering it with papers, and that the folds of the card may show.  The only thing I know I wanted to do when I started is have a striped awning, so that was done first. The candy paper was too much fun, so I decided a candy stand was the way to go. Below you can see how that paper was cut to fit the wall of the stand, plus the top of the table in front.
If ever there's a measure twice, cut once situation, this is it. I had one 6x6 piece of this paper. No room for mistakes! Here's the back of the piece, with some directions. The black plaid paper seen below is the back of the candy paper. Once I cut the paper to the correct width of the stand, I measured carefully and cut out the space for the window under the awning. Put the paper on the front. Holding things in place, carefully slice between the stand in the slits on each side of the "no glue here" part pictured below. That will be the top of the table. Cross your fingers, flip over the piece, and carefully glue only where the dotted line is. You don't want to glue your table top until the piece is fully opened. Once you've glued all that, you can carefully trim the extra paper from the top (where it says "trim here"). Once the candy paper is attached correctly, it's relatively easy to cover the front of the stand and the ground.
The chipboard sign adds a little fun to the scene. It's painted with acrylics and lettered with a fine line marker. I wanted to give it a hand painted look, so I didn't worry about keeping everything straight.
If you plan to shop at the Scary Halloween Sweet and Treats Stand, don't forget to stay on the candy corn stickers so you don't get sick. Isn't 2020 fun? For a list of supplies, click here.


Wednesday, September 23, 2020

Halloween Tableaux

It's Halloween season! Because I can never have too much Halloween decor, or do too much Halloween crafting, I had a blast making these tableaux to celebrate my favorite spooky holiday. Large Spiderweb Mirrors with Frames are the perfect backdrop for each scene. All they need is a little stand; easy to make with some foam core and tissue paper. I'll show you how at the end of this post.

The first tableau is a little on the spooky side. There's a witchy woman, a graveyard, pumpkins, a skull, and a black cat. A crescent moon shines down on the scene as a bat flies into the night. The gravestones are cardboard shapes; there's a tutorial on how to paint them at the end of this post. The cat is a cupcake pick. If you leave a little of the pick attached when you cut it off, it's easy to stick down into the foam core to make the cat secure. I gave this one some funny eye stickers. He looks scared! 

Side view, so you can see some of the 3D elements. The large pumpkin in the back was too fat to fit on the base, so I cut it in half with a box cutter. That made it easy to glue it onto the background. Another alteration I made is in the image of the woman. She was originally wearing a very cool bat hat, but it was a little hard to see on the background, so I gave her a new witch's hat with a bright orange band. The "boo" sign and the little pumpkin girl were attached with foam tape, and the cat banner was glued only at the ends so it pops out a bit.

What's Halloween without candy and costumes? You're invited to a Spook Party! I layered a cat head image on top of a black medallion and a gold medallion, and then could not help but add an extra paper medallion (tutorial on making the paper medallion can be found here). I wanted this scene to be busy and fun, so it features some happy kids, lots of candy, a couple of jack o'lanterns, and a colorful witch's hat.

Side view. The cat head is attached with foam tape, and the paper medallion is attached to the back of the scene for extra depth. The little clown with the pointy hat is also glued to the back of the scene, and his other clown and the witch are attached with foam tape, as are the paper pumpkins. In order to display the witch's hat at a jaunty angle, I glued a toothpick to its back and stuck it into the foam core. A little dab of glue at the bottom of the hat helps keep it secure. The red cape of the little witch flared out on both sides of her, but I trimmed it back on the side where she's holding the cat so it doesn't cover too much of the ghost. Don't be afraid to alter those collage sheet images to fit!

Of course I didn't manage take any photos while these were in progress, so here's a dramatic re-creation of how the stands were made. The backgrounds on the art above are 5" tall. The one I'm using for this tutorial is smaller, around 3 1/2" tall, but the technique is the same. Cut your foam core to the size and shape you want. Mine is just enough to allow for some 3D decorations in the front of the scene. Cut a piece of tissue paper to the right size to wrap your base. I adhered mine with Mod Podge. Tuck the ends in like you're wrapping a present.   

Once the base is wrapped, position your background where you want it, and holding it steady, trace around the bottom with a pencil. *Hint: cover and/or paint your background and frame before you do this step, as adding extra paper and paint will make the stand a little thicker.*


Use an x-acto blade to cut out the slot. See the two red arrows in the photo below? That bottom part of the frame will fit into the slot you have just cut.

Set your background in your stand. If you've cut the slot a little too wide, insert a slip of cardboard to help secure the background. Now you're ready to decorate! For a complete list of supplies, click here.

 Happy Halloween!


Related Posts Plugin for WordPress, Blogger...