Design team member of Alpha Stamps, lover of ephemera and junk.

Welcome! Grab a cold one, kick off your shoes, and have a look around.
Showing posts with label ornament. Show all posts

Saturday, November 28, 2020

2020 Tree Ornament

2020 has definitely been a year, and I felt the need to commemorate it with a Christmas ornament. Using a wooden ornament from Alpha Stamps, I made this. This will be the perfect reminder of such an imperfect year.

"Our first pandemic. So sweet. That pretty much says it all, yeah? Here's the back.

I love these vintage snowpeople. They have the prettiest smiles. Of course you can't see them, though, as they are wearing their masks. To give this ornament a chalkboard look, I used a white colored pencil for the lettering.


I hope this ornament makes us laugh next year, when we are able to get together again with friends and family. Until then, we'll stay safe at home. For a list of supplies used for this project, click here!


Wednesday, December 11, 2019

Quick and Easy Ornaments, with quick and easy tutorials

Need more ornaments? These wood ornaments from Alpha Stamps are so quick and easy to decorate! I'm going to use mine for gift tags, so it will be like giving two gifts in one!

For the first snowman couple, paint the ornament holder silver, then cover the circular part with scrapbook paper and an image from the Silly Snowman collage sheet. Layer on a "Merry Christmas" greeting from the same collage sheet. Glue a beaded trim around the edge. Add some holly, some tiny snowflakes, and a pretty ribbon, and you're done!

The second snowman couple is made in the same way, just using a bit of a different palette.  Its Christmas greeting came from the Small Retro Xmas Tags & Labels collage sheet.

I love this mitten! Covered it with a patterned scrapbook paper, with red paper at the top and bottom. Use a grey Copic marker to draw ribbing around the cuff. Glue on a loop of pretty red ribbon and a paper rose, and you're done. Easy peasy!
For a complete list of supplies, click here!

Friday, November 29, 2019

Snowglobe Ornament

Here's a fun ornament that's easy to put together quickly. It's similar to a snow globe, but it looks like a little mason jar. Love! The jar is plastic, so it's not as fragile as it looks, and it's nice and lightweight for hanging on your tree. This jar could hold whatever you like, but I decided to make a little snowy scene.

The first thing I did was to build up the base so the deer and the tree would be flush with the clear part of the jar. To do this, I simply cut out three circles of corrugated cardboard that were a tiny bit smaller than the opening of the jar (save room so you can screw that jar in!). I glued the cardboard together and then punched a hole into which I inserted my "tree". I was liberal with the hot glue, because I sure don't want that tree coming loose.

Next, I glued the deer's feet down, and then wrapped the base with white cotton from a cotton ball. It doesn't have to be too neat, just good enough to keep the cardboard from showing through the snow. Once the base was cotton-wrapped, I glued it on the inside of the lid, making sure the lid could screw in before the glue dried. While the glue set, I guesstimated how much Diamond Dust "snow" would be needed to cover the ground and filled the jar up. It doesn't need a whole lot. Hold the jar with the opening upright, and then turn over the lid, gently insert the snowy scene inside the jar, and screw the lid on. Turn the jar over and shake that snow down to the ground.

Once the snow globe is assembled, you can add some embellishments to the outside. I added a little ribbon and some garland to the bottom, and some bright berries to the top. So cute!
Need supplies? Click here!

Saturday, October 28, 2017

Christmas already? Time for some kitchy ornaments!

If you're a crafter, you know you have to get ahead of the holiday rush. Therefore, it's time for Christmas crafting in October/November! Here are a couple of kitchy ornaments I made with this month's Alpha Stamps kit.

First, a holly jolly snowman on sweet pastels. This fellow is the perfect size for the opening in the chipboard ornament, even if his hat does stick out a bit. I adorned him with a glittery sprig of holly, surrounded him with an assortment of snowflakes, and embellished the side with more holly and pine cones.

Metallic Dresden trim makes such a nice frame around our jolly snowman friend. It was easy to curve the trim to fit: just snip between each half circle, leaving the bottom part of the trim intact. Curve as you go! It just so happened that the trim fit this inner circle perfectly, but just in case, I started gluing at the upper right, so that if there did happen to be an awkward place where the ends met, it would be under the snowman's hat where it wouldn't show.

Check out Santa! He's looking mighty fine on this star shaped ornament. This ornament features gold tinsel, a holly wreath with bead "berries", faux Christmas lights, ribbons and a pair of jingle bells. Nothing's too festive when it comes to Santa!

Here's a little hint for making this ornament: when you're applying tinsel, it's best to cut the tinsel in smaller pieces that meet at the outer points of the star. This will give you nice sharp points. If you use one long piece of tinsel, the points will appear rounded. Tacky glue works well to adhere the tinsel.

Each of these ornaments is backed with coordinating paper. The back of Santa's ornament has a cute collage of children's wishlists.

Ho ho ho, stay tuned for more Christmas coming up. Meanwhile, for a complete list of supplies for these two ornaments, click here. Happy Christmas crafting!

Saturday, December 3, 2016

Ornaments to Deck Those Halls

I'm crazy about Alpha Stamp's new Layered Ornaments. They each have a laser-cut chipboard scene, two outer edges, and clear plastic low-profile domes that combine to make a snow globe ornament. One of my favorite things about them: even when they're done and fully decorated, they're still lightweight enough to not pull down the branches of your tree!

Here's what I made with this month's kit. I really loved the scene with the deer, so that's the first one I made. I colored the tree and deer with colored pencils, and then brushed white paint on the tree and ground to look like snow. A little bow on the top with a pine cone and some holly complete the ornament.

To get this look, brush some glue on the snow and sprinkled with Diamond Dust. Then, glue the dome to the front of the ornament. Once the glue is good and dry, add some micro beads to give a snow globe effect. Glue the plastic dome to the back circle. While the outside of the back is lying face down, pour a few micro beads into the dome, and then carefully glue the ornament to the back. It helps if you use clothespins to hold all the sides together while your glue dries. Once the ornament is assembled, glue a ribbon around the outer edge and embellish with greenery, charms, etc. as you wish.

My next ornament was the Santa. I really love all the details in this laser cut; it's my favorite. The ribbon on the package and the springs on the Jumping Jack are so delicate! I used acrylic paint to bring Santa to life, along with a gold metallic paint pen. After painting, I brushed glaze over all the painted surfaces to give a little shine.

For the back of this ornament, I chose a holly-covered paper. I added some Diamond Dust snow, some snowflake charms, and some peppermint slices from this cane. Here's the front and back together:

Here's a little quick ornament: after painting the outside with red and green stripes, I painted the laser cut scene black. Before putting the back on, I attached silver stars with the tiniest dab of glue. Diamond Dust snow was added before assembling. I looped a ribbon around the holder and added a snowflake charm.

It's pretty easy to get those stripes placed, if you go about it like you're drawing a clock. Start with stripes at 12, 3, 6, and 9, and then fill in evenly. After the red was done, I painted green stripes between. I liked the look of the cardboard, so the neutral color you see is the unpainted chipboard.

Most of these photos make these ornaments look pretty flat. They're actually about 1/4" wide; the perfect width to add a colorful ribbon to the sides! You can see the depth in this photo:

Last but not least, here's a great way to preserve some Christmas memories. I've taken photos of my girls every year since my older daughter was born. Back in the days before digital cameras, I would take 20 some pictures and then wait for the film to be developed. I always ended up with several outtakes that were not "card worthy". Here is my favorite. My younger daughter was almost two, and in every.single.picture she screamed "tee hee!" My older daughter, who was not excited about taking Christmas photos in the first place, could not hide her exasperation.

Nine years later, the girls agreed to recreate that photo for me for our 2013 Christmas card. That card is one of my all time favorites, and I will love having this ornament on my tree. I am planning on going through all my old cards and making more photo ornaments. Wouldn't these make great gifts for family?
 Time to get to trimming the tree! For a complete list of supplies to make these ornaments, click here.

Sunday, December 13, 2015

Quick and Easy Placeholders/Ornaments

I always love to set the holiday table, and one thing I like to do every year is make a placeholder that can later be taken home and used as an ornament. This year, I was excited to find some adorable ceramic snowmen on sale at Michaels for only 79 cents apiece.
I used paint pens to draw in a few details, and then tied a bit of ribbon around each little guy's neck. So quick and easy! Here's a little hint for you, if you want to personalize something like this, write the name and date first, and then it's so easy to center the buttons and faces. Perfect every time!

The snowmen have rounded bottoms, so I purchased a package of little wreaths to give them some support as they sit on the table.

Sunday, December 7, 2014

Mini Tin Ornament

My last kit from Alpha Stamps came with the cutest little reindeer charm. I just had to figure out something to do with him. I also had some small bottle brush trees and lots of Snow-tex left over, so I popped the lid off of a mini Altoids tin and put this little ornament together. The gold tinsel and the jingle bell hanging on the bottom make it extra festive.
This was a quick little project that was fun to do.

Sunday, December 8, 2013

Vintage Look Christmas Ornament

Do you ever just wake up and think, "I need to make something today."? I did, just this morning. I didn't want to just start something, I wanted to spend a little time in the craft room and make a little project, start to finish.

So, a Christmas ornament. I used a round tin, some scrapbook paper, micobeads, faux pearls, some tinsel, a few rhinestone stars, and a bottlebrush tree and a little vintage plastic Santa.

The snow on the bottom is Apoxie Sculpt clay with microbeads pushed into it. The clay is so great to use because I just simply pushed the tree and the Santa into it and it holds them in place. 
Not a lot to it, but I love its sweet, simple vintage look. And it looks great on the tree.

Sunday, December 16, 2012

Wooden Photo Ornament

I wanted just one more little thing to give to my sister this year for Christmas, but I wasn't sure what. Then I remembered some photobooth pictures we took one year when we were Christmas shopping together, and thought that it would be fun to take some of those photos and make an ornament. I went rummaging around in my craft room for inspiration, and came up with the idea of using some of the old wooden blocks I've picked up at thrift stores.
It was pretty simple, really. The square block is from a set of puzzle blocks. I love these when the pictures are distressed and ripped. They make for a nice bright background. I copied the photos to size, and then gave them a slight hint of color with some Copic markers. I added the scrapbook paper hats and then glued an image onto each side of the block. The round part on top is an old wheel, covered with a ribbon and some ric rac. The wooden knobs are from Alpha Stamps, painted and distressed so they fit in with the vintage blocks.
A few sequin stars and rhinestones give it a little bling. I hope this will be a nice memory to hang on her tree. I think I'll have to make one of these for me!
Can you believe Christmas is so close? A happy holiday to you and yours!

Monday, November 26, 2012

Reindeer Ornament With Vintage Parts

Wow, long time no post, but I've been working on Christmas stuff and can finally post a little bit of what I've been working on. I've made some fun stuff for Alpha Stamps that I'll be able to post on December 3rd, but until then, here's what I'm working on now. 

I'm always looking for a nice placecard holder/ornament for our family Christmas eve dinner. This year I was very excited to find a little basket of vintage candle clips at a local antique mall. These are the things that Christmas tree fires are made of! I don't want to be burning down my house, but I love the shape and patina of these clips.


Here's what I decided to do with them: I gently bent down all but one of the prongs intended to hold the candle, and attached a large metal snowflake that I embellished with some rhinestones. I then took some white garland I found at Ikea and wound it around the cup of the base. I gave a little plastic deer a quick spray with glitter mist, hung a jingle bell around his neck, and then glued him into place with some E6000.

For the table, I'll use the clip to hold everyone's name card, and then everyone can take the ornament home to use on their tree next year. This particular ornament was my prototype, and went to a swap partner in a Craftster swap. I'll be whipping up the rest as soon as my order of tiny deer comes in the mail.

Monday, December 19, 2011

Quick Placecards and Ornaments for the Christmas Table

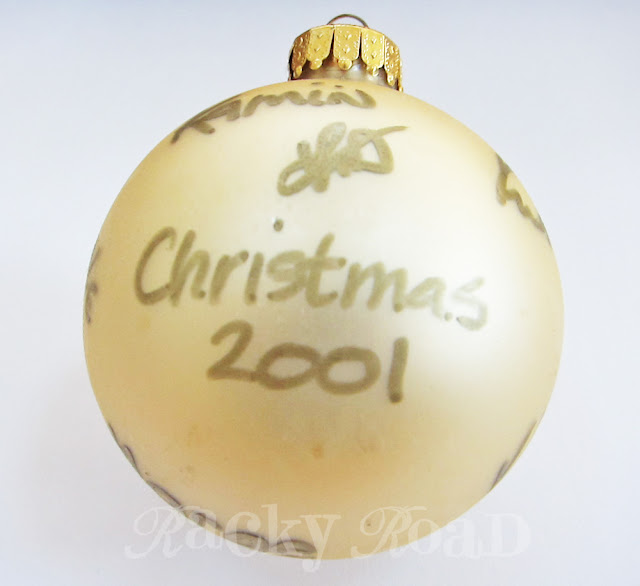
Each year for our big family Christmas Eve dinner, we like to set the table with placecards that everyone can keep and later hang on their tree. Each year, it's so fun to see all the ornaments from past Christmases. The last time we did a glass ornament was in 2001, and everyone at the table signed their name. Ten years later, all the kids are grown up, so we thought it would be fun to do one again. These are so easy to do: all you need is a paint pen!

Here's the 2001 ornament:

And some of the signatures:

And here's what we'll be signing this year:

 I thought it would be fun for everyone to have their name on the front. This is such a quick and easy project, and it's so nice to have the look back at the ornament and remember who was at the table that year.

We hosted a dinner party for some of our neighbors this weekend, and because I had a few ornaments left over after making them for the family, I thought it would be a nice take-home gift for our dinner guests. Each couple got an ornament like this one:
Merry Christmas!

Friday, March 4, 2011

Thumbs Down

Well, I didn't make the call for the Graphic 45 design team, so I guess I'll have to continue to pay to fuel my addiction to their lovely paper. Here's a little ornament I made with their Springtime collection. The tin was some packaging which used to contain metal flowers. The ribbons and beads are from Alpha Stamps.
When you open the lid, a little accordion book folds out, like so:
Here are a few closeups so you can see the details
Sorry it didn't work out between us, G45. 

Wednesday, March 2, 2011

Wooden Spool Ornament

I have several old wooden spools given to me by my mom and grandmothers, and I love to use them in my crafting. I'm going to be sad when they're all gone! I saw this blog post where someone had made little spool poetry. I thought they were so cute! I decided to hang mine, so it could be an ornament. I used a few vintage buttons and a great big ornate head pin from Alpha Stamps. Here's what I came up with. When you unroll it, it says "Eat, Sleep, Make Stuff", which I think are words to live by.

Related Posts Plugin for WordPress, Blogger...