Design team member of Alpha Stamps, lover of ephemera and junk.

Welcome! Grab a cold one, kick off your shoes, and have a look around.
Showing posts with label beach. Show all posts

Saturday, July 11, 2020

Faux Florida Vacation

Oh, coronavirus. We are still sheltering at home. As of today, it's been 121 days since our lives were normal. Since we most likely won't be traveling any time soon, I used this month's Alpha Stamps kit to make a little faux Florida vacation home. It's the next best thing to actually traveling somewhere other than my own backyard. And look, some of my friends are already there!
The front is hinged at the bottom, using green paper. On the outside, it may look like there's not much to this little house, but when you open it up, it's a true tropical vacation. The beaches are crowded, people are splashing in the waves, and some lucky guy even caught some fish for dinner. Bonus: no social distancing required.

Don't miss the cute little crab charm in the lower right corner of the niche!

Nothing like a comfy chair and a good book (plus a bucket full of cold beverages!) to make my faux vacation the perfect place to relax.

Here's a closeup of the niche and those cute miniatures.

The front panel of the house is held in place by the flag pole, which is actually a glass ball sewing pin. It's just gently pushed through the apex of the roof, right in front of the house facade. To allow the panel to drop down, you just have to lift the flag. You can just see the pointy end of the flag pole circled below.

I'm so in love with the floral paper and vintage Florida postcards combination. It's busy and fun and exciting, which is unlike my life at home right now. Someday we'll travel again, but until then, this little faux vacation house will have to do.
For a complete list of supplies, click here!

Wednesday, August 1, 2018

Mermaid ATC Mailer

Alpha Stamps just came out with a fun new ATC mailer, and because we're still in the heat of summer, I decided a mermaid theme would be appropriate. I used some great beachy papers from the Authentique Sea-Maidens 6" x 6" paper pad. I love that these papers include one of my favorite color combinations: turquoise and red! In the collection, there's a great paper that looks like weathered painted boards. I used that on the outside of the mailer.

The collaged area is what shows when the mailer is folded up. This mermaid has found a treasure under the sea: a lovely starfish charm!

Here's the back of the mailer, folded up and ready to go.

When you open the mailer, here's what you find inside - whimsical colorful bubbles, and a mermaid ATC securely inserted into the mailer.

It's easy to pull the ATC out for further inspection.

Here are a few tips on working with the mailer. If you want to cover the mailer with decorative paper like I did, you're really not going to want to cover the folds as the extra paper there will make things too bulky. Therefore, before I added the papers, I painted the folds and cut the papers to fit just within the insides of the folds.

I did want to use the precut flaps to hold the ATC inside, but I didn't want any cuts on the mailer's front surface, so after the inside was covered with the bubble paper, I flipped the mailer over and used an x-acto knife to cut the flaps through the paper on the other side. In the photo below, notice that the folds are painted and the mermaid collage is not yet in place; it was glued on after these cuts to the inside were made.

Now to glue on the front. It's important to not glue the front collage to the flaps. If you do that, they won't flip open to hold your ATC! I inserted a playing card to keep the flaps covered and protected while gluing. I also opted to use some strong double stick taps around the edges, in the middle, and along each flap. This will help hold down that collage. I used a glue stick to fill in the spaces between the tape. Not on those flaps, though - keep them clean! Once the collage is in place, gently remove the playing card and make sure that the flaps are able to open. The ATC will now have a happy home within the mailer.

Now finish that front and give an ATC to a friend!

For a complete list of supplies, click here!

Saturday, July 16, 2016

Ticky Tacky Tiki

What's better than being at the beach and coming up on a little Tiki bar? Why, nothing! Last time I was near the shore, I happened upon this inviting establishment.

OK, full disclosure: this is actually a miniature Tiki bar, and it was photographed in my back yard. I only wish I had come up on it at the beach! I made this little bar using one of the houses from the set I featured in this post. I only adhered one side of the roof, and then supported the other side with a couple of bamboo skewers, creating a little kiosk. To create the bar, I wrapped a thick piece of cardboard with a piece of weathered wood-look scrapbook paper and attached it under the window with hot glue.

Hey, it looks like we're in luck- the bartender is serving up frosty Cosmos, my all-time favorite adult beverage. He's even gone so far as to sugar the rim and add a nice slice of lime on the side. Mmmm! The little sign hanging under the bar states "Always happy hour". I'm telling you: this is my kind of place! 

The bartender looks a little stern, but he's really a fun guy. How festive is that lei he's wearing? It was pretty simple to make; I just used a hole punch to cut several circles from tissue paper, and then poked a threaded needle through small stacks of the punched circles. I tied a little knot between colors to make them look more like individual flowers. It helped to tape down an end while making the lei. Want to know how to make a mini Cosmo? I explained how I did that at the bottom of this post.

Doesn't that Cosmo look tempting? I'll have one, please!

If you don't like Cosmos, perhaps a nice bucket of beer will suit you better. Umbrellas rent for only $5, so grab one, pull up a beach chair, and come sit next to me.

Here's a nice spot. The beer's on ice, so it's nice and cold. That's my Cosmo on the right, though, so hands off!

One more view before we go. There are so many awesome miniatures that really make this project fun, from the tiny martini shaker to the bucket and tiny ice cubes for the beer. For a complete list of supplies I used, click here.
Cheers!

Wednesday, July 13, 2016

The Fish House

In continuing on with the summer themed craft projects, I took a folding house shrine from Alpha Stamps and created "The Fish House". When it's all folded up, it looks like a house made of waves. I couldn't resist adding a small window on the side.

The roof is made of corrugated cardboard with the top thin layer of paper removed. A different bathing beauty is featured on the back.

When the house is opened up, it's apparent why I named it The Fish House (or at least I hope it is!)

The King of Fish watches over his kingdom from the center panel, while his loyal subjects collect the perfect fish from the surrounding ocean. He has put those bathing beauties to work! Here's my favorite panel. She's so proud of the catch of the day.

The house is hinged together with washi tape, while the striped outline on the top and bottom of the panels is made from thin strips of the scrapbook paper used in the striped panels. 

Here's the outer view of the opened house, but I have to admit that I'm still partial to the king and his helpers of The Fish House. 

For a complete list of supplies, click here.

Saturday, July 2, 2016

Cabana, Cabana, Cosmo!

It's summertime at Alpha Stamps! Not only do I have photos of tiny beach cabanas, there's a sneak peak tutorial and preview of my next project at the end of this post.

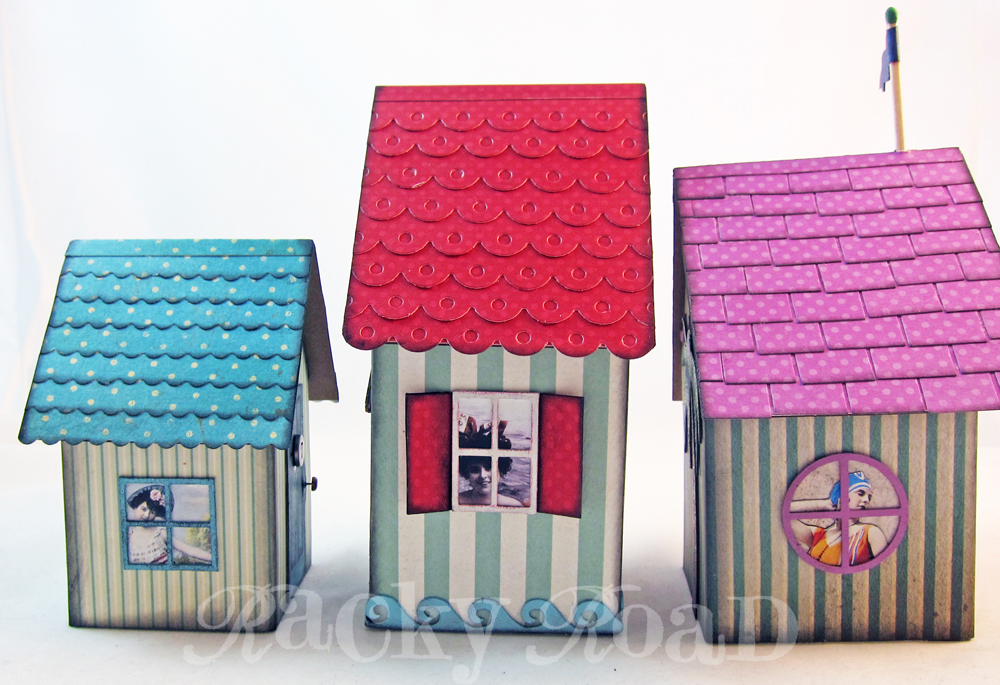
Summer means hitting the beach, but where will you change into your suit? If you're lucky, there will be cabanas nearby so you can hit the beach in style. Here are three miniature beachy cabanas, ready when you are (if you're really teeny tiny, that is.) Can you see the bather behind the louvered door in the center house? She's just about ready for her debut.

These chipboard houses come flat, but are simple to assemble. Just fold on the score lines, cover the sides with paper or paint, and glue together with white glue. I used a strong double stick tape to attach the roofs.

Here's the largest cabana. The first bather is just getting ready to exit, while her friend peeks out the window on the side. For the roof on this cabana, I ran some scrapbook paper through a die cutter and layered the strips to look like shingles.

Number 17: Seahorse Inn. A bright gold seahorse on the door will help you to locate this cabana. On the roof, shingles were cut out separately, edges inked, and then applied one by one for a layered look.

 Here's the smallest of the cabanas, number 7. Scalloped scissors made the edges of this roof.

I had fun photographing these houses on sand, but to really get the details, I put them in my photo studio.

I would be remiss not to show you some of the cuties looking out the windows! They are all ready for some fun in the sun!

Seaside details on the back! The cardboard cutouts can be used in many ways. The wave and the draped edge were painted, while colored pencils were used for the palm trees, umbrella, shell, and life preserver.

For a complete list of supplies to make these beach cabanas, click here.

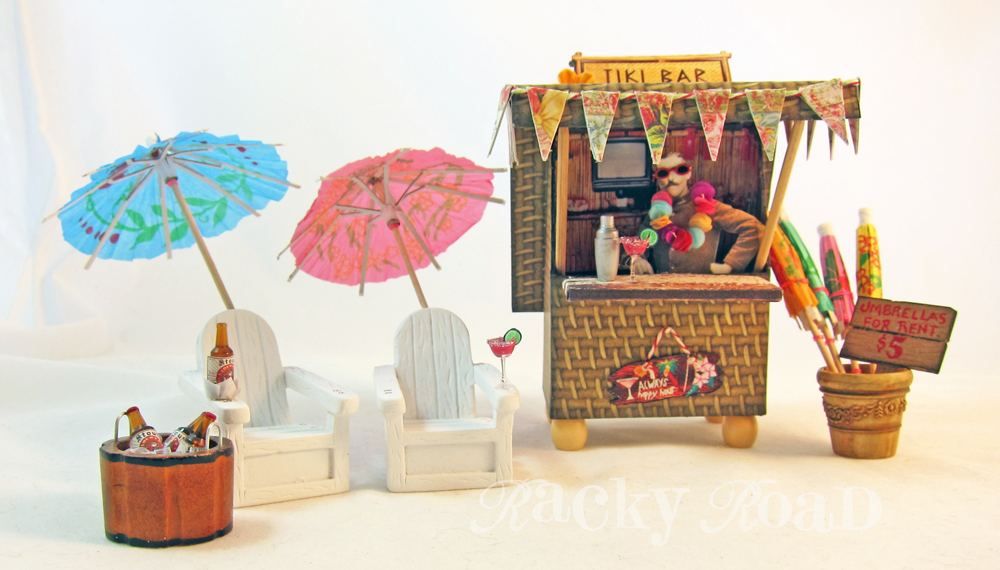
And now for the sneak peek tutorial. My next project was in need of some sort of summery beverage, so naturally I picked my favorite: Cosmopolitans! Here's how I took plain little glasses and made Cosmos.

First off, the glass itself. Look how tiny!

I added the pink color of the Cosmo itself using a mixture of Liquitex Gloss Medium and a little paint. Each glass just needed a drop or two.

Sugar the rim! I love to use Stirrings Cosmopolitan Rimmer on our real Cosmos; it's pink and tasty and fun. I used a little pink glitter to rim the tiny drinks. Use a toothpick to put a thin bead of tacky glue around the rim and then either sprinkle the glitter on, or carefully press the top of the glass into a little pile glitter. I did both, for better coverage. When I did this first round of glasses, I put the limes on before sugaring the rims, but if I had to do it again, I'd add the limes after the glass is sugared.

Every Cosmo needs some lime! This lime cane is the perfect size for a tiny beverage. Simply cut a thin slice with a sharp exacto blade, and take out a small pie-shaped wedge so the slice will fit nicely on the rim of your glass. If the glue from your sugar is still wet, it may be enough to hold the lime on. You can also use a toothpick to put a tiny bead of glue on the inside edges of the lime where you removed the wedge.

Miniscule Cosmos are served! But where?!? Stay tuned...
You can purchase some mini Cosmo supplies here.


Tuesday, June 10, 2014

Mermaid Spoolie

I'm currently participating in an Altered Spool swap on Craftster.org.  My partner received yesterday, so I can share photos now of the ocean themed spool I sent her.

All of the materials for this spool were in my (massive) stash, including the shells, the green sequins (they were my grandmother's!) and the hideous earrings/charms that became the coral. I knew I'd use those some day!
 

Here's a closeup so you can see her sweet face.  She's so adorable. I hope she likes her new fins and seashell bra. She's carrying around a little pearl. Does she not see the giant pearl right behind her?

Saturday, March 29, 2014

Summer Memory Mini Book

What's new this month at Alpha Stamps? Vintage albums with a beachy vibe! Here's a little souvenir album I created with all the fun new products. Hopefully it brings to mind someone's long ago summer fun memories.

The cover. The book is such a fatty that it needs clips to keep it closed. Thank goodness washi tape can make a plain black clip a little more fun! Can you believe that cover is from a collage sheet image, just glued to shirt cardboard? It looks like real leather!

All the inside pages of the album are made from 7Gypsies scrapbook papers. All splayed open:

I used a combination of collage sheets, vintage photos from my collection, fun little envelopes, and rubdown numbers. Here are the rest of the pages. I won't bother you with too much chatter about each one. I'll let most of them speak for themselves.


Tag removed:


A great old photo of two couples on vacation, and some tickets.

I love using the glassine envelopes. Hole reinforcements make a great grabby spot for some baker's twine so you can pull the tags out.

One more picture of the couples, Gus, Irene, Maddie, and Al. Those are their real names, they're written on the back of the photo.

This photo is from a collage sheet. The paperclips have washi tape flags on them.

Last page.


Wanna make a fun memory book like this one? For a list of where to find most of the supplies, click here.
Related Posts Plugin for WordPress, Blogger...