Design team member of Alpha Stamps, lover of ephemera and junk.

Welcome! Grab a cold one, kick off your shoes, and have a look around.
Showing posts with label graveyard. Show all posts

Saturday, October 10, 2020

Ghosts in the Graveyard Altered Tin

Watch out for ghosts in the graveyard! I used an Altoids-sized tin with the lid removed to make some tiny Halloween fun. An insert from Alpha Stamps' new Halloween Altoids Tin Inserts set makes a rustic fence and black cat in the foreground of the tin. I painted the insert orange, black and grey, and then added texture to the fence with colored pencils. I used a white colored pencil to outline the edges of the cat to make it pop a bit. The seated cat, front right, is acrylic.

 
So many ghosts! This paper, from the Halloween Market 6x6 pad, makes the perfect background. After I glued the paper to the inside of the tin, I cut a couple of the ghosts out of the remaining paper and attached them with some foam tape to add some dimension. The tombstones were painted (tutorial at the bottom of the post here; I love painting tombstones!) In checking to see how the tombstones looked behind the insert, I realized that the two shorter tombstones were getting a little lost behind the fence. I set those two stones up on some foam core (painted black) to make them tall enough to be seen.
 
Some curious ghosts were added to the border of the insert, and a small ghost was added with foam tape to the front of the tombstone you see on the right. Some lichen was pushed through the "ground" between the slats of the fence and glued behind. When I tried that smiling jack o'lantern on the top, I knew he would have to stay. This needs a little more orange at the bottom, don't you think? A couple of pumpkins there should do the trick. In this photo, the cat on the fence is not outlined yet, so he's a little hard to see.

Here's that cat with a little white pencil outline; now you see him. A black ribbon trim along the opening of the tin adds texture. Skeleton arms for that Jack; why not?
 
Happy Halloween! For a list of supplies, click here.

Saturday, August 31, 2019

Halloween At The Cemetery, a Candle Holder

More Halloween! This month, Alpha Stamps sent me some small reliquaries. What to do, what to do? I'm not sure what made me think of making a candle holder, but now that it's done, I'm glad I did. This will be such fun to add to the mantle this year. *Note, to avoid any sort of fire hazard, I'll be sure to only use a battery operated candle in this holder.

I painted all the tombstones with a mixture of paints (tutorial at the bottom of this post) and added papers, charms, rub on type, and collage sheet images to create five different tombstones. This little graveyard is littered with pumpkins, a witch's broom, and bones that were snapped off of a plastic skeleton. It's pretty easy to just break those bones off at the joints.

Here lies Edgar Allan Poe.  I used rub on type to indicate the year of his death, and for the RIP written on the gravestone to the right. To make the bats fly, I used a thin wire and literally just shoved it into the rubber bodies of the bats (poor things!). The wire was sandwiched between the two pieces of chipboard before gluing the gravestones together. Clothespins were used to hold the pieces tight while drying.

A black cat, a giant crow, and more bones. So spooky! I wrapped the candle with a black mesh ribbon before placing it into the holder.

I love the sentiment on this final tombstone: "Gather ye blossoms while ye may."

I made the base for the candle holder from corrugated cardboard. I used a large can to trace around a circle, and cut two of those out using an x-acto knife. Glue these together to make a thicker piece This will elevate the candle and give the tombstones something to lean against. Glue this double thick base to another piece of cardboard.

You can make the base any shape you want; I elected to make mine a larger circle. Cut that shape out with an x-acto knife, and you are ready to go. I added a little moss to help hold my tombstones in place, then glued them to the inner circle with a glue gun. Most of the other elements, like the bones and pumpkins, were also attached with the hot glue.

For a complete list of supplies, click here. Spooky Halloween!

Saturday, October 6, 2018

Tiny Haunted House, with Tombstone Tutorial

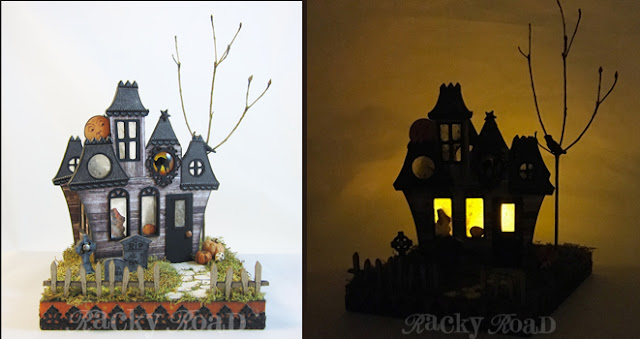
I love the new Tealight Haunted House Kit from Alpha Stamps, and am really excited about how my final project turned out. The kit comes with a chipboard house, a 6"x 6" base, four tombstones, and a run of rickety fencing. It's so fun to construct and decorate. Beware! I took a ton of pictures.

I covered the sides of the house with a wood plank scrapbook paper, and the roofs with spiderwebs. Dresden trim accents the roof lines. 

The "stone" path in the front is cut from a cardboard egg carton. It's got the perfect texture for pavers.

Tombstones litter the front yard. The kit comes with four; I chose to use three. Buried in the front yard are "Al B. Bach" and "Ima Goner". Sadly, no one knows who lies beneath the cross. I have created a tutorial for how I made the tombstones, and you can find it at the bottom of this post.

The windows in this little house are actually thin sheets of mica. Here in the front,  I put the image of the child behind the mica, so it looks like she's inside. The pumpkin is in front of the mica so it looks like it's outside, sitting on the windowsill.

I used mica in the window because the house is designed to accommodate a tea light. When it's dark, you can light it up and it looks so spooky!

Here you can see the back of the house. I wanted the inside to be as light as possible when the tea light is lit, so I did not paint the walls or floor. You can also see all the mica in the windows. Believe it or not, it's really easy to cut the mica to size with just a regular pair of scissors. (But not your good paper cutting scissors; use the cheap pair!) I used a little white glue to adhere the mica to the back of the house.

The tree is made from a branch of an azalea bush. Perfect! I punched a little hole in the base and just fed the bottom of the branch in. The crow sitting in that tree used to be a bluejay. I filed down the tuft on his head and painted him black. He prefers life as a crow.

Next to the door are a couple of tiny pumpkins and a skull.  Although the house is designed with three windows across the front, I decided to include a door. It's just a piece of painted cardboard, with a window cut into it so the light can shine through. The doorknob is a brad.

The sides of the house are solid. I used some window frames backed with mica to make it look like there were windows there.

I had so much fun making this haunted house! I love that it looks good both in the daytime and at night.
For a complete list of supplies I used, click here! And now, the tombstone tutorial:

(I put together this tutorial after this house was complete, so these are not the tombstones seen above. The tombstones shown here are larger and from another set, but the same process was used.)
Items needed:
Chipboard tombstones
Ratty old paintbrush
Black, white, and grey paint
Straight edge (optional)
Very fine black pen. I used .1 and .05 Copic Multiliner pens (above)
N4 Grey Copic Marker (not shown above)

Dip your paintbrush into each of your three colors and dab it onto the tombstone at random. It's best to use an old stiff brush that's pretty wrecked already.

Keep dabbing on the mixed paints until you are happy with the results. Once I get the mottled look I like, I often dip the brush in just the white paint for some contrast.

Make sure you also paint the back and sides of each piece. If you're making a little graveyard, it's nice if some of the stones are lighter than the others.

Using a straight edge and a .1 black pen, draw thin lines to give the tombstone a 3D effect. If you have a steady hand (or you need to go around a curve, like the stone at top below, just freehand it.)

Use the .05 pen to draw tiny cracks in the tombstones. I also used a grey Copic marker (N4) to give some shadows and dimension. For the tombstones in the haunted house project above, I hand lettered the gravestones, but for these two, I found some odd bits of rub on type that added detail. Either way works great. Now that I've got some new tombstones to play with, I need to do another Halloween project. Hmm....
For a complete list of supplies I used in the Haunted house, click here, and for the set of tombstones used in the tutorial, click here. Happy haunting!

Saturday, September 8, 2018

Haunted Halloween Surprise Box

I don't know about you, but if someone gave me a beautifully wrapped little gift that had a tag proclaiming it "haunted", I might think twice about opening it up. It's so tempting, though. I do love Halloween, and look how fun that bow is...

But beware! This is not an ordinary box, it's an exploding box straight from Alpha Stamps. Once you lift the lid, the sides of the box slowly open, and you see exactly what's doing the haunting.

Yikes! It appears to be a forgotten cemetery, and one of the grave's occupants seems to be clawing his way up from underground. I cut those hands off of an unfortunate plastic skeleton.

The chipboard tombstones were painted in mottled black, grey and white acrylic paints, and then embellishments were added: a silver medal flower on the cross, some rub on scrolly lines and a painted RIP on the rounded stone, and a silver skull charm, also painted, on the pointed headstone. Some tiny bats, cut out of a chipboard border, fly overhead. A spooky skull has also made an appearance.

There are also a few pumpkins in the graveyard. The two in the back help stabilize the chipboard fence. The flap of the box with the night sky on it is supported in the back by some clay so it remains upright when the box is opened. I added a faux orange side behind it for symmetry.


Would you open it? Happy haunting! For a complete list of supplies, click here.

Saturday, September 1, 2018

Teeny Tiny Halloween Shriney (x 3!)

It's the most wonderful time of the year: college football, and Halloween crafting. Yay! Today I present to you three out of the five adorable mini Halloween shrines just released from Alpha Stamps. The opening of each one measures just 2" by 2". The tallest one shown below is a little less than 6" tall. So cute! Here's what I did with mine...

For the Raven October Shrine, I painted the front with acrylics, and gave the raven a witch hat and a red rhinestone eye. The interior is lined with a very dark paper (with bats!) that is pretty much impossible to photograph due to the depth of the box. Please use your imagination.  Three tiny trick or treaters stand on a bed of moss and select from the available pumpkins. I considered printing out the "pumpkin patch" sign, but every pumpkin patch I've ever been to seems to sport a crudely painted sign, so I hand painted the sign in the interest of historical accuracy. Rickrack covers the tabs that show on the front when the box is assembled.

I love the orange polka dot paper that I used on the sides so much that I used it on all three of the shrines.

Here's a slightly better view of the inside.

I considered painting details on the top part of the Haunted House Shrine, but once I painted the back black, I really liked the plain silhouette, so I painted the front plain black as well. This shrine was lined with a dark purple paper with a bed of moss on the floor. A full moon smiles at a black bat, as two little black rats explore the graveyard. Black and white baker's twine hides the tabs on this one.

There's that orange polka dot paper again!

The interior. The rats were actually tiny white mice, but a little black paint made them look more sinister and rat like.

And, the cat. I gotta be honest: I am not a cat lover by any means. However, there was something about this cat that I just couldn't resist. This shrine is similar to the others, so it comes with the 2" by 2" square opening, but I gave my kitty a mouth. And teeth. I cut a piece of shirt cardboard just big enough to attach to the front, and painted a nose and mouth. Once the paint dried, I cut out the interior of the mouth, and it was the perfect size to catch a big ole black rat. The cat looked so happy, that I felt it needed a Halloween party hat.

And yes, the cat got the orange paper sides as well. Kitty better watch out, or that rat's going to get away!

There are two other shrines in this set: a cat sitting on a pumpkin, and a cat in front of a full moon. I might get around to constructing those soon, but I'm working on a different Halloween project for next week first. Meanwhile, if you want to make some of these tiny shrines, click here for a complete supply list.

Saturday, October 4, 2014

Gravestones and Goblins

How cool are the new paper maché tombstones from Alpha Stamps? I used all three to make a spooky graveyard and set it up in the backyard. This is a tiny cemetery; the tombstones are each just around 6" tall.

A little bit about how I made them: the tombstones were originally the color of craft paper. I thought about covering them with scrapbook paper, but really wanted to get the look of an actual stone tombstone, so I ended up painting them. To get the mottled effect, I used four colors of paint: white, light grey, dark grey, and black. Using one brush, I dipped it into the paints and just dabbed it all over the surface, mixing the paints as I went. This technique works great; you just have to keep adding paints and dabbing until you achieve the look you want. Once the surface was done, I went in with a detail brush and black paint and added some cracks.

To make the niches for the skulls and gargoyle, use an ellipse template to draw the desired outline of the opening.

Once you've got your opening outlined, carefully cut it out with an xacto knife. I found it worked best to lightly score around the penciled outline, and then use the tip of the xacto in a sawing motion to cut through the cardboard. The tombstones are hollow, but there are strips of cardboard inside for support. I was able to just move those strips out of the way where I wanted the hole. Once I had the opening cut, I painted the inside black so it would be nice and dark.

The skulls and gargoyle are adhered with Apoxie Sculpt clay. I absolutely love that stuff. I was able to not only attach them, but to raise them up to the proper height to fit well in the niche. I ended up making a little frame around each niche to give them a more finished look. Here's the first of the gravestones. Is that nasty goblin trying to remove a stone on the frame?

The gargoyle bead in the second tombstone is the perfect addition to a proper gentleman's final resting place. The crow perched on this grave is also a bead, so it had a hole through its chest and back. I filled the hole with Apoxie Sculpt and painted it black. A little moss growing on the gravestones adds to the aged look.

And last but not least, there's the last resting place of a drama queen. Poor girl died relatively young. Someone has left her flowers, but I'm afraid those pesky goblins are thinking of stealing them.

Here they are all together. Happy Halloween!
Need supplies? Click here for a complete list.
Related Posts Plugin for WordPress, Blogger...