Craftster.org is always a fun place to be on April 1st. This year we celebrated April Fool's by going a little nutty. All the moderators made project involving nuts. There was an exfoliating soap, some votive candles made of peanut shells, lovely jewelry, and much more. Here's my project, entitled "Nutterflies Are Free".
Lovely butterflies in a desktop display, with a hopeful caterpillar crawling nearby. The plaque on the front reads, "reality has limits, imagination is boundless". Perfect, don't you think?
Here's a closeup of my "masterpiece".
Such fun!
Design team member of Alpha Stamps, lover of ephemera and junk.
Welcome! Grab a cold one, kick off your shoes, and have a look around.
Wednesday, April 2, 2014
Saturday, March 29, 2014
Summer Memory Mini Book
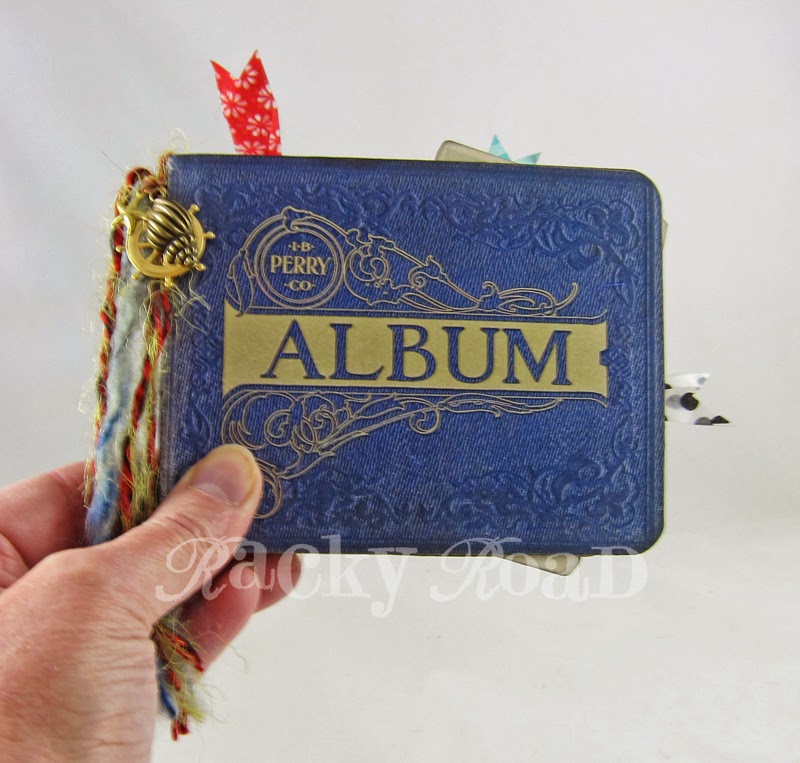
What's new this month at Alpha Stamps? Vintage albums with a beachy vibe! Here's a little souvenir album I created with all the fun new products. Hopefully it brings to mind someone's long ago summer fun memories.
The cover. The book is such a fatty that it needs clips to keep it closed. Thank goodness washi tape can make a plain black clip a little more fun! Can you believe that cover is from a collage sheet image, just glued to shirt cardboard? It looks like real leather!
All the inside pages of the album are made from 7Gypsies scrapbook papers. All splayed open:
I used a combination of collage sheets, vintage photos from my collection, fun little envelopes, and rubdown numbers. Here are the rest of the pages. I won't bother you with too much chatter about each one. I'll let most of them speak for themselves.
Tag removed:
A great old photo of two couples on vacation, and some tickets.
I love using the glassine envelopes. Hole reinforcements make a great grabby spot for some baker's twine so you can pull the tags out.
One more picture of the couples, Gus, Irene, Maddie, and Al. Those are their real names, they're written on the back of the photo.
This photo is from a collage sheet. The paperclips have washi tape flags on them.
Last page.
Wanna make a fun memory book like this one? For a list of where to find most of the supplies, click here.
The cover. The book is such a fatty that it needs clips to keep it closed. Thank goodness washi tape can make a plain black clip a little more fun! Can you believe that cover is from a collage sheet image, just glued to shirt cardboard? It looks like real leather!
I used a combination of collage sheets, vintage photos from my collection, fun little envelopes, and rubdown numbers. Here are the rest of the pages. I won't bother you with too much chatter about each one. I'll let most of them speak for themselves.
Tag removed:
A great old photo of two couples on vacation, and some tickets.
I love using the glassine envelopes. Hole reinforcements make a great grabby spot for some baker's twine so you can pull the tags out.
One more picture of the couples, Gus, Irene, Maddie, and Al. Those are their real names, they're written on the back of the photo.
This photo is from a collage sheet. The paperclips have washi tape flags on them.
Last page.
Labels:
Alpha Stamps,
beach,
book
Friday, March 28, 2014
Scary Toys with Hands
Just listed these two Scary Toys on Etsy:
This one might be waving hello
...although a friend of mine said it looked like it was drowning.
Whereas this one just wants to punch you.
Watch out for it!
Happy Friday! I'm looking forward to the weekend. Hope you have a great one.
This one might be waving hello
...although a friend of mine said it looked like it was drowning.
Whereas this one just wants to punch you.
Happy Friday! I'm looking forward to the weekend. Hope you have a great one.
Labels:
Etsy,
scary toys
Thursday, March 27, 2014
Scary Toys and Halloween
I took a little break from Etsy, but I've just reopened my shop, Racky Road! I'll be featuring all my scary toys for sale (including some new ones I just made), plus Halloween items, and eventually, Christmas. It'll take me a few days to enter everything in, but stop on by, I'd love to see you there.
Labels:
Etsy,
Halloween,
scary toys
Tuesday, March 11, 2014
Terribly Important Swap Stuff
I just participated in the Terribly Important SOB swap on Craftster.org recently. Everyone that participated was highly important indeed! Here's what I sent to my partner. First, a #1 keychain, put together with some Tim Holtz products and charms:
I've made a few new toys since last time I posted. Once I get them all photographed, I'll be putting most, if not all, of them in my Etsy shop. I've had a nice vacation from Etsy, but my craft room is starting to get crowded!
A tiny shrine with her favorite title, "The Ultimate Winner":
And lastly, a little toy.
It also contains her moniker, "The Ultimate Winner", but it's really designed to be a photo holder. My partner is pregnant with her first child, a son, and I thought this would be cute in a baby's room. Here it is with one of my old photos as an example:
Saturday, March 1, 2014
Corset Trading Cards and Storage Box
When I saw this month's new collage sheets from Alpha Stamps, featuring corsets, for some reason I thought of baseball cards. Wouldn't it be funny if young girls in Victorian times collected and traded corset cards? With that in mind, I designed a set of cards to look as though they had been handled and poured over, and perhaps traded with friends. This photo shows the fronts of four of the cards, and the back of one, plus a fancy box I made for storage. I used the same corset ad on the backs of all the cards.
Making the cards was fun. I started with cream colored card stock, cut it to ATC size (2 1/2" by 3 1/2"), and slightly rounded the corners. I dabbed the top with Antique Linen Distress Ink, and then roughed up the edges using a Paper Distresser. After I layered on the images from the collage sheets (plus a measuring tape and a number for each card), I bent corners, folded edges, and sanded down the images.
The finished cards. Not only do they look old, they actually feel old!
I felt they needed a special box for storage, so I decorated a 3" Chipboard Memory Box using a pretty striped paper, pieces of a doily, and some pearl garland. The top finial was made with an old toy wheel I had, plus a painted wooden ball. Some painted wooden finials made perfect feet.
A pretty little scene cut from scrapbook paper makes a nice surprise on the inside of the box. The cards fit the box nicely, if you store them at an angle. If you'd like a complete list of products used for this project, click here.
Corset trading cards: collect them! Keep them! Trade them with your friends!
Making the cards was fun. I started with cream colored card stock, cut it to ATC size (2 1/2" by 3 1/2"), and slightly rounded the corners. I dabbed the top with Antique Linen Distress Ink, and then roughed up the edges using a Paper Distresser. After I layered on the images from the collage sheets (plus a measuring tape and a number for each card), I bent corners, folded edges, and sanded down the images.
The finished cards. Not only do they look old, they actually feel old!
I felt they needed a special box for storage, so I decorated a 3" Chipboard Memory Box using a pretty striped paper, pieces of a doily, and some pearl garland. The top finial was made with an old toy wheel I had, plus a painted wooden ball. Some painted wooden finials made perfect feet.
A pretty little scene cut from scrapbook paper makes a nice surprise on the inside of the box. The cards fit the box nicely, if you store them at an angle. If you'd like a complete list of products used for this project, click here.
Corset trading cards: collect them! Keep them! Trade them with your friends!
Saturday, February 22, 2014
Odd Bird Toy
It's all about birds this month at Alpha Stamps! This month, we were given a bird shrine, and since I've been having so much fun making toys lately, I couldn't help but make this shrine into a toy as well. My goal was to make it look like a well-loved toy from years gone by; you know, something you'd pick up at an antique shop or, I guess, at a thrift store.
The shrine comes with a front and a back, a plastic disk for the window, and two pieces for the inside. I used both of the inside pieces of the shrine to make a deep niche, and added some mini bird eggs and some micro beads to achieve a snow-globe affect. On the outside, I covered the shrine with black and white polka-dotted paper and colored it with Copic markers. It was way too bright and new looking, so I sanded it down quite a bit, and then brushed on some Cognac colored ink to make it appear aged.
After gluing all the pieces together, I drilled a small hole in the back to insert the winding key. It may look like it, but this is not actually a working toy. I used two sizes of wheels, 3/4" and 1 1/4". I painted them black, and then added a little turquoise to the inside. Once the paint was dry, I sanded them down and added an axle. Dowels would work best for this, but I didn't have any at the time, and I was impatient. I used the handle of an old paintbrush that just happened to fit. Luckily for you (and me, now that I destroyed my only junky paintbrush handle!), Alpha Stamps carries the appropriate sized dowels to fit each sized wheel. The wheels are attached with some E6000 glue.
The eyes are bead caps, and I just had to add a little crown on her head. I love these little crowns. I need to stock up on some more! For a complete list of the supplies available at Alpha Stamps, click here.
Labels:
Alpha Stamps,
birds,
New toys
Subscribe to:
Posts (Atom)