Design team member of Alpha Stamps, lover of ephemera and junk.

Welcome! Grab a cold one, kick off your shoes, and have a look around.

Saturday, June 29, 2013

Fairy Lantern

I got a little black lantern from Alpha Stamps, and decided to alter it using a fun collage sheet designed by my very talented friend, Nichola Battilana.
Here's the lantern, before. Isn't it cute?
And after:
I painted white stripes with gesso, and filled the lantern with moss and faux flowers. The tiny fairies fit right in! (It was easiest to make this by removing the back panel of glass in the lantern.) I then took tiny triangles of paper and glued them onto thread to make colorful banners to string all around the top of the lantern and along the back.
Copic markers gave the white daisy ribbon coordinating centers. I sure love those markers!
I've known Nichola, creater of the fairy collage sheet, through Craftster for years. She does the most amazing magical work. If you get a chance, check out her blog, Pixie Hill. She made some fairy lanterns, too. I think it's funny that she also put a pennant banner on one of hers. Great minds, and all that.  

Wednesday, June 19, 2013

Big Top Tunnel Book

In my last post I featured a couple of peekaboo cards made with the chipboard frame set from Alpha Stamps. Here's what else I made with one of those sets: a fun little tunnel book using one of my favorite themes: the circus!

Here's a photo of the book when it's flat, just so you can get a good idea of its size. The frame set itself is 4" x 4". I added a little cardboard for the peak of the tent. 

The Tiny Circus and Circus Parade collage sheets are probably my favorites from Alpha Stamps. I used images from both of them, plus some striped Graphic 45 paper, for this project. 

Sadly, it's really difficult to photograph the depth of the book. I would guess it's about 2" wide when opened. You can just barely see the string of stars on a wire which hangs across the middle of the opening in the tent.

Here's the side view, where you can see the accordion folds and see the depth a bit better. There are about five layers of images, causing, as the sign proclaims, "controlled mayhem". I drew those juggling pins that are scattered along the bottom, using some Google images for reference. Now I want some old juggling pins. I found some real beauties on eBay!
Figuring out the logistics on how to make this tunnel book was a bit of a challenge, but lots of fun. I have one more set of those cards. I may have to do another.

Wednesday, June 5, 2013

Peekaboo Card Tutorial

How cute are the new Peekaboo cards from Alpha Stamps? This month the swap at Alpha Stamps is all about Peekaboo cards. They're so versatile! I made a couple of very different designs with my cards: a beach card and a spooky Halloween card. It may be early summer, but is it too early for Halloween? I think not! Here's how you can make your own.

For this card, cover the sides of both pieces of chipboard frame set with scrapbook paper, and then use a piece of paper tape on the left side for a hinge. You can't really see the tape on the Halloween card, but it is visible on the beach card below. On the outer section of the card (the piece with the hole in it) glue on a section of small white picket fence. The fence comes in an 18" long section, but it's easy to clip a section off with pliers. Trim the other three sides with black and white braid. Clip the tines off of two black brads and glue them on the corners. This will cover any fraying caused by cutting the braid.
Some black stitched leaf ribbon makes a nice spooky vine for the pumpkins. To adhere those pumpkins, carefully cut a few pumpkin pods in half (I used a box cutter) and glue them down with E6000. Find a good image of the moon, and paint the back of it black, as you will see it when the card is opened.

See how the inside of the card shows through that hole? I used an image from The Black Cat collage sheet, and to add a little spunk, I gave the cat some 3D cat eyes. Make sure, when you place your elements on the inside of the card, to pay special attention to what shows through the hole when the card is closed. Save a few surprises for when the card is opened.
Here's the inside of the card. See how the fence, some of the pumpkins and the back of the moon show through the hole? I love the surprise on the inside of what you can't see from the outside.

In case you're not feeling that Halloween vibe just yet, here's a card that's a little more seasonally appropriate: a fun day at the beach!
And, the inside:
Happy card making!

Monday, May 27, 2013

Tiny Goodies for Blythe Dolls

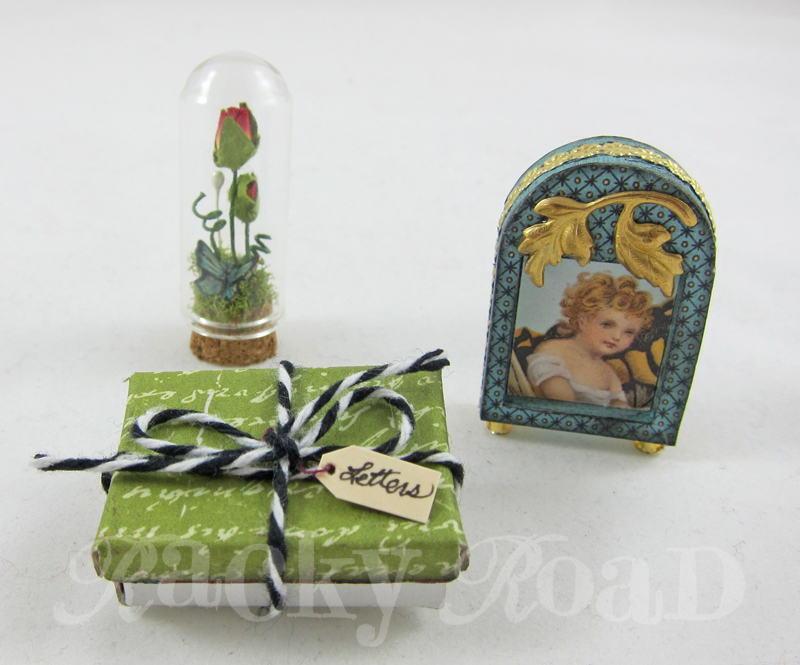
I just completed another Craftster swap. My partner loves Blythe dolls, and has several, so one thing I wanted to make for her was accessories for her girls. I made them a box of letters, a clock that reverses to a picture frame, and a tiny terrarium under glass:

Here's the box all tied up with a little tag (those Blythes are so organized!), and the back of the clock, showing the frame: 

And just because I was so happy about the way it turned out, a closeup of the terrarium. The butterfly was a brass charm that I painted with fingernail polish and a little black acrylic paint. I then bent the wings to make it look a little more real.

I'm pretty sure I'll be making more accessories for Blythe in the future! I don't own a Blythe, but it might be a fun addition to my Etsy shop.

Here's a photo of Bonnie, enjoying her new goods.


Wednesday, May 22, 2013

Something Fun

I've just returned from a long family vacation. We had such fun, but it's been forever since I had a chance to make anything! I've been working this week on items for a craft swap. I'm going to try to mail them out tomorrow, and I'll post them when my partner receives them.

Meanwhile, look at this fun thrift store find: it originally held a buttonholer part for a Singer sewing machine, but I'll use it for storage. Doesn't it look like something straight out of "The Jetsons"?

It's almost 12" across, and I kind of love it. 

Wednesday, May 1, 2013

Star Book Tutorial

Star books are such a great way to display atcs or photos, and they're not as difficult to make as you might think. Here's how to make a colorful 4 1/2" x 6" book like this one, perfect for spring-themed atcs or whatever you wish.

Supplies Needed
2 pieces of sturdy matboard: 4 1/2" x 6"
2 pieces of cover paper for matboard cover: 6" x 7 1/2"
Black pages, 7 pieces cardstock: 4 1/2" x 12"
Small red filler pages: 14 pieces of cardstock: 4 1/2" x 2 1/2"
Red pages, 7 pieces of cardstock: 4 1/2" x 9"
Cream pages, 7 pieces of cardstock: 6 1/2" x 8"
Beads for spine decoration (optional)
2 yards waxed linen thread
At least 2 feet of ribbon for closure
PVA glue
Glue Stick
Double Sided Tape
Tracing paper


Let's start with the cover. Using a glue stick, glue your matboard onto the wrong side of the cover paper you have chosen, and trim the corners as shown. Carefully fold the sides in and glue securely to the back of the cover. Decorate the covers any way you like. I used paper flowers and images from The Lovely Garden collage sheet from Alpha Stamps.


Now, let's fold the first of your pages: the black pages and the small red filler pages. Fold the black pages in half so that you have 7 folded sheets measuring 4 1/2" x 6". Fold the small red filler sheets so that you have 14 folded sheets that are 4 1/2" x 1 1/4". These are the pages that will actually be sewn, with the red papers inside the fold of the black page.

Make a template for your stitching out of tracing paper. Mark the top and bottom of the pages, and make four marks for the holes you will punch. The top and bottom holes (end holes) should be about 1/2" from the edge of the pages, and the two center holes should be about 1 1/2" from the edges. Use this template to punch holes in each of the seven nested signatures with an awl or needle punch. Each signature should have one black sheet, with two of the smaller red sheets nestled within.


Thread your waxed linen with two needles, one at each end. Take the first signature (one black page with two red pages inside) and thread the needles from the inside to the outside through the two center holes. Then cross the needles and thread them back through the center holes towards the inside of the signature. Bring each needle back to the outer spine of the signature through its closest end hole.

Now add the second signature. Thread the two needles through the corresponding end holes to the inside of the second signature from the outside spine, and pull the thread fairly snug. On the inside of this signature, thread each needle through its nearest center hole to the outside of the spine. On the 2nd, 4th, and 6th signature, add beads if desired. Thread them through one needle and then thread the other needle through the beads before going back through the center hole to the inside of the signature. Then, thread the needles back out through the end holes as before. Continue sewing each set of your seven signatures in this way. On the pages that don't have beads, just cross the threads before going back through the center holes.When you have added the last signature, you will end up with the needles on the inside of the pages in the center holes. Tie the threads off with a square knot. Whew! That was the most tedious part.

When the book is closed, you will have six sets of black pages that are back to back. Using a glue stick, carefully glue these six sets together, so that each set makes one page. Set the book under some weights to let it dry.

Meanwhile, fold your remaining pages. Fold the red pages in half so that you have seven 4 1/2" x 4 1/2" pages. Fold the cream pages in half for seven  6 1/2" x 4" pages. Fold the 6 1/2" side of the cream paper up two inches to make a pocket. This page should now be 4 1/2" x 4". If you wish, round the corners of the pocket with a corner punch. Then, using a thin doublestick tape, affix tape to the outside edges of the pockets where they will fold up. Attach double stick tape to the outside edges of all the red pages where they will affix to the black.


Attach the taped outside edge of each red page to the outside edge of a black page. Make sure the edges line up well. Press firmly to adhere. When all the red pages have been attached, go back and attach the outside edge of the cream pages to the edges of the red pages in the same manner.


Once all your pages are affixed, attach ribbons to the outer sides of your book block with double stick tape. Glue the covers to the book block, using PVA glue. Make sure that the covers are lined up and the edges are affixed well. Put the book under heavy weights, and allow that glue to dry!


Now you have a beautiful Star book with a beaded spine. Decorate the inside pages and fill it with your favorite little works of art.


You can change the dimensions of the cover and pages to make any size book. Here's one I made with triangular pockets and extra embellishments to hold "Comedians in B&W" atcs.


Monday, April 29, 2013

Language of Flowers ATCs

Alpha Stamps is hosting a Language of Flowers atc swap this month, so they asked the design team to create a few atcs. I am still having so much fun with the Little Darlings collage sheet that I decided to use a couple of the kids for the cards. Party hats, butterfly wings, and flowers. Everyone's happy, with the exception of that poor boy on the right with his sad tale of woe. Am I a bad person because he makes me laugh? Probably.

I created a Star book to display these cards. On Wednesday, I'll publish it along with a full tutorial. Come back and see me then!
Related Posts Plugin for WordPress, Blogger...