Design team member of Alpha Stamps, lover of ephemera and junk.

Welcome! Grab a cold one, kick off your shoes, and have a look around.
Showing posts with label cosmo. Show all posts

Saturday, March 20, 2021

Cheers, Marie! Altered Altoids Tin

I'm not sure if anyone was drinking Cosmopolitans back in Marie Antionnette's day, but I'm pretty sure that if they were, Marie would have been a huge Cosmo fan. I know I am! In fact, we've made a dedicated Cosmo party shelf in our kitchen, where our martini glasses, the shaker, and a little container of  rim sugar are kept. It also includes some Cosmo artwork; some by me, some by my friends. When I got this month's kit from Alpha Stamps, all the pink reminded me of that shelf, and I decided to let Marie enjoy a Cosmo, at long last. Cheers, Marie!

I removed the cover of the tin, and covered the inside with some gorgeous pink floral paper, plus some black and white harlequin paper from my stash. I found a gold dollhouse frame which was the perfect size to frame a quote featured on some of that kit paper, which reads, "Life is nothing without passion". Ain't that the truth?

The outsides of the tin are also covered harlequin paper, and then adorned with some gold Dresden trim. A string of little red beads sits atop the rim. In the photo below, you can see that Marie's yellow overdress overlaps her pink skirt a bit. I used two French Ballet Costumes collage sheets to achieve this look. I cut the yellow overdress at the "v" of the bodice and glued it only at the waistline of a full image of Marie. A couple of foam tape squares were inserted between the overdress and the skirt to separate the layers. Marie is adhered to the tin with 4 layers of foam tape, so she really stands out.


A gold crown brad was the perfect little topper for the tin. The prongs were easy to fold flat into the base of the crown. A large flat-backed crystal fit perfectly inside the crown and hid the folded prongs. At the angle of the next photo, you can see the stacks of foam tape helping keep Marie front and center.
 

 A few tips on construction:

The Marie from the collage sheet has her arms spread out as if she is dancing. It's a beautiful pose, but it's not conducive to enjoying a drink, nor did her arms allow her to fit inside the tin. Here's how to change her position. In the top half of the image below, there are two identical images of Marie. The left image is the one that will be used in the tin. Her right arm is cut off at the elbow, and her left arm is cut at the shoulder. The duplicate image at the right has already had the overskirt removed. Both its arms are cut at the shoulder. Her wand is removed from the right hand, and her hand is removed from the left arm. When her left arm is hanging down, that hand is not in the correct position. Therefore, I used another image from the same collage sheet, and Marie was given a hand transplant.  When you position this new left arm on Marie, there is a little gap at the shoulder. It's easy to fill that in with a little piece of one of the unused arms. You'll just have to trim it to fit.


The beads aren't tough to adhere to the edge of the tin, but they do require some patience. You will have to really babysit them while the glue dries. It's best to glue only 2 or 3 inches at a time. I use Aleene's Tacky glue. I put it on fairly goopy, but it's invisible when it dries.

While it is drying, you'll need to hold it in place. Those beads are going to want to fall off the lip of that tin. One thing that helped me keep my sanity during this step was to lean the side of the tin up against a flat surface. You'll still have to keep checking it until it's fully dry, but it helps keep the beads in place. Make sure you stop and start your beaded strand in on one of the sides, not at the corners.

For a complete list of supplies, click here! And now, how about a little bonus photo of that Cosmo shelf? Yes, it has party lights.

Saturday, March 21, 2020

Five Shrines

I love the bright colors of Mexican folk art, and I love making little shrines, so these little matchbox shrine facades that just came out at Alpha Stamps make me so happy. For the past week or two, I have been busy making shrines. All the bright colors! The fronts are chipboard, while the little niches are matchboxes. (I have so many extra matches now!)

The first shrine I did was all about Cosmopolitan martinis, so I painted the exterior a bright pink with a red border. It's embellished with polymer clay limes and pink leaves, and the niche features a miniature Cosmo drink (a tutorial for making the tiny Cosmo can be found here). The small metal saint is painted in Cosmo colors, and she's offering up a slice of lime! This shrine will be the perfect addition to the Cosmo shelf in my kitchen. 

My next shrine was made before the Corona virus threat got real, but in light of all the news of the hour, I'm calling this one the "I See Coronavirus" shrine. I used a small loteria card for the niche, and a bright red eyeball at the top. The eye sits on a round filigree setting. I painted the tiny flowers on the filigree to match the colors of the shrine border. The perfect black lines are Dazzles Thin Line stickers.


On this next shrine, I first painted the facade a bright turquoise and then searching for an image to feature in the niche. I found the perfect one on the Loteria Matchbox Shrines collage sheet. The saint was painted in the same light turquoise used for the interior of the niche. A bronze metal flower makes the perfect halo for the saint. Metal roses on the sides, along with polymer clay leaves give a bright pop of color.

Oh no, it's the devil! This is another shrine where I chose the color first, and then the image. The flames were painted on chipboard, then cut out and glued to the front. I could not resist making a few tiny demons suffer in those flames.

This image of the Madonna is just so beautiful. It was the first thing I chose for this shrine. I then picked the paint colors to coordinate with the image. Gold Dresden trim and halos work perfectly with this heavenly theme.

All these bright colors look so fun together. I think I'm going to need another set of facades so I can make more.
For a list of supplies, click here.


Wednesday, December 5, 2018

"He Sees You When You're Drinking"

I'm so in love with some of the tags on the new Alpha Stamps "Snarky Christmas Tags", that I finally quit procrastinating on altering a vintage ornament box I've had for a couple of years. A turquoise background of happy Santas from the "Jingle" 6"x6" paper pad was the perfect background for the last of my turquoise plastic deer.

I couldn't help but put a tiny wine bottle up in that left hand corner and add a lovely Cosmopolitan inside the box, for that deer. He no doubt needs a little warmth, standing on that snow covered ground.

A thin line of Stickles (glitter in a tube) sets off the opening of the box. It wasn't hard to make that Cosmo using a miniature cocktail glass, a polymer clay lime cane, and a sugar rim made from glitter. A tiny log makes the perfect table. If you are in need of a tiny Cosmo in your life, click here for a post that contains a tutorial.

One more photo for scale. I have to wonder: just how many of these boxes of ornaments did one have to buy to decorate their tree? No matter, I'm in love with their tiny selves. I have one more left to alter. No telling when I'll finally get around to that!
For a complete list of supplies, click here.

Saturday, July 16, 2016

Ticky Tacky Tiki

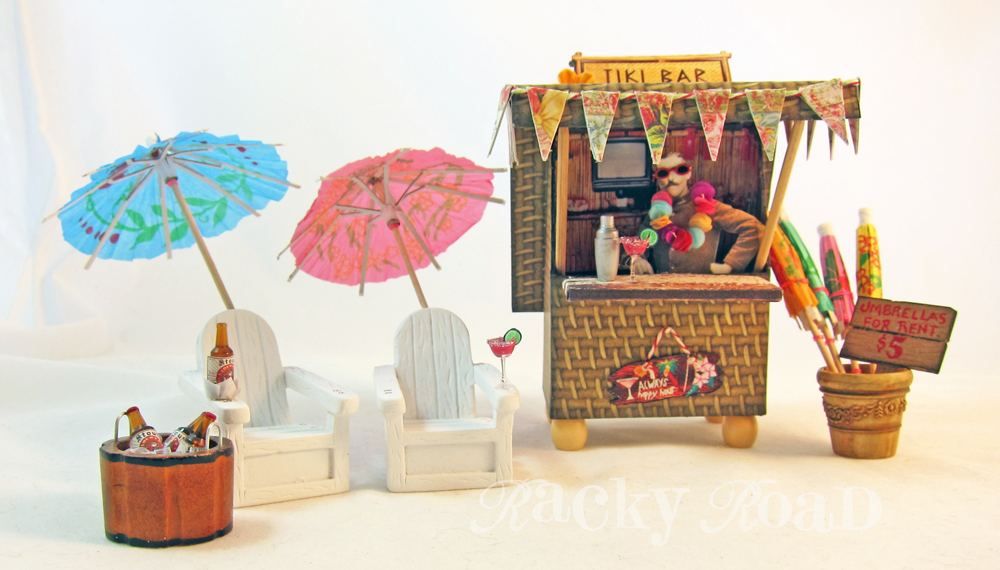
What's better than being at the beach and coming up on a little Tiki bar? Why, nothing! Last time I was near the shore, I happened upon this inviting establishment.

OK, full disclosure: this is actually a miniature Tiki bar, and it was photographed in my back yard. I only wish I had come up on it at the beach! I made this little bar using one of the houses from the set I featured in this post. I only adhered one side of the roof, and then supported the other side with a couple of bamboo skewers, creating a little kiosk. To create the bar, I wrapped a thick piece of cardboard with a piece of weathered wood-look scrapbook paper and attached it under the window with hot glue.

Hey, it looks like we're in luck- the bartender is serving up frosty Cosmos, my all-time favorite adult beverage. He's even gone so far as to sugar the rim and add a nice slice of lime on the side. Mmmm! The little sign hanging under the bar states "Always happy hour". I'm telling you: this is my kind of place! 

The bartender looks a little stern, but he's really a fun guy. How festive is that lei he's wearing? It was pretty simple to make; I just used a hole punch to cut several circles from tissue paper, and then poked a threaded needle through small stacks of the punched circles. I tied a little knot between colors to make them look more like individual flowers. It helped to tape down an end while making the lei. Want to know how to make a mini Cosmo? I explained how I did that at the bottom of this post.

Doesn't that Cosmo look tempting? I'll have one, please!

If you don't like Cosmos, perhaps a nice bucket of beer will suit you better. Umbrellas rent for only $5, so grab one, pull up a beach chair, and come sit next to me.

Here's a nice spot. The beer's on ice, so it's nice and cold. That's my Cosmo on the right, though, so hands off!

One more view before we go. There are so many awesome miniatures that really make this project fun, from the tiny martini shaker to the bucket and tiny ice cubes for the beer. For a complete list of supplies I used, click here.
Cheers!

Saturday, July 2, 2016

Cabana, Cabana, Cosmo!

It's summertime at Alpha Stamps! Not only do I have photos of tiny beach cabanas, there's a sneak peak tutorial and preview of my next project at the end of this post.

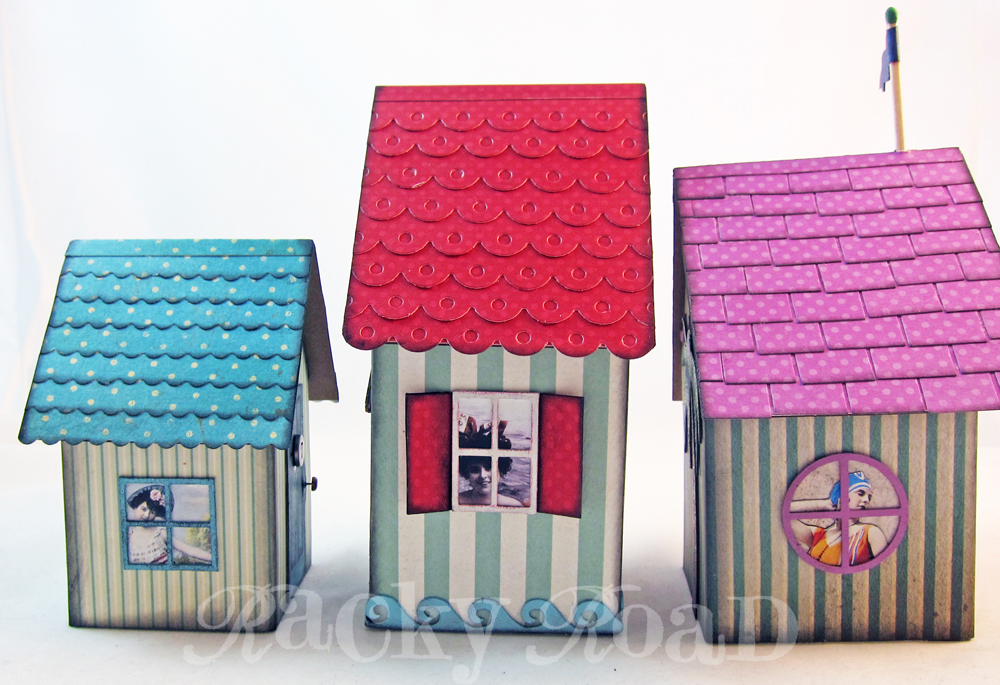
Summer means hitting the beach, but where will you change into your suit? If you're lucky, there will be cabanas nearby so you can hit the beach in style. Here are three miniature beachy cabanas, ready when you are (if you're really teeny tiny, that is.) Can you see the bather behind the louvered door in the center house? She's just about ready for her debut.

These chipboard houses come flat, but are simple to assemble. Just fold on the score lines, cover the sides with paper or paint, and glue together with white glue. I used a strong double stick tape to attach the roofs.

Here's the largest cabana. The first bather is just getting ready to exit, while her friend peeks out the window on the side. For the roof on this cabana, I ran some scrapbook paper through a die cutter and layered the strips to look like shingles.

Number 17: Seahorse Inn. A bright gold seahorse on the door will help you to locate this cabana. On the roof, shingles were cut out separately, edges inked, and then applied one by one for a layered look.

 Here's the smallest of the cabanas, number 7. Scalloped scissors made the edges of this roof.

I had fun photographing these houses on sand, but to really get the details, I put them in my photo studio.

I would be remiss not to show you some of the cuties looking out the windows! They are all ready for some fun in the sun!

Seaside details on the back! The cardboard cutouts can be used in many ways. The wave and the draped edge were painted, while colored pencils were used for the palm trees, umbrella, shell, and life preserver.

For a complete list of supplies to make these beach cabanas, click here.

And now for the sneak peek tutorial. My next project was in need of some sort of summery beverage, so naturally I picked my favorite: Cosmopolitans! Here's how I took plain little glasses and made Cosmos.

First off, the glass itself. Look how tiny!

I added the pink color of the Cosmo itself using a mixture of Liquitex Gloss Medium and a little paint. Each glass just needed a drop or two.

Sugar the rim! I love to use Stirrings Cosmopolitan Rimmer on our real Cosmos; it's pink and tasty and fun. I used a little pink glitter to rim the tiny drinks. Use a toothpick to put a thin bead of tacky glue around the rim and then either sprinkle the glitter on, or carefully press the top of the glass into a little pile glitter. I did both, for better coverage. When I did this first round of glasses, I put the limes on before sugaring the rims, but if I had to do it again, I'd add the limes after the glass is sugared.

Every Cosmo needs some lime! This lime cane is the perfect size for a tiny beverage. Simply cut a thin slice with a sharp exacto blade, and take out a small pie-shaped wedge so the slice will fit nicely on the rim of your glass. If the glue from your sugar is still wet, it may be enough to hold the lime on. You can also use a toothpick to put a tiny bead of glue on the inside edges of the lime where you removed the wedge.

Miniscule Cosmos are served! But where?!? Stay tuned...
You can purchase some mini Cosmo supplies here.


Related Posts Plugin for WordPress, Blogger...