Design team member of Alpha Stamps, lover of ephemera and junk.

Welcome! Grab a cold one, kick off your shoes, and have a look around.
Showing posts with label fairy. Show all posts

Saturday, February 20, 2021

Five Tiny Tins: Fairies, Mary, and Alice

How sweet are these little 1" by 2" tins? I made a couple shrines with the ones I had, and then begged Leslie at Alpha Stamps to send me at least 5 more. The tins come with a sliding lid, and I still plan to try a design incorporating the lid, but for now: tiny shrines. I started out making little fairy shrines. The backs of the tins are covered in scrapbook paper. Tiny wings from a collage sheet are added to create fairies, who dance on beds of moss amongst the smallest of mushrooms, made from floral stamens.

Here's a quick photo for scale. Adorable! 


All the fairies are attached with small pieces of foam tape to add dimension. This first fairy is friends with a lucky ladybug. Her crown is made from a sequin star, cut in half and glued together points up. For link to the supplies used for this tin, click here. A full list of supplies for all the tins is at the end of this post. 


Several of the tins have half-round toppers on them. I used a wide pair of pliers to gently bend round medallions in half. The pieces I used were very easy to bend. Just grip the medallion where you want to bend it, and push to fold. The flat side can then be glued to the top of the tin with E6000 glue. 


The ballerina fairy has caught a falling star. Make a wish! The word "wish" was cut from an old dictionary. I found a picture of a tiny flower and cut out two petals to glue on her back for wings. Supplies can be found here

 
I didn't want to use only half of the star for this next shrine, so I used some Apoxie Sculpt to adhere it to the top of the tin. Extra sequin stars add a little sparkle. This gentleman's supplies can be found here
 
 
Of course I also needed to make a shrine for Mary. After gluing the paper to the back of the tin, I covered the sides with beautiful glass glitter, plus some more sequin stars. I used two images of Mary for this shrine; the entire image is glued to the back of the tin, and then Mary alone was cut from the second image, and stuck on with foam tape. I did not like the way the medallion on top of this tin had a hole in it (see picture above where it's getting bent with pliers) so I added a metal rose to cover the hole. Mary deserves a little extra bling anyway. Here's your supply link

 
I have had this adorable White Rabbit charm (from Alice in Wonderland) for a while. I finally found the perfect home for him! I removed his hanging loop with wire snippers. Using some Alice themed scrapbook paper, I covered the back and the sides of this tin. Then all that was needed was a little moss, some polymer clay playing cards, and a tiny teacup on the top. The heart was painted on with a small detail brush and acrylic paints. Supplies for this tin (including that rabbit!) can be found here.
 
 
I really enjoyed making these little tins. The projects were quick and relatively easy. Placing the stamen mushrooms was a little tricky, but once you cut them to the desired height and run the stems through some glue, they stick easily. I often used a toothpick to straighten them up once they were inserted into the moss; it can be difficult to stick a finger in such a little space! Finished tins can be hung up with removable mounting putty or glued to small magnets. They don't stand on their own, but it would be easy to mount them on a medallion or small block of wood if you want to display them on a flat surface.
 
For a list of supplies used on all the tiny tins, click here

Friday, July 13, 2018

Scary Fairy for Halloween

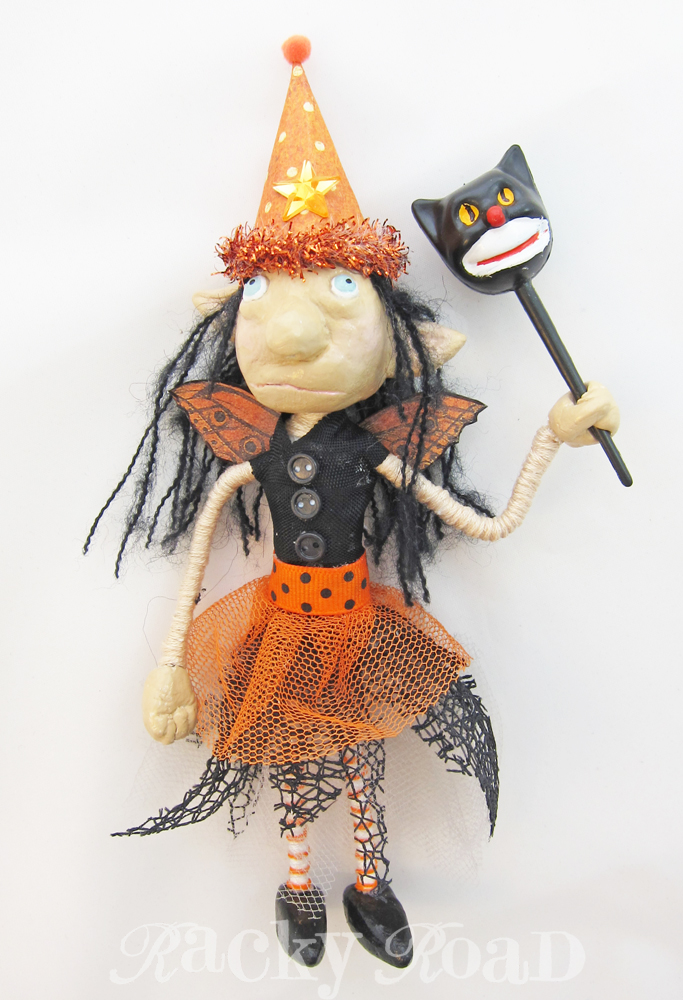
Just did another swap on Craftster.org, and my partner had the cutest fairies on her Pinterest board. Since the swap was "Halloween in June", I thought I'd attempt a similar fairy, dressed for Halloween.

Her face, hands and feet are paperclay, and her body and arms are made with pipe cleaners. She's holding a scepter that's actually a vintage cupcake pick. But that face!

Her legs are a little spindly, so she demanded a chair. Luckily, I had one that was the perfect size.

She loves to lounge in that chair.

She's a wee thing, and hard to catch, but if you're very, very patient...
Gotcha!!

Wednesday, August 2, 2017

Flashback: Fairy Godmother

I did this several years ago for a swap on Craftster.org. I found the most perfect photo of a fairy godmother (look at her! I'm sure that's who she was!) in an antique mall, and crowned her with a cigar band crown. She proclaims, as any good godmother would: "Anything you wish, sweetie!"

This art is mounted on a 4" by 4" board. There are lots of advantages to being married to a woodworker: I get all the scraps!

I hope this godmother has performed her duties well in her new home.

Wednesday, March 16, 2016

Fairy Garden

I've been wanting to make a fairy garden forever, and now that Alpha Stamps is carrying all sorts of wonderful miniatures, I finally got my chance!

I took a bright blue pot that was currently only hosting dead annuals (so sad!), and replanted it with tiny plants to create a sweet little garden. You can tell it's early spring, because my grass has only just begun to green up.

I made a little bunting for the garden, because fairies love festive things. The bunting is made from scrapbook paper, cut into little flags and strung with baker's twine across two painted bamboo skewers. It's a nice little entrance to the fenced in sitting area of the garden.

Tiny gardens are pretty popular right now, and my local nursery even had a table full of miniature plants specifically for fairy gardens. There was lots to choose from, including some that can look like bushes, and several varieties of tiny trees. My "tree" is a small boxwood.  The grass is a lovely moss that will eventually bloom with tiny white flowers.

What really makes the garden fun is the adorable accessories, scaled perfectly for a tiny fairy. This garden contains a white picket fence, a stepping stone path, several clay pots, and a bench for resting (someone's been doing yard work; there are clippers and a watering sitting on that bench).

Two of the pots, the one with pink flowers and the hanging pot, contain paper flowers and a little bit of moss. The large pot on the right is filled with some cuttings from a butterfly bush. I may go back and purchase another tiny plant to actually plant in there. I'm not sure you could have a real plant in the hanging pot; it's so tiny! I made the shepherd's hook with a piece of wire: just bend it into shape.


Here's a bit of aerial view. Can you see the tiny porcupine hiding near the pink roses on the right? He is the cutest! Here's a closeup:
  
Because the flowers and bunting are paper, and the accessories are small and not fastened down in any way, this garden will live on my covered porch where it will be protected from rain and leaf blowers. Hopefully the fairies will be able to find it and will visit often! 

Alpha Stamps has oodles of great miniatures now. For a list of supplies I used for this project, click here, or click here for a huge list of fairy garden supplies.

Monday, May 25, 2015

Fairies Three

I had some pegs left over from my last project; tiny little things in dresses. I decided to make a little trio of fairy queens with them. Have I mentioned before how much I love those wee crowns? I distressed their clothing a bit, because everyone knows fairies are hard workers. Each fairy measures 1 1/2" tall, including her little crown.

Not sure what the two on the right will do for you, but I'm pretty sure the one in the blue dress with the apron will wash the dishes for you if you ask nicely.

Saturday, June 29, 2013

Fairy Lantern

I got a little black lantern from Alpha Stamps, and decided to alter it using a fun collage sheet designed by my very talented friend, Nichola Battilana.
Here's the lantern, before. Isn't it cute?
And after:
I painted white stripes with gesso, and filled the lantern with moss and faux flowers. The tiny fairies fit right in! (It was easiest to make this by removing the back panel of glass in the lantern.) I then took tiny triangles of paper and glued them onto thread to make colorful banners to string all around the top of the lantern and along the back.
Copic markers gave the white daisy ribbon coordinating centers. I sure love those markers!
I've known Nichola, creater of the fairy collage sheet, through Craftster for years. She does the most amazing magical work. If you get a chance, check out her blog, Pixie Hill. She made some fairy lanterns, too. I think it's funny that she also put a pennant banner on one of hers. Great minds, and all that.  

Related Posts Plugin for WordPress, Blogger...