Design team member of Alpha Stamps, lover of ephemera and junk.

Welcome! Grab a cold one, kick off your shoes, and have a look around.
Showing posts with label Craftster. Show all posts

Wednesday, October 2, 2019

Pink Flamingos!

I recently participated in an altered tin swap on Craftster.org. My partner listed a few themes she would like, and I thought it would be fun to do pink flamingos. I picked some fun papers and some fun trims and here's what I whipped up.

I found the tiny flamingos on etsy. The were solid pink, so I added a little paint to make them more detailed. I couldn't resist adding glitter around the edge of the tin.

The grass came from a little square of astroturf I've had forever. I just knew that would come in handy some day. And that trim! That and the glitter just add to the kitschy goodness. The stand and the finial were painted and then glazed to make them shiny.

Some kitschy paper on the back, and done!

Friday, July 13, 2018

Scary Fairy for Halloween

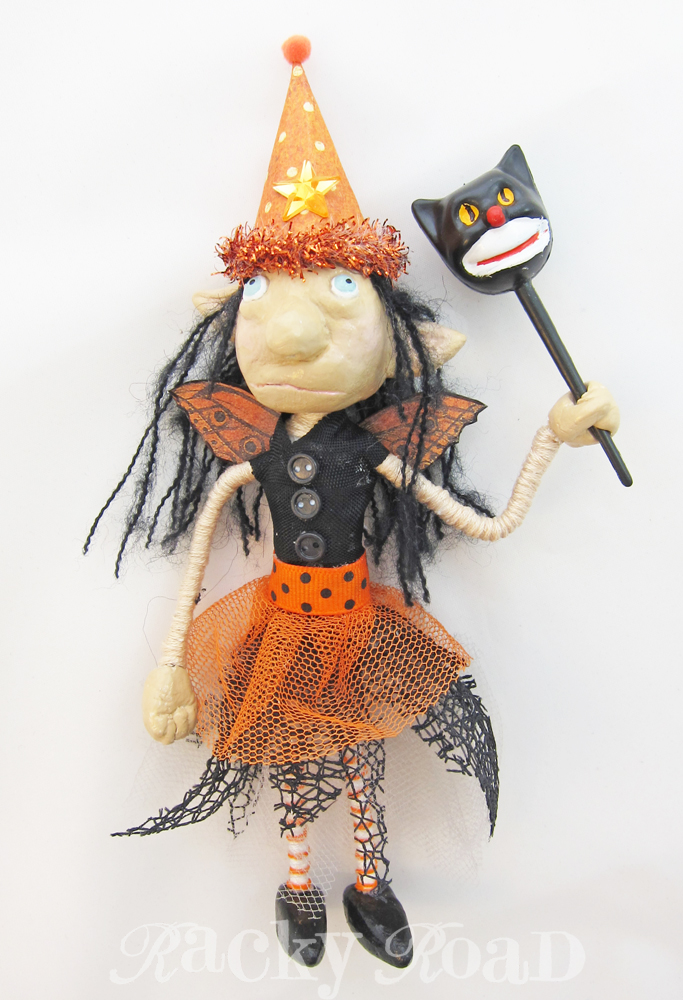
Just did another swap on Craftster.org, and my partner had the cutest fairies on her Pinterest board. Since the swap was "Halloween in June", I thought I'd attempt a similar fairy, dressed for Halloween.

Her face, hands and feet are paperclay, and her body and arms are made with pipe cleaners. She's holding a scepter that's actually a vintage cupcake pick. But that face!

Her legs are a little spindly, so she demanded a chair. Luckily, I had one that was the perfect size.

She loves to lounge in that chair.

She's a wee thing, and hard to catch, but if you're very, very patient...
Gotcha!!

Saturday, September 9, 2017

Halloween Cat Bat

Here's a little paper clay cat bat I made for the Vintage Halloween swap on Craftster. I don't often work with clay, so each time I try, it's a real adventure. He stands about 6" tall, and is dressed to go trick or treating. To help him stand, I bent a wire hanger into a U shape, turned it upside down, and built his body onto the wire with the two ends of the U becoming his legs.

The open polka dots on his costume were the result of a happy accident. When I first painted them, I wasn't happy with the color, so I attempted to wipe them off. They had already partially dried, so I was left with a little ring of color that I happened to like. I did the rest of the dots in that same way: putting dots in a small area, and then wiping out the centers. Once he was all painted, I used some ink to dirty him up, and then painted him with glaze to make him shiny.  

My partner in the swap said she liked a bit of humor, so oops! cat bat has lost a button and his little rear end is exposed.

Ready for my close up, Mr. DeMille.


Wednesday, September 30, 2015

Halloween Peg Doll with Boo Blocks

One of my favorite swaps on Craftster this time of year is the One Tiny Thing October Holiday swap. My partner mentioned she loves peg dolls, so I decided to make her a couple, along with some little Boo blocks. The only rule of the OTT swap is that your swap item has to be under 4". These blocks are 3/4" square, and the little cat is 1" tall, for reference. Depending on your monitor, you're probably seeing them actual size.

One thing I thought would be fun is that they can be arranged in many different ways. I hope my the recipient enjoys playing with them!


Wednesday, August 19, 2015

Black Cat

My favorite swaps to do on Craftster are always the Halloween swaps, and especially the Vintage Halloween swap. I can't resist doing those just about every year. Here's what I made for my swap partner this year. It's about 8" tall, made from paperclay on a foil armature. The star stand is the bottom of a paper maché box.
 

My partner mentioned on the signup form that she like black cats, bats, and pumpkins, so I got in all three. The ruffle around his neck was originally white, so I colored it with a Copic marker.

The back:

And a little closeup of his face, just for fun.

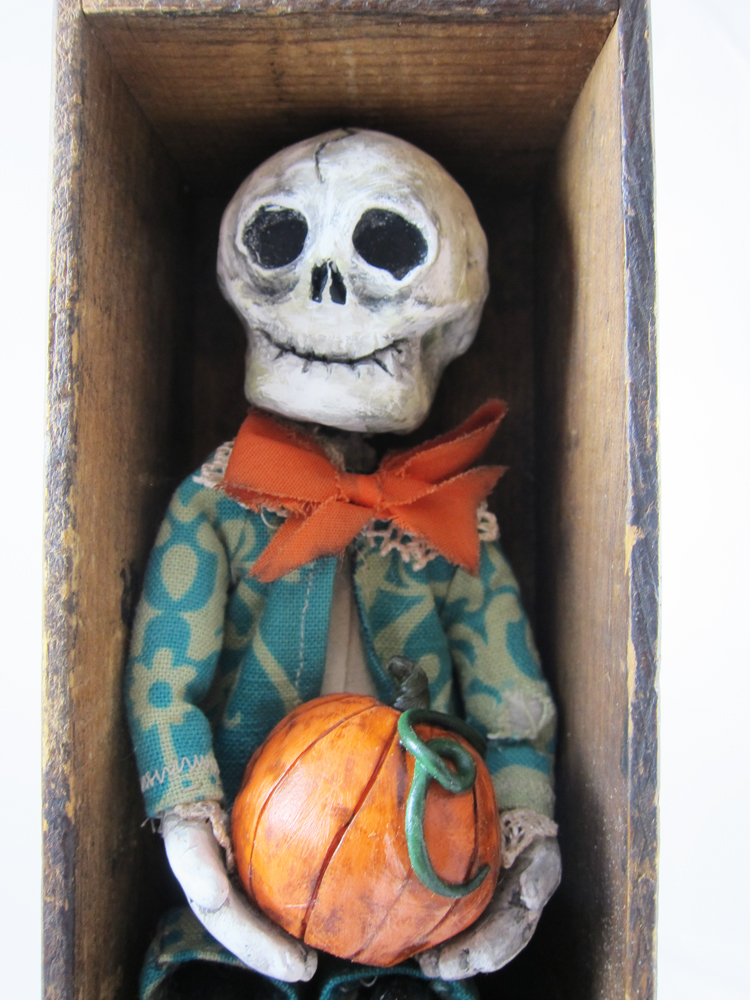
Want to see what my partner sent to me? This awesome seated skeleton, nestled in an old cheese box:

Detail:

That pretty much sums up why I love the Vintage Halloween swap over on Craftster!

Sunday, October 12, 2014

Halloween Scary Toy

It's been a while since I've made a Scary Toy, but I just participated in a Craftster swap and my partner mentioned that she really liked the toys I've done in the past. Since the swap was for "one tiny October thing", I decided to make her a Halloween themed toy. Here's what I sent her:


I guess you could say it's sort of a modified batmobile. One of the rules of the swap was that items had to be no more that 4" in any direction. The toy shown above is actually the second toy I made. The first was just a little large. I'm a rule follower! Here's the bigger toy:

The back has a "vintage" bat wings label on it. 
I popped this one up for sale in my etsy shop with the rest of my Halloween things.  Spooky!

Monday, September 22, 2014

Couple of Kitties

I just did a swap with a good friend of mine on Craftster. She wanted some pet portraits; I asked for a blanket to have on my screened in porch for cool evenings.

Here are her kitties:

And here's the gorgeous afghan she sent in return. Look how great it looks with the pillows! Awesome swap!

Thursday, August 14, 2014

Finn, Accomplished Bird Boy

A while back, a partner in a Craftster swap sent me some crocheted flowers and ceramic bird heads and leaves that she made.  She thought I might enjoy playing with them, and she was correct! The other day I was procrastinating (while supposedly working on a different project), and I started fiddling around with the things she sent and a vintage block, and somehow, Finn was born.

Doesn't the crocheted flower make the perfect ruffly collar? I was going to give Finn a party hat, using the lace for a trim, but when I cut the lace to size, it struck me that the lace made a perfect crown.

The head, wings and doll feet were affixed with Apoxie Sculpt. It makes the perfect little pantaloons.
 Stand tall, Finn!

Saturday, April 12, 2014

Luck of the Irish: A Leprechaun

I did a swap with a friend on Craftster, and one thing she said she'd really like is something Irish.  I saw she had some cute leprechauns posted on Pinterest, and thought it would be fun to try and make her one. I am not a clay person, but I had some paper clay and really wanted to give it a shot. I know a lot of people use foil as the bases for clay things, but for the shape of this guy, I used a plastic Easter egg. The egg was a nice smooth surface to work on. If I were to do it again, I'd glue it shut before working with it, because for a while there, it was popping open and that was a bit frustrating, to say the least.

So here he is, with his lovely egg-shaped figure. I used inks to age him and glaze to make him shiny.

My daughter found the rusty shamrock years ago. It's the perfect thing for him to hold, and really helped me deal with the question of what to do with his arms.

Because he was formed over an egg, he didn't sit well at all, until I gave him a bit of a bum.

Here's a closeup of his freckly face.

Wednesday, April 2, 2014

A Litte Foolery

Craftster.org is always a fun place to be on April 1st. This year we celebrated April Fool's by going a little nutty. All the moderators made project involving nuts. There was an exfoliating soap, some votive candles made of peanut shells, lovely jewelry, and much more. Here's my project, entitled "Nutterflies Are Free".

Lovely butterflies in a desktop display, with a hopeful caterpillar crawling nearby. The plaque on the front reads, "reality has limits, imagination is boundless". Perfect, don't you think?

Here's a closeup of my "masterpiece".

Such fun!

Tuesday, March 11, 2014

Terribly Important Swap Stuff

I just participated in the Terribly Important SOB swap on Craftster.org recently. Everyone that participated was highly important indeed! Here's what I sent to my partner. First, a #1 keychain, put together with some Tim Holtz products and charms:

A tiny shrine with her favorite title, "The Ultimate Winner":

And lastly, a little toy.

It also contains her moniker, "The Ultimate Winner", but it's really designed to be a photo holder. My partner is pregnant with her first child, a son, and I thought this would be cute in a baby's room. Here it is with one of my old photos as an example:
 
I've made a few new toys since last time I posted. Once I get them all photographed, I'll be putting most, if not all, of them in my Etsy shop. I've had a nice vacation from Etsy, but my craft room is starting to get crowded!


Thursday, January 16, 2014

Artist Trading Block: Life Is Good

I'm currently co-hosting an Artist Trading Block swap on Craftster, and my partner just received the block I sent her. She told me that some of her favorite colors are red and turquoise (love!), and that she collected vintage games. I went through my stash and found as many fun game pieces as I could, to use in her block. Here's what I came up with:

I've had these mini alphabet bottlecaps for ages. I'm so glad I finally found the perfect use for them! The top finial is a gamepiece resting on a domino. The "r" on the gear is her initial.
Fun!

Sunday, August 4, 2013

Happy Birthday, Craftster.org!

This month, Craftster.org is turning 10! To celebrate this momentous occasion, they're holding a "Tin for Ten" craft contest. Of course my tin had to be an altered Altoids tin.

I wanted it to be festive and fun and full of Craftster-y goodness. Here's what I came up with: a sweet little girl who's not afraid to be a little silly every now and then, along with her little dog, who never dreamed that anyone who is a fan of Craftster may just be inspired to dress up a pup in some crazy costume, just for the fun of it.

Stars for all the wonderful, inspirational people I've met through the site, and a balloon celebrating the 10 years of fun Craftster has provided. It was not easy tying that tiny bow around the neck of the balloon!

And last but not least, some bright bulbs to represent all the wonderful and creative ideas that Craftster members have shared.
If you're crafty, or want to be, go check check out Craftster. You'll be amazed at all the wonderful projects you'll find, many with tutorials.

Happy birthday, Craftster, and many more!

Thursday, April 25, 2013

Playing Around With Spellbinders' Media Mixáge Line

One of the perks of my job as a contractor for Craftster.org is that occasionally some of our wonderful sponsors send me products to try out. I love that! Recently, Spellbinders sent me products from their new line, Media Mixáge, which is tailored for the mixed media artist. Look at the goodies they sent! There's the new Artisan X-plorer Machine, a paper pack, some dies, texture plates, ICE resin, and round bezels and bezel dies. The wonderful thing about this line is that the dies cut shapes that fit exactly into the bezels. No awkward edges or ill fitting pieces here.

This was my first project using the largest bezel, which is about 2 1/4" across. I filled all these bezels with resin after adding the art and other elements.

Then, I got frisky and used a pig image from their paper pack. I added a little tutu and the words "oink (oink)" cut from an old dictionary. I love the little rubber pig at the top. I glued some magnets to the back of this so I can keep it on my fridge. You know, as a reminder: only one pig per household!

For my last (and favorite) project, I finally tackled the smallest of the bezels. I used a bee image from some Graphic 45 paper, some glitter, and a foam dot to raise the image of the bee and give the pendant some dimension. The bee charm is from Alpha Stamps.

Spellbinders sells packages of five of the smaller sized bezels. They also have them in other shapes, like hearts, triangles, and squares. I'm definitely going to have to make more of these for gifts for this Christmas. Thanks again, Spellbinders! To read more about how I made each of these projects, click here to go to the Craftster blog.

Saturday, April 13, 2013

The Doubtful Guest

I love the works of Edward Gorey. I just participated in a Gorey swap on Craftster.org. It was harder than I thought it would be to think of things to make. I didn't want to try to do illustrations like his; he's definitely one of a kind. I finally settled on trying to recreate The Doubtful Guest, an interesting little fellow that popped up one day and unexpectedly moved in with family, creating chaos and discomfort. I made my doubtful guest out of paperclay. He's a little fatter than the original, but maybe that's because he made himself at home in the pantry and fridge.

Instead of trying to paint the texture from the drawing, I drew on the figure with a Sharpie. Actually, a couple of Sharpies; they tend to dry out and die fairly quickly when drawing on paperclay. I was lucky enough to have some black and white striped fabric that was perfect for his scarf. It's even got enough body to it to look like it's flowing out behind him. A painted trinket box from Michaels is the base. I really love the stark black and white: just like a Gorey illustration!

I don't work much with clay at all, but I am pretty happy with this Doubtful Guest. I hope my swap partner liked him as well. 
 
Related Posts Plugin for WordPress, Blogger...