Design team member of Alpha Stamps, lover of ephemera and junk.

Welcome! Grab a cold one, kick off your shoes, and have a look around.
Showing posts with label altered. Show all posts

Wednesday, January 20, 2021

Tiny Bakery Box and Book

This month's new Alpha Stamps kit contains the cutest little bakery box you have ever seen! At 2.5" x 2.5", it fits perfectly in the palm of your hand. (I can't help thinking that it would be the perfect size for an American Girl doll.) The box is easy to put together and fun to decorate. Who wants fresh baked donuts?


I gently removed the window cellophane on the box lid in order to trim the decorative paper added to the top of the box. Once that paper was trimmed, I replaced the cellophane and added a picture of yummy donuts so they'd show through the window. Mmm! Tiny polymer clay cake slices make a fun swirly design element for the box top.
 
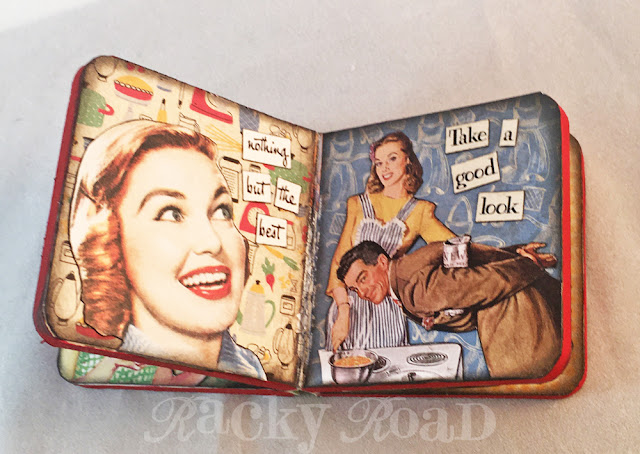
Polka dot paper on the inside top of the box hides the back of the donut photo. I just happened to have the perfect sized chunky book that fit in this little box, so I altered it with Delicious Scrapbook papers and vintage housewives.
 
The cover and the pages:
 
Before I glued anything down, I lightly sanded the glossy papers to help the glue adhere. I decided to paint the cardboard edges after I finished gluing everything down, but a wiser person would have painted those page edges before gluing. Next time I'll plan ahead.

Such fun background papers, and who doesn't love a happy housewife? The woman on the right seems to be silently contemplating smashing that poor fella's head into the pot.
 
 Hey fellas, look at all that tasty grub. Someone's been working hard in the kitchen today.

What will go in your tiny box? For a complete list of supplies (minus the chunky book) click here!

Wednesday, October 17, 2018

Altered Costume Boxes

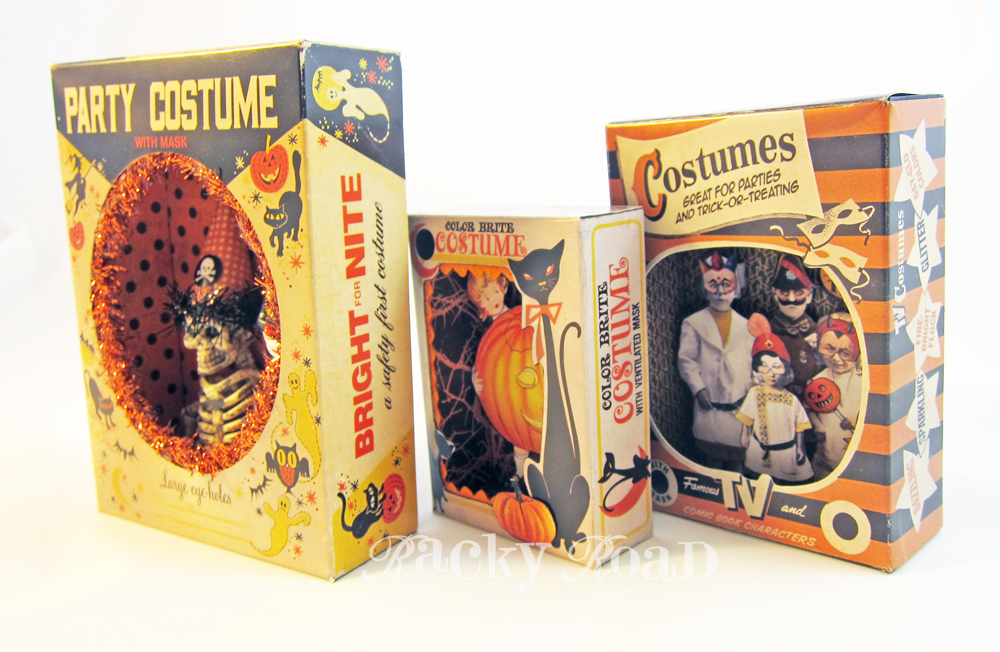
I'm a big fan of making art in vintage Christmas ornament boxes (like these here and here), so when I saw these new Tim Holtz reproduction Halloween Costume boxes, it was love at first sight. Halloween is my favorite! These small boxes (the cat box below is 2" by 3") look great on their own, so it doesn't take much to create cute little Halloween decor. What fun!

For the smallest box, I covered the back of the box with orange and black scrapbook paper, black alphabet beads (boo!) and a vintage image of a girl with a pumpkin. I used foam adhesive dots to raise her up from the back. Rick rack trim and a little pumpkin was added to the box top.

On this next box, I used some vintage kids from one collage sheet and masks from another to make a group of tiny trick or treaters. Foam adhesive was again used to give the group more of a 3D look. C'mon now, give them some candy!

Here's the largest box. It got a background of orange with black polka dots and some fun orange tinsel around the opening. The inside features a flying bat and a ready-for-a-party plastic skeleton holding a black cat shaker. The skeleton was, of course, too tall to fit in the space like that, so I took some heavy duty clippers and removed his pelvis and the bottom part of his arms to fit. Sounds ghastly, but look how happy he is; he doesn't mind a bit!

I love the details on these boxes, and the fact that they look so real, despite their size.

What a fun addition to my Halloween decor! These are going to look great on my mantel.
  For a list of supplies, click here!

Saturday, November 11, 2017

Tinsel Rain Christmas, with mini tutorial

I'll admit it: I have a love for vintage packaging, and vintage Christmas ornament boxes hold a special place in my heart. Maybe you remember the dioramas a friend and I did a couple of years ago?

You may not have access to a vintage ornament box, but here's how you can get the the same look of one with some supplies from Alpha Stamps: a Tiny Diorama Box and "A Very Merry Christmas" paper pad. I used paper from the pad for both the inside and outside of the box, fussy cutting elements of some of the paper to create logos and box design. In the photo below, the two boxes in back are vintage; the one in the front is a fake.

Stack 'em up! I used a nice golden brown ink pad to dirty up the imposter a bit.

The diorama box I used is cardboard, so even though it's a one piece box, I left the bottom "as is", and only glued the decorated sides at the corners so it looks like a box with a lid. (Check out those staples; I love that little detail. More about those later.)

The interior of the box features a wee little elf admiring the decorated Christmas tree.

There's plenty of room for Christmas fun in this box!

Here's how it was done: glue the paper on the top of the box, and cut out the opening. The paper in the pad I used was not big enough to cover the four sides of the box, so I used red stripey paper around the bottom edge of each side. Glue in your patterned background paper. Glue beads and a star onto a bottle brush tree, and make a cardboard ledge to raise up the floor of the display area so the elf and tree are easily visible. The tree I used was a little too tall, so I cut a hole in this new false floor to sit the wooden base of the tree into.

Use Snow-tex to create "snow" for the bottom. Once the snow is good and dry, glue the elf in place and set the tree down into its hole.

Glue the cardboard base to the back of the wall, and put a line of glue on its front cardboard flap to adhere it to the box front when the box is closed. My floor is slightly tilted toward the front, so you can see the elf a little better. *Plan ahead! If you want some tinsel around the opening, now's the time to glue that in. Trust me, it's not easy to add tinsel if your box is already sealed. My problem: it wasn't until my box was "finished" that I felt adding the tinsel was necessary.* Now would be a good time to put the wreath up, too. Once your interior is finished, tuck the flap of the box lid on the inside the of box, leaving the decorative paper outside, and glue the flap in place.

I was so happy how real my little box was looking, that I just had to add staples on the ends just like my two actual vintage boxes had. I used a sewing needle to punch holes in the box, and pushed the staples in with my fingers.

The front of the box was decorated with elements cut out from the paper pad. I used a silver Sharpie to add the dots of snow to the plain green paper. Oh my, look how tiny and cute!

For a complete list of supplies, click here.

Wednesday, May 10, 2017

Fun Time, a Framed Shadowbox

This month at Alpha Stamps, we were encouraged to do some art representing our passion, our craft room, or something we collected. I'm not much of a collector, but I do love toys, especially vintage toys. When I mentioned that to Leslie (Queen of Alpha Stamps), she said she would make a collage sheet with some of my favorite toys on it if I'd supply her with photos. Heck yeah! Bonus, she ended up making two collage sheets: one, some general toys, and two: circus themed toys. She even added a few fun toys that I now wish I owned, like the Happy Hooligan tin toy, which you can see in oval frame in the upper right corner of the photo below. Here's what I made with those collage sheets, plus some fun dollhouse sized frames and a wooden crate. I like to think the little boy below is visiting a toy museum, filled with toys I love. These toys are so fun, they are practically bursting out of their frames!

The small frame shadowbox is just deep enough host a few real toys in front of the wall of art.

Here's the back of the Fun Time museum. With the shadowbox alone, the frame will stand on its own, but it will lean a bit. I wanted this piece to sit flat, so I added a wooden block to prop it up. Works like a charm!

I liked the way the shadowbox fit exactly inside frame if you decide not to forego using the glass. Included in the kit is an extra piece of cardboard that the tabs on the sides of the box fit into. That's great to use if you want to use the glass on your work, but I chose to not use it in this piece. I used an exacto knife to cut off the tabs on the front of the box so it fit more snugly. It would have been better if I removed those tabs before I had partially glued the box, but hey, live and learn.

Here's a closeup of the inside of the shadowbox so you can see the toys better. The black plastic alien and the rubber duck are tiny, and just fit into the miniature fruit crate. The dog is an old Cracker Jack toy, and the train came from Alpha Stamps. The toy metal phone in the bottom frame is one of my favorite toys. It sits on the table next to my sofa, so I can make and receive important imaginary calls.
I hope you enjoyed the Fun Time museum. For a complete list of supplies, click here.

Saturday, January 3, 2015

Wonderbox

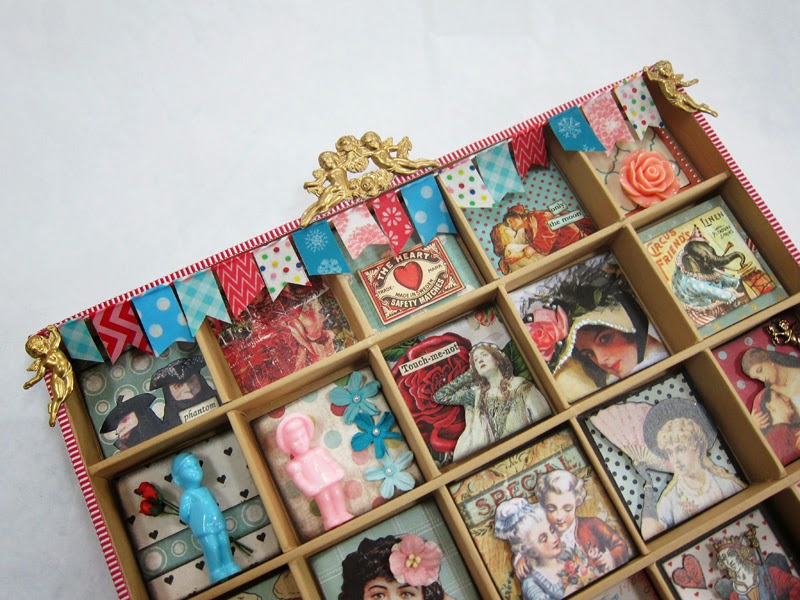
My last project of 2014, and first to be published in '15! Alpha Stamps sent me a twinchie shadowbox to decorate. I decided on an "Almost Valentine" theme and a red and turquoise scheme, which matches my craft room. I have so many great collage sheets that I've collected, so I pulled them out and found some great images. Most of them are love related, but some, I chose for their color alone, like the elephant on the bicycle, Red Riding Hood, who's now reaching for some pie, and the curious rabbit with the little mushrooms.

Cupids hold a banner made from washi tape and baker's twine.

Here you can see that some of the squares are elevated, in order to give the surface more depth. All I did was cut some small squares of corrugated and place them under a few of the twinchies. Some of the blocks are as deep as the cubbies, but others have one, two, or even three layers of corrugated supporting them. You can also see the stripey sides of the box in this shot. I love that paper; it's so fun.

Here are a few close ups of some of the squares. The figures are elevated with foam tape. Some ladies, one with a gentleman caller:
  
Some queens, a fancy lady, and a loner:

This was a really fun project with only one real downside: my craft room is a huge mess now! My New Year's resolution is to straighten out my work space.

If you'd like to see a list of all the wonderful Alpha Stamps goodies that went into the making of this box, click here

Sunday, December 14, 2014

Tiny Ornament Boxes, OR a Fun Swap

Quite some time ago, a good friend of mine and I got all excited about decorating vintage Christmas ornament boxes. I found a great deal on Ebay: two adorable identical boxes for $10. Each box measured just 4" by 5 1/2". I kept one and sent one to her, with the promise that we would each decorate them and give them to each other as gifts.

So here's what I sent her. It's a vintage plastic reindeer with a stocking, sitting on a glittery surface of snow. There's a little package next to him, addressed to her. What could be inside?
I left the cellophane window on mine; she removed hers. She wins. It's really better without. I told her she may want to take that off of the one I sent her. The glare is pretty bad, especially in photos.

Aren't these the cutest boxes ever? Neither of us could bear to mess with the outsides; they were just too perfect!

And here's what she sent me. I just love it so much! The tree is raised up to give it dimension, and look at that deer, spying on Santa. So cute! There's lots of glitter in the snow on the ground and on the roof of the house. I am a big fan of the little bit of glitter around the opening of the box.

And a picture of the side, so you can see the dimension better. 
What a fun Christmas exchange. Ho ho ho!

Wednesday, November 5, 2014

Cigar Box Mini

I really love old cigar boxes, so when the November kit from Alpha Stamps came out, I couldn't wait to start; they are now carrying so many new cigar box themed collage sheets, plus tons of coordinating scrapbook papers. I made a mini cigar box! Here's a photo of it with some of my actual sized boxes.
Isn't it so cute? The tiny masonite cigar box I used is just the right size to hold a gift card, and the Turquoise Mini Cigar Boxes collage sheet is designed to perfectly fit this box.

Here's a little tip if you're going to be covering a box: before you adhere the paper to the top, reinforce the hinged area with some tape. This will help keep that joint strong when the lid is opened and closed.

I added images from some of the other collage sheets to the top and sides of the box. Here's the finished outside, with the red "seal" broken:

The interior is lined with a lovely houndstooth pattern, and features a 3D cigar-themed sticker.

This little box would make a perfect gift box for a cigar aficionado. But I'd like to just display it, so I chose a few images from the Cigar Box Secrets scrapbook paper, cut them out, and mounted them on a little foam core base, cut just to fit inside the box. They stand up nicely, but are easy to remove should I decide to use the box to hold a gift card later.

In this next photo, you can see the three pieces after I first completed them. I liked the way they looked inside the box, but just couldn't be happy with that lady in the back. She blends in too much with the background, and it's hard to see her and tell that she's actually 3D.

I used some colored pencils to give her face and hair a little more definition, and then used some Copic Markers to color in the halo in the background. What a difference! Now she shows up so much better.

It looks to me like these lovely ladies are all waiting for a parade.
For a complete list of supplies, click here.

Thursday, August 14, 2014

Finn, Accomplished Bird Boy

A while back, a partner in a Craftster swap sent me some crocheted flowers and ceramic bird heads and leaves that she made.  She thought I might enjoy playing with them, and she was correct! The other day I was procrastinating (while supposedly working on a different project), and I started fiddling around with the things she sent and a vintage block, and somehow, Finn was born.

Doesn't the crocheted flower make the perfect ruffly collar? I was going to give Finn a party hat, using the lace for a trim, but when I cut the lace to size, it struck me that the lace made a perfect crown.

The head, wings and doll feet were affixed with Apoxie Sculpt. It makes the perfect little pantaloons.
 Stand tall, Finn!

Saturday, August 2, 2014

Grandma's House, with tutorial

Who's making the rounds now at Alpha Stamps? It's Little Red Riding Hood! This month, I took a Votive House Shrine Kit and made it into Grandma's cottage in the woods. For the interior, I chose lovely scrapbook paper for Grandma-like wallpaper and flooring, and set to work. When I began to address the outside, the little house just begged to be made of stone. Once I covered the three walls included in the kit, I loved how it looked so much that I made a fourth wall of cardboard and completely enclosed the house.

This is the cutest little size! Here it is with a quarter for scale.

The front of the house is the wall I added. I made a small wooden door that opens up to reveal Little Red and that Big Bad Wolf, posing as Grandma. Watch out, Lil' Red!

Back of the house, with a vine growing up the wall:

I learned a lot while making this house, so I wrote up a tutorial on making the stones and the shingles. 

First, decorate the interior using scrapbook paper. It's hard to see now that all four walls are up, but I'm planning to put a battery operated tea light candle inside to light it up, and then Grandma's lovely wallpaper will be more visible. When covering the inside walls, make sure you don't put any paper where you'll need to glue; keep those tabs clean, or the house will not fit together well.

Next, paint the exterior. You don't have to have an even coat for this, as only a bit of the paint will show through as grout. Do make sure the mullions in the windows are painted nicely, though, as they will show.

Make your stones using the inside top of a cardboard egg carton. Brush on some ink and dry brush on some paint to get a mottled color and cover any words or graphics. As you can see, I didn't fully cover mine; some of the type will look just like part of the stone when cut out. Once the stones are on the house, you can use your dry brush with paint to dab out any areas that are obviously parts of words.

Assemble the walls, and start adding stones. I cut smaller, more uniform stones to go around the windows and door, and then filled in with larger stones. Clip any sharp corners so the stones look more organic. Cutting out and setting the stones was by far the most time-consuming part of this project. I now have a new-found respect for masons. Make sure when you cover the corners of the house that you wrap the stones around. You don't want that hard edge to show! The stones attach easily with white glue; I used Aleene's Tacky Glue for this project.

The roof shingles made of sandpaper and also adhered with white glue. I used a black ink pad to edge one side of a strip, and then cut several rectangles of approximately the same size. Start in the center of your bottom row and work outwards, and then stack the remaining rows, being sure to stagger the seams. Leave each row overlapping the edge of the roof, and trim to fit using small scissors once the roof is fully covered.
  
It always happens when I write up a tutorial: I take more photos than necessary at the beginning, and then get so involved with the project that I forget to take any during the end. This time was no exception. After I finished the roof of the three walled kit, I decided to add the fourth wall with a door. I had to remove all the stones on the sides of the walls adjoining the new wall so I could replace them with stones that wrapped the corners. I was not happy about that, but I'm glad I did it because it really does make a difference. (I know this because I originally thought I could get away with replacing only a couple of stones on each side. I was wrong about that.)
The door is a thin piece of wood I found in my husband's workshop and cut to size. The hinges and knocker came from Alpha Stamps and were altered to look like iron. Once the wall was done and the door was in place (the hinges were glued on with E6000), I used white glue to attach some moss around the bottom and some vines growing up the sides. The house seemed like it needed just one more little something, so I gave it an address: Number 8. Grandma's house.

For supplies, and to see this month's art kit, head on over to Alpha Stamps!

Related Posts Plugin for WordPress, Blogger...