
Monday, May 27, 2013
Tiny Goodies for Blythe Dolls
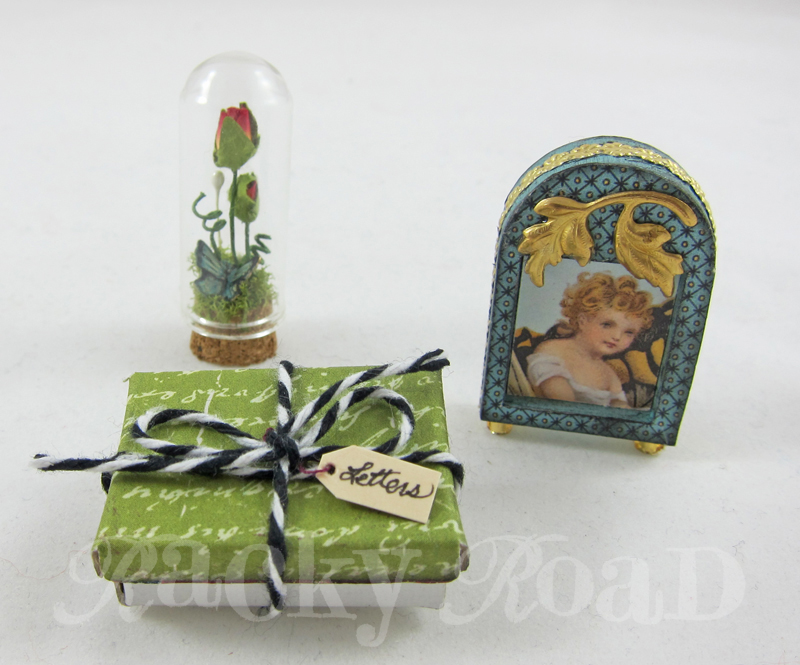
I just completed another Craftster swap. My partner loves Blythe dolls, and has several, so one thing I wanted to make for her was accessories for her girls. I made them a box of letters, a clock that reverses to a picture frame, and a tiny terrarium under glass:


Wednesday, May 22, 2013
Something Fun
I've just returned from a long family vacation. We had such fun, but it's been forever since I had a chance to make anything! I've been working this week on items for a craft swap. I'm going to try to mail them out tomorrow, and I'll post them when my partner receives them.
Meanwhile, look at this fun thrift store find: it originally held a buttonholer part for a Singer sewing machine, but I'll use it for storage. Doesn't it look like something straight out of "The Jetsons"?

It's almost 12" across, and I kind of love it.

Meanwhile, look at this fun thrift store find: it originally held a buttonholer part for a Singer sewing machine, but I'll use it for storage. Doesn't it look like something straight out of "The Jetsons"?

It's almost 12" across, and I kind of love it.

Wednesday, May 1, 2013
Star Book Tutorial
Star books are such a great way to display atcs or photos, and they're not as difficult to make as you might think. Here's how to make a colorful 4 1/2" x 6" book like this one, perfect for spring-themed atcs or whatever you wish.


Let's start with the cover. Using a glue stick, glue your matboard onto the wrong side of the cover paper you have chosen, and trim the corners as shown. Carefully fold the sides in and glue securely to the back of the cover. Decorate the covers any way you like. I used paper flowers and images from The Lovely Garden collage sheet from Alpha Stamps.
Now, let's fold the first of your pages: the black pages and the small red filler pages. Fold the black pages in half so that you have 7 folded sheets measuring 4 1/2" x 6". Fold the small red filler sheets so that you have 14 folded sheets that are 4 1/2" x 1 1/4". These are the pages that will actually be sewn, with the red papers inside the fold of the black page.
 Make a template for your stitching out of tracing paper. Mark the top
and bottom of the pages, and make four marks for the holes you will
punch. The top and bottom holes (end holes) should be about 1/2" from
the edge of the pages, and the two center holes should be about 1 1/2" from the edges. Use this template to
punch holes in each of the seven nested signatures with an awl or needle punch. Each signature
should have one black sheet, with two of the smaller red sheets nestled
within.
Make a template for your stitching out of tracing paper. Mark the top
and bottom of the pages, and make four marks for the holes you will
punch. The top and bottom holes (end holes) should be about 1/2" from
the edge of the pages, and the two center holes should be about 1 1/2" from the edges. Use this template to
punch holes in each of the seven nested signatures with an awl or needle punch. Each signature
should have one black sheet, with two of the smaller red sheets nestled
within.

Thread your waxed linen with two needles, one at each end. Take the first signature (one black page with two red pages inside) and thread the needles from the inside to the outside through the two center holes. Then cross the needles and thread them back through the center holes towards the inside of the signature. Bring each needle back to the outer spine of the signature through its closest end hole.
 Now add the second signature. Thread the two needles through the
corresponding end holes to the inside of the second signature from the
outside spine, and pull the thread fairly snug. On the inside of this
signature, thread each needle through its nearest center hole to the
outside of the spine. On the 2nd, 4th, and 6th signature, add beads if
desired. Thread them through one needle and then thread the other needle
through the beads before going back through the center hole to the
inside of the signature. Then, thread the needles back out through the
end holes as before. Continue sewing each set of your seven signatures in this way.
On the pages that don't have beads, just cross the threads before going
back through the center holes.When you have added the last signature, you will end up with the
needles on the inside of the pages in the center holes. Tie the threads
off with a square knot. Whew! That was the most tedious part.
Now add the second signature. Thread the two needles through the
corresponding end holes to the inside of the second signature from the
outside spine, and pull the thread fairly snug. On the inside of this
signature, thread each needle through its nearest center hole to the
outside of the spine. On the 2nd, 4th, and 6th signature, add beads if
desired. Thread them through one needle and then thread the other needle
through the beads before going back through the center hole to the
inside of the signature. Then, thread the needles back out through the
end holes as before. Continue sewing each set of your seven signatures in this way.
On the pages that don't have beads, just cross the threads before going
back through the center holes.When you have added the last signature, you will end up with the
needles on the inside of the pages in the center holes. Tie the threads
off with a square knot. Whew! That was the most tedious part.
When the book is closed, you will have six sets of black pages that are back to back. Using a glue stick, carefully glue these six sets together, so that each set makes one page. Set the book under some weights to let it dry.
 Meanwhile, fold your remaining pages. Fold the red pages in half so that
you have seven 4 1/2" x 4 1/2" pages. Fold the cream pages in half for
seven 6 1/2" x 4" pages. Fold the 6 1/2" side of the cream paper up two
inches to make a pocket. This page should now be 4 1/2" x 4". If you wish, round the corners of the pocket with a corner punch. Then, using a thin doublestick tape, affix tape to the outside edges of the pockets where they will fold up. Attach double stick tape to the outside edges of all the red pages where they will affix to the black.
Meanwhile, fold your remaining pages. Fold the red pages in half so that
you have seven 4 1/2" x 4 1/2" pages. Fold the cream pages in half for
seven 6 1/2" x 4" pages. Fold the 6 1/2" side of the cream paper up two
inches to make a pocket. This page should now be 4 1/2" x 4". If you wish, round the corners of the pocket with a corner punch. Then, using a thin doublestick tape, affix tape to the outside edges of the pockets where they will fold up. Attach double stick tape to the outside edges of all the red pages where they will affix to the black.

Attach the taped outside edge of each red page to the outside edge of a black page. Make sure the edges line up well. Press firmly to adhere. When all the red pages have been attached, go back and attach the outside edge of the cream pages to the edges of the red pages in the same manner.
Once all your pages are affixed, attach ribbons to the outer sides of your book block with double stick tape. Glue the covers to the book block, using PVA glue. Make sure that the covers are lined up and the edges are affixed well. Put the book under heavy weights, and allow that glue to dry!

Now you have a beautiful Star book with a beaded spine. Decorate the inside pages and fill it with your favorite little works of art.
You can change the dimensions of the cover and pages to make any size book. Here's one I made with triangular pockets and extra embellishments to hold "Comedians in B&W" atcs.


Supplies Needed
2 pieces of sturdy matboard: 4 1/2" x 6"
2 pieces of cover paper for matboard cover: 6" x 7 1/2"
Black pages, 7 pieces cardstock: 4 1/2" x 12"
Small red filler pages: 14 pieces of cardstock: 4 1/2" x 2 1/2"
Red pages, 7 pieces of cardstock: 4 1/2" x 9"
Cream pages, 7 pieces of cardstock: 6 1/2" x 8"
Beads for spine decoration (optional)
2 yards waxed linen thread
At least 2 feet of ribbon for closure
PVA glue
Glue Stick
Double Sided Tape
Tracing paper

Let's start with the cover. Using a glue stick, glue your matboard onto the wrong side of the cover paper you have chosen, and trim the corners as shown. Carefully fold the sides in and glue securely to the back of the cover. Decorate the covers any way you like. I used paper flowers and images from The Lovely Garden collage sheet from Alpha Stamps.
Now, let's fold the first of your pages: the black pages and the small red filler pages. Fold the black pages in half so that you have 7 folded sheets measuring 4 1/2" x 6". Fold the small red filler sheets so that you have 14 folded sheets that are 4 1/2" x 1 1/4". These are the pages that will actually be sewn, with the red papers inside the fold of the black page.


Thread your waxed linen with two needles, one at each end. Take the first signature (one black page with two red pages inside) and thread the needles from the inside to the outside through the two center holes. Then cross the needles and thread them back through the center holes towards the inside of the signature. Bring each needle back to the outer spine of the signature through its closest end hole.

When the book is closed, you will have six sets of black pages that are back to back. Using a glue stick, carefully glue these six sets together, so that each set makes one page. Set the book under some weights to let it dry.
 Meanwhile, fold your remaining pages. Fold the red pages in half so that
you have seven 4 1/2" x 4 1/2" pages. Fold the cream pages in half for
seven 6 1/2" x 4" pages. Fold the 6 1/2" side of the cream paper up two
inches to make a pocket. This page should now be 4 1/2" x 4". If you wish, round the corners of the pocket with a corner punch. Then, using a thin doublestick tape, affix tape to the outside edges of the pockets where they will fold up. Attach double stick tape to the outside edges of all the red pages where they will affix to the black.
Meanwhile, fold your remaining pages. Fold the red pages in half so that
you have seven 4 1/2" x 4 1/2" pages. Fold the cream pages in half for
seven 6 1/2" x 4" pages. Fold the 6 1/2" side of the cream paper up two
inches to make a pocket. This page should now be 4 1/2" x 4". If you wish, round the corners of the pocket with a corner punch. Then, using a thin doublestick tape, affix tape to the outside edges of the pockets where they will fold up. Attach double stick tape to the outside edges of all the red pages where they will affix to the black.
Attach the taped outside edge of each red page to the outside edge of a black page. Make sure the edges line up well. Press firmly to adhere. When all the red pages have been attached, go back and attach the outside edge of the cream pages to the edges of the red pages in the same manner.
Once all your pages are affixed, attach ribbons to the outer sides of your book block with double stick tape. Glue the covers to the book block, using PVA glue. Make sure that the covers are lined up and the edges are affixed well. Put the book under heavy weights, and allow that glue to dry!

Now you have a beautiful Star book with a beaded spine. Decorate the inside pages and fill it with your favorite little works of art.
You can change the dimensions of the cover and pages to make any size book. Here's one I made with triangular pockets and extra embellishments to hold "Comedians in B&W" atcs.

Subscribe to:
Posts (Atom)
