Design team member of Alpha Stamps, lover of ephemera and junk.

Welcome! Grab a cold one, kick off your shoes, and have a look around.

Saturday, November 28, 2020

2020 Tree Ornament

2020 has definitely been a year, and I felt the need to commemorate it with a Christmas ornament. Using a wooden ornament from Alpha Stamps, I made this. This will be the perfect reminder of such an imperfect year.

"Our first pandemic. So sweet. That pretty much says it all, yeah? Here's the back.

I love these vintage snowpeople. They have the prettiest smiles. Of course you can't see them, though, as they are wearing their masks. To give this ornament a chalkboard look, I used a white colored pencil for the lettering.


I hope this ornament makes us laugh next year, when we are able to get together again with friends and family. Until then, we'll stay safe at home. For a list of supplies used for this project, click here!


Wednesday, November 18, 2020

Otis Brings Home the Tree

No one can say that Otis doesn't have the Christmas spirit! He decorated his truck up big time for the season and has gone out and found the perfect Christmas tree.  I cut the hook off of two Vintage Truck Ornaments from Alpha Stamps, and using a Truck Bed Bagatelle Box, made a Christmas truck. Here's Otis, heading home.

I'm not one to decorate my car in real life, but I enjoyed decorating this car with Otis. He's a fun loving snowman that enjoys peppermint candy and snow, and the hubcaps and the garlands on his car reflect that. Even the door handles look like candy canes! The Hello Christmas Polymer Clay Slice Mix contains lots of fun shapes, including peppermints, snowflakes, and snowmen, all of which I used to decorate the car. 

The front of his car features a wooden bumper and a bright silver snowflake; flat backed crystals made the perfect headlights. The Santa hat is made with red felt and a cotton ball.

I think my favorite part of the car is the back view, from the "ho ho ho!" license plate to the glittery bow on the tree, to the "family stickers". Looks like Otis has a wife and child at home eagerly awaiting this tree. To make the snowman kiddo, I used an x-acto knife to make his hat a little smaller, trim his sides up a little, and make him shorter. The polymer clay is easy to cut.

Here's how this all started: the first step was painting the truck and wooden tires a nice Midnight Blue. It almost reads black, but you can see on the tires where they're sanded down that the blue really comes out. I trimmed the paper to fit the back part of the truck, and then glued it down before trimming the front and windows. Pictured below is the paper in place, ready to be trimmed around the front of the truck.

Once the paper is cut out and ready to go, it's time to assemble. I used tacky glue to put my truck together. Spread out all the glue so the entire surface is covered! Clothespins are great for holding everything together while the glue dries.

Details on the side of the car were made using a Stabilo pencil. I love this pencil so much I included a photo, should you want to get one. It draws a nice dark line, and you can take a brush with water to add a little shading with it. I used it to outline the doors and hood, and to stripe the sides of the car a little.

It appears that Otis has stopped on his way home to admire the starry night. Can't say I blame him. For a list of Alpha Stamps supplies used for this project, click here!

Saturday, October 24, 2020

Scary Halloween Sweets and Treats Stand

One last Halloween project for the season: how about some fun mail? My mom mentioned the other day that she never got anything but bills in the mail anymore, so I thought I'd send her a little Halloween treat. Welcome to Alpha Stamps' "Scary Halloween Sweets and Treats" stand. Please be aware of the handy candy corn stickers on the floor that indicate where to stand when ordering your favorite spooky treats; you know we're still in a pandemic.

 
Never mind that the proprietors are deceased; they're still being careful to wear masks and enforce social distancing. Aren't their little candy bags adorable? Those bags are so easy to make using the Retro Halloween Bags collage sheet. A couple of toothpicks hold up the striped awning. I used an awl to punch small holes in the stand and awning for each end of the toothpicks. Once the card is assembled, a little dab of glue will help keep the toothpicks in place.


The beauty of this little scene is that it folds flat, so I can mail it off in an envelope.
 
A lot of people plan out an entire project before starting it. I am not one of those people. Lots of what I do is trial and error and finding things that work at the last minute. For that reason, before I even started this project, I painted the entire thing black. I know I would be covering it with papers, and that the folds of the card may show.  The only thing I know I wanted to do when I started is have a striped awning, so that was done first. The candy paper was too much fun, so I decided a candy stand was the way to go. Below you can see how that paper was cut to fit the wall of the stand, plus the top of the table in front.
If ever there's a measure twice, cut once situation, this is it. I had one 6x6 piece of this paper. No room for mistakes! Here's the back of the piece, with some directions. The black plaid paper seen below is the back of the candy paper. Once I cut the paper to the correct width of the stand, I measured carefully and cut out the space for the window under the awning. Put the paper on the front. Holding things in place, carefully slice between the stand in the slits on each side of the "no glue here" part pictured below. That will be the top of the table. Cross your fingers, flip over the piece, and carefully glue only where the dotted line is. You don't want to glue your table top until the piece is fully opened. Once you've glued all that, you can carefully trim the extra paper from the top (where it says "trim here"). Once the candy paper is attached correctly, it's relatively easy to cover the front of the stand and the ground.
The chipboard sign adds a little fun to the scene. It's painted with acrylics and lettered with a fine line marker. I wanted to give it a hand painted look, so I didn't worry about keeping everything straight.
If you plan to shop at the Scary Halloween Sweet and Treats Stand, don't forget to stay on the candy corn stickers so you don't get sick. Isn't 2020 fun? For a list of supplies, click here.


Saturday, October 10, 2020

Ghosts in the Graveyard Altered Tin

Watch out for ghosts in the graveyard! I used an Altoids-sized tin with the lid removed to make some tiny Halloween fun. An insert from Alpha Stamps' new Halloween Altoids Tin Inserts set makes a rustic fence and black cat in the foreground of the tin. I painted the insert orange, black and grey, and then added texture to the fence with colored pencils. I used a white colored pencil to outline the edges of the cat to make it pop a bit. The seated cat, front right, is acrylic.

 
So many ghosts! This paper, from the Halloween Market 6x6 pad, makes the perfect background. After I glued the paper to the inside of the tin, I cut a couple of the ghosts out of the remaining paper and attached them with some foam tape to add some dimension. The tombstones were painted (tutorial at the bottom of the post here; I love painting tombstones!) In checking to see how the tombstones looked behind the insert, I realized that the two shorter tombstones were getting a little lost behind the fence. I set those two stones up on some foam core (painted black) to make them tall enough to be seen.
 
Some curious ghosts were added to the border of the insert, and a small ghost was added with foam tape to the front of the tombstone you see on the right. Some lichen was pushed through the "ground" between the slats of the fence and glued behind. When I tried that smiling jack o'lantern on the top, I knew he would have to stay. This needs a little more orange at the bottom, don't you think? A couple of pumpkins there should do the trick. In this photo, the cat on the fence is not outlined yet, so he's a little hard to see.

Here's that cat with a little white pencil outline; now you see him. A black ribbon trim along the opening of the tin adds texture. Skeleton arms for that Jack; why not?
 
Happy Halloween! For a list of supplies, click here.

Wednesday, September 23, 2020

Halloween Tableaux

It's Halloween season! Because I can never have too much Halloween decor, or do too much Halloween crafting, I had a blast making these tableaux to celebrate my favorite spooky holiday. Large Spiderweb Mirrors with Frames are the perfect backdrop for each scene. All they need is a little stand; easy to make with some foam core and tissue paper. I'll show you how at the end of this post.

The first tableau is a little on the spooky side. There's a witchy woman, a graveyard, pumpkins, a skull, and a black cat. A crescent moon shines down on the scene as a bat flies into the night. The gravestones are cardboard shapes; there's a tutorial on how to paint them at the end of this post. The cat is a cupcake pick. If you leave a little of the pick attached when you cut it off, it's easy to stick down into the foam core to make the cat secure. I gave this one some funny eye stickers. He looks scared! 

Side view, so you can see some of the 3D elements. The large pumpkin in the back was too fat to fit on the base, so I cut it in half with a box cutter. That made it easy to glue it onto the background. Another alteration I made is in the image of the woman. She was originally wearing a very cool bat hat, but it was a little hard to see on the background, so I gave her a new witch's hat with a bright orange band. The "boo" sign and the little pumpkin girl were attached with foam tape, and the cat banner was glued only at the ends so it pops out a bit.

What's Halloween without candy and costumes? You're invited to a Spook Party! I layered a cat head image on top of a black medallion and a gold medallion, and then could not help but add an extra paper medallion (tutorial on making the paper medallion can be found here). I wanted this scene to be busy and fun, so it features some happy kids, lots of candy, a couple of jack o'lanterns, and a colorful witch's hat.

Side view. The cat head is attached with foam tape, and the paper medallion is attached to the back of the scene for extra depth. The little clown with the pointy hat is also glued to the back of the scene, and his other clown and the witch are attached with foam tape, as are the paper pumpkins. In order to display the witch's hat at a jaunty angle, I glued a toothpick to its back and stuck it into the foam core. A little dab of glue at the bottom of the hat helps keep it secure. The red cape of the little witch flared out on both sides of her, but I trimmed it back on the side where she's holding the cat so it doesn't cover too much of the ghost. Don't be afraid to alter those collage sheet images to fit!

Of course I didn't manage take any photos while these were in progress, so here's a dramatic re-creation of how the stands were made. The backgrounds on the art above are 5" tall. The one I'm using for this tutorial is smaller, around 3 1/2" tall, but the technique is the same. Cut your foam core to the size and shape you want. Mine is just enough to allow for some 3D decorations in the front of the scene. Cut a piece of tissue paper to the right size to wrap your base. I adhered mine with Mod Podge. Tuck the ends in like you're wrapping a present.   

Once the base is wrapped, position your background where you want it, and holding it steady, trace around the bottom with a pencil. *Hint: cover and/or paint your background and frame before you do this step, as adding extra paper and paint will make the stand a little thicker.*


Use an x-acto blade to cut out the slot. See the two red arrows in the photo below? That bottom part of the frame will fit into the slot you have just cut.

Set your background in your stand. If you've cut the slot a little too wide, insert a slip of cardboard to help secure the background. Now you're ready to decorate! For a complete list of supplies, click here.

 Happy Halloween!


Wednesday, September 2, 2020

Welcome to the Nut House

Hello, and welcome to the Nut House. A squirrel lives here! This whimsical mushroom house kit from Alpha Stamps almost made me forget how effed up 2020 is. Almost. At least it was a fun distraction.  

The house comes with a niche, so it's easy to make a front room. A little sugar glider has moved in, and he brought a large acorn along with him.

The squirrel is very happy in his new home. The staircase is designed with two steps; I added a little landing at the doorway. 

This squirrel appreciates a nice garden. The yard is made with a combo of Field Grass, Green Turf Grass, Leafy Green Underbrush, and Clump Foliage, which makes for beautiful red flowers along the path. The path is composed of Miniature Brown Path Pebbles and "stones" made from egg cartons (click here for a tutorial on making egg carton stones).  Oh look, there's some mail!  

The mailbox pretty easy to make. The bottom of the box was made from a rectangular shutter that was included in the door and window set made especially for the mushroom house. I painted it black and then glued a strip of black card stock to each side to make the rounded top. Once the top was in place, I put a thin bead of glue on the back of the box and set it on the card stock. Once that glue was dry, I carefully cut around the edge to make the back of the box. In the photo on the right, you can see how the door was made: a piece of the card stock is trimmed to fit the opening, with extra paper to go up under the bottom. This will allow the door to open and close. The flag was attached with a tiny brad.

The mailbox stands on a painted wooden spindle. The enclosed letter is written with a .05 pen on typing paper, and the envelope was made with the same. The "postcard" is a label from a collage sheet, mounted on thin cardboard and trimmed. That's a teeny tiny letter! It's pictured below on a 1" grid.

A little bit about how the house was made: once it was decorated front and back, and the niche was in place, I cut strips of paper to finish the sides. All it takes is a thin line of glue on the sides of the cardboard to attach those pieces. It's best to do a little bit at a time, so you can hold the paper in place while the glue dries. My house isn't exactly uniform, and some parts were wider than others, so I cut the strip a little wider than necessary and lined it up with the front of the house. After the glue was dry, I carefully trimmed the excess paper in the back with an x-acto knife.

Here's the house in position on the base. It's easy to put the mailbox in place, as the spindle it stands on has little pegs at each end. I punched a little hole in the base to insert the peg. A dab of glue holds it tightly in place. This is the time to draw the sidewalk in, so you know where to put down your stones. I made the sidewalk before gluing the mushroom down. Once the sidewalk was done, I glued on the mushroom and  the yard was "planted" using white glue.

I hope you enjoyed looking at the Nut House. Need supplies? Click here!


Saturday, July 11, 2020

Faux Florida Vacation

Oh, coronavirus. We are still sheltering at home. As of today, it's been 121 days since our lives were normal. Since we most likely won't be traveling any time soon, I used this month's Alpha Stamps kit to make a little faux Florida vacation home. It's the next best thing to actually traveling somewhere other than my own backyard. And look, some of my friends are already there!
The front is hinged at the bottom, using green paper. On the outside, it may look like there's not much to this little house, but when you open it up, it's a true tropical vacation. The beaches are crowded, people are splashing in the waves, and some lucky guy even caught some fish for dinner. Bonus: no social distancing required.

Don't miss the cute little crab charm in the lower right corner of the niche!

Nothing like a comfy chair and a good book (plus a bucket full of cold beverages!) to make my faux vacation the perfect place to relax.

Here's a closeup of the niche and those cute miniatures.

The front panel of the house is held in place by the flag pole, which is actually a glass ball sewing pin. It's just gently pushed through the apex of the roof, right in front of the house facade. To allow the panel to drop down, you just have to lift the flag. You can just see the pointy end of the flag pole circled below.

I'm so in love with the floral paper and vintage Florida postcards combination. It's busy and fun and exciting, which is unlike my life at home right now. Someday we'll travel again, but until then, this little faux vacation house will have to do.
For a complete list of supplies, click here!

Saturday, June 20, 2020

Tiny TV

This new tv from Alpha Stamps: it's 2" wide and about 1 3/4" tall. Adorable! I love making tiny things. There's just something fun about fiddling around with all the little details.

The antennae are made from balled straight pins, the knobs are made from a watch gear and a couple of brads that are designed to look like screws. The bottle features a label from a collage sheet, and the mug is actually a ceramic bead.  Hey, looks like it's time for a Western!

This tv is obviously from a different era; so you know there's no fast forwarding through the ads. Just when you remove your beer and get comfy, dangit! It's a stinking commercial!
  
Here's how this little tv works: the cowboy show fits into a tiny slit in the top. The image has a tab on it, which is folded down. The beer bottle and mug are glued onto the tab to keep it flat on the surface of the tv.
The tab is covered with the same paper as the tv set. I was careful to match the patterns so when it's in place, it's almost invisible. The top edge is colored brown with a colored pencil to blend in more with the top of the tv. I did have to cut into another image on the collage sheet to create this tabbed piece, but attaching a tab to the back of the image would have required a thicker, more noticeable slit in the top of the tv.

To accommodate the cowboy show, I used thin shirt cardboard to help separate the front of the tv from the next layer of tv inserts. NOTE: at this stage of construction, I cut out the Western image thinking I would attach a tab later. My thoughts originally to put a different "show" on the back, but when I started thinking about how the tab would look, I realized it was more important to me to be able to camouflage the tab. Luckily, I had another collage sheet with that same cowboy image, so I cut it out with the tab in place, like you see above. 

Here's the inside of the tv in progress.  The legs are colored with a Copic Marker, and the front and back have the patterned paper in place. The back of the tv has a scrapbook paper sky, and a woman who is very excited about that hot dog. On top of that is the first of the cardboard inserts that help build the sides the tv. I cut the woman's hand from the image and removed the spoon she was holding. She's now able to wrap her hand around that hotdog bead. The arm is glued to the insert, and the inside edges and the fronts of all the inserts was blackened with a Sharpie. You don't have to be too neat for this step. I sure wasn't! NOTE: The tv kit comes with two inserts, so if you use one kit, your tv will not be as thick as this one. I used an extra insert from another set to make this tv, due to the size of the hot dog bead.

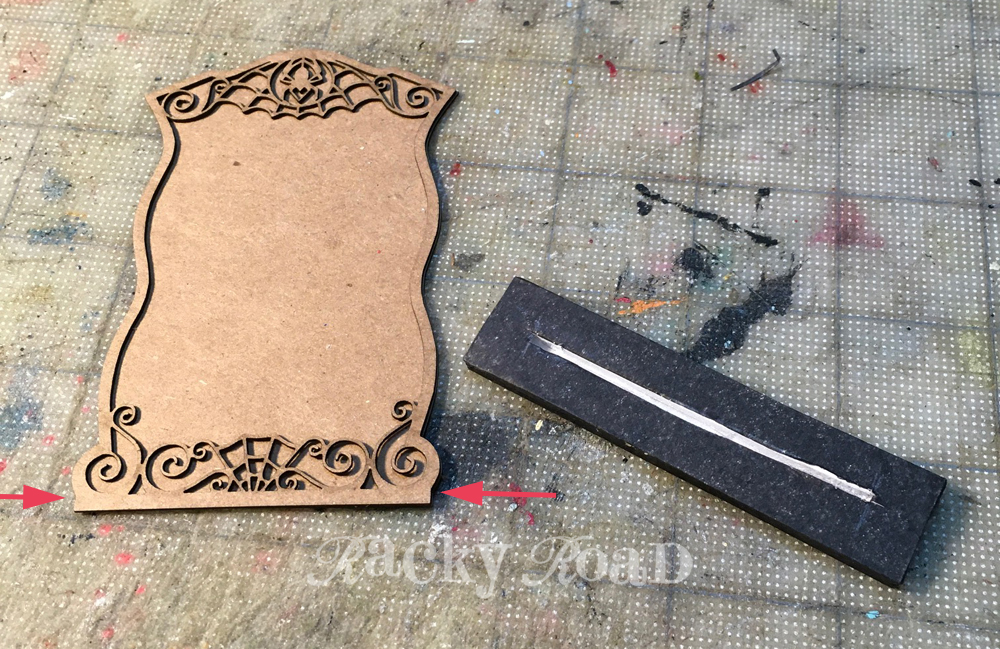
Once the steps above are complete, it's time to glue all the parts together. Below you can see the glued up tv from the back. The space between the arrows is the slit for the Western image. I put washi tape on the front to show that lines up to where the slit will start and stop. The tape will serve as a guide of where to cut the slit out, once the top is covered in paper.

To cut the slit, center the paper on top of the tv, and glue down the top only. Fold over the washi tape. This will let you know where the slit in the top needs to start and stop. Measure the thickness of the front panel of your tv, and using a sharp x-acto knife, gently push through the paper and cut the slit. I wiggled the blade back and forth a bit to make the slit wide enough for the paper to fit comfortably. Once the slit is cut, gently remove the tape.
 
If you use a busy paper for your tiny tv, that tab will blend right in!
 
Oh no, not another commercial! For a complete list of supplies, click here.
Related Posts Plugin for WordPress, Blogger...