Design team member of Alpha Stamps, lover of ephemera and junk.

Welcome! Grab a cold one, kick off your shoes, and have a look around.
Showing posts with label shrine. Show all posts

Saturday, February 20, 2021

Five Tiny Tins: Fairies, Mary, and Alice

How sweet are these little 1" by 2" tins? I made a couple shrines with the ones I had, and then begged Leslie at Alpha Stamps to send me at least 5 more. The tins come with a sliding lid, and I still plan to try a design incorporating the lid, but for now: tiny shrines. I started out making little fairy shrines. The backs of the tins are covered in scrapbook paper. Tiny wings from a collage sheet are added to create fairies, who dance on beds of moss amongst the smallest of mushrooms, made from floral stamens.

Here's a quick photo for scale. Adorable! 


All the fairies are attached with small pieces of foam tape to add dimension. This first fairy is friends with a lucky ladybug. Her crown is made from a sequin star, cut in half and glued together points up. For link to the supplies used for this tin, click here. A full list of supplies for all the tins is at the end of this post. 


Several of the tins have half-round toppers on them. I used a wide pair of pliers to gently bend round medallions in half. The pieces I used were very easy to bend. Just grip the medallion where you want to bend it, and push to fold. The flat side can then be glued to the top of the tin with E6000 glue. 


The ballerina fairy has caught a falling star. Make a wish! The word "wish" was cut from an old dictionary. I found a picture of a tiny flower and cut out two petals to glue on her back for wings. Supplies can be found here. 

 
I didn't want to use only half of the star for this next shrine, so I used some Apoxie Sculpt to adhere it to the top of the tin. Extra sequin stars add a little sparkle. This gentleman's supplies can be found here. 
 
 
Of course I also needed to make a shrine for Mary. After gluing the paper to the back of the tin, I covered the sides with beautiful glass glitter, plus some more sequin stars. I used two images of Mary for this shrine; the entire image is glued to the back of the tin, and then Mary alone was cut from the second image, and stuck on with foam tape. I did not like the way the medallion on top of this tin had a hole in it (see picture above where it's getting bent with pliers) so I added a metal rose to cover the hole. Mary deserves a little extra bling anyway. Here's your supply link! 

 
I have had this adorable White Rabbit charm (from Alice in Wonderland) for a while. I finally found the perfect home for him! I removed his hanging loop with wire snippers. Using some Alice themed scrapbook paper, I covered the back and the sides of this tin. Then all that was needed was a little moss, some polymer clay playing cards, and a tiny teacup on the top. The heart was painted on with a small detail brush and acrylic paints. Supplies for this tin (including that rabbit!) can be found here.
 
 
I really enjoyed making these little tins. The projects were quick and relatively easy. Placing the stamen mushrooms was a little tricky, but once you cut them to the desired height and run the stems through some glue, they stick easily. I often used a toothpick to straighten them up once they were inserted into the moss; it can be difficult to stick a finger in such a little space! Finished tins can be hung up with removable mounting putty or glued to small magnets. They don't stand on their own, but it would be easy to mount them on a medallion or small block of wood if you want to display them on a flat surface.
 
For a list of supplies used on all the tiny tins, click here. 

Wednesday, April 8, 2020

Let Us Crown Him Triptych

Here's a quick little 3" tall triptych I put together recently. The image is from one of my favorite collage sheets: Saints and Sinners. So many great images to play with! The triptych is covered with "heavenly" paper, and the edges are painted with a gold metallic paint. The "Let Us Crown Him" caption was cut from an old hymnal. I painted over it a bit to make it blend into the background, and then went over the letters with a fine black pen. Gold sequin stars and a golden halo complete the heavenly look.

The back is finished in more of that lovely paper. For a complete list of supplies, click here!


Saturday, March 21, 2020

Five Shrines

I love the bright colors of Mexican folk art, and I love making little shrines, so these little matchbox shrine facades that just came out at Alpha Stamps make me so happy. For the past week or two, I have been busy making shrines. All the bright colors! The fronts are chipboard, while the little niches are matchboxes. (I have so many extra matches now!)

The first shrine I did was all about Cosmopolitan martinis, so I painted the exterior a bright pink with a red border. It's embellished with polymer clay limes and pink leaves, and the niche features a miniature Cosmo drink (a tutorial for making the tiny Cosmo can be found here). The small metal saint is painted in Cosmo colors, and she's offering up a slice of lime! This shrine will be the perfect addition to the Cosmo shelf in my kitchen. 

My next shrine was made before the Corona virus threat got real, but in light of all the news of the hour, I'm calling this one the "I See Coronavirus" shrine. I used a small loteria card for the niche, and a bright red eyeball at the top. The eye sits on a round filigree setting. I painted the tiny flowers on the filigree to match the colors of the shrine border. The perfect black lines are Dazzles Thin Line stickers.


On this next shrine, I first painted the facade a bright turquoise and then searching for an image to feature in the niche. I found the perfect one on the Loteria Matchbox Shrines collage sheet. The saint was painted in the same light turquoise used for the interior of the niche. A bronze metal flower makes the perfect halo for the saint. Metal roses on the sides, along with polymer clay leaves give a bright pop of color.

Oh no, it's the devil! This is another shrine where I chose the color first, and then the image. The flames were painted on chipboard, then cut out and glued to the front. I could not resist making a few tiny demons suffer in those flames.

This image of the Madonna is just so beautiful. It was the first thing I chose for this shrine. I then picked the paint colors to coordinate with the image. Gold Dresden trim and halos work perfectly with this heavenly theme.

All these bright colors look so fun together. I think I'm going to need another set of facades so I can make more.
For a list of supplies, click here.


Saturday, February 29, 2020

The Bunny Circus Eggstravaganza

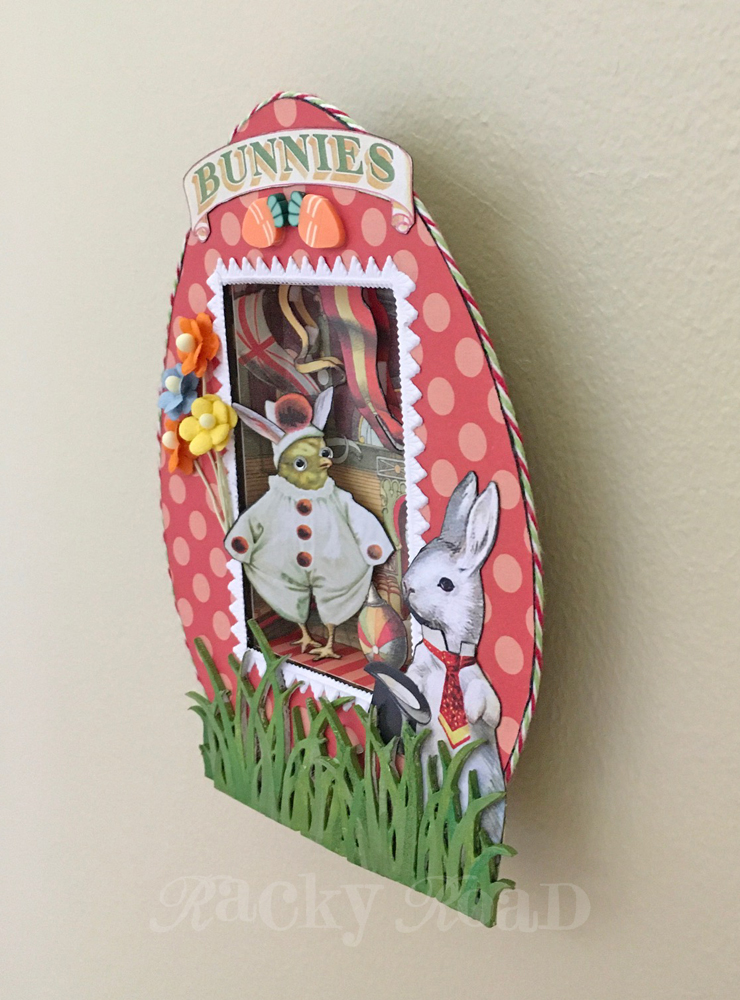
The March kit from Alpha Stamps is here! So many chicks and bunnies; spring is on the way, which means Easter is not far behind. I love some Easter art, but I found a collage sheet entitled "Circus Chicks", and you sure can't go wrong with that! I made my Little Niche Egg shrine into a tiny springtime circus, because why not?

I fell in love with the little chick in its clown costume, and decided to work around him. Sure, he's not a bunny, but he is, at least, now sporting the bunny ears. For the background, I found the perfect circus image from the Big Top Circus collage sheet, and made it the background of my niche. I used two copies of the circus collage sheet so I could cut out the flags and banners and attach them with foam tape for added dimension. I also cut out the ball, and attached it with two layers of foam tape to bring it to the forefront.

Every circus needs a ringmaster, but the rabbit image I wanted to use had his head facing away from the action. I cut out the body of that rabbit and used the head from a different rabbit from the same collage sheet. Now he's paying attention!

The chick on the collage sheet appears to be wearing an eye patch, so I colored the patch yellow to match his head, and added a couple of crazy eyes. The eyes I used are designed for fishing flies; they were the perfect size for this crazy little clown chick. Because the eyes are plastic, it was easy to trim his left eye so it looks like it sits behind his beak. I also gave him some bunny ears, cut from the original head of the ringmaster bunny. Now he fits in with the other rabbit performers.

Here are a few photos of how this project came together. I first chose the image of the chick, and the circus background, and then the perfect piece of scrapbook paper from the Echo Dot Summer Dots and Stripes 6x6 pad that coordinated with those colors. The dotted paper was glued to the egg, and then carefully trimmed with an x-acto knife. Some baker's twine was glued around the outer edge. The circus image was adhered to the back and sides of the cardboard niche, which was then glued together with white glue. Clothespins work great for holding things together while the glue dries.

The niche was put in place and the flaps glued to the back of the egg. Masking tape held down the flaps during drying time. The hanger was also glued on at this time.

White Dresden trim around the opening reminds me of those sugar eggs with the scene in them that I used to love as a kid. I tried it out to make sure I liked it before gluing it down. In the photo below, the flags in the circus background have not yet been doubled up. That was my next step.

See how the flags pop, now that there's an extra layer? After the egg was put together, the outside was decorated with all the elements. The chipboard grass was greened up with a combo of paint and colored pencils. I used three clusters to make the Easter grass that the egg sits in.
Thanks for visiting the bunny circus! For a complete list of supplies, click here.

Thursday, February 20, 2020

Teeny Tiny Circus Shriney

I had the smallest of jeweler's tins sitting around for the longest time, and decided to make a tiny shrine out of it. Luckily, I found a teeny tiny image of an elephant, so of course I made a circus shrine. It sits on a bead cap, and features some miniscule sequined stars. Here it is, with a penny for scale.

Not much else to say about this one. 😀

Monday, March 18, 2019

Maximus the Magnificent

So. I had a little spell of free time where I didn't have a deadline for any art projects, and I decided to look for a tin to alter. I had in mind doing something Spring/Easter related. People are always giving me empty tins, so I looked through my tin drawer hoping to find something different. I found a square green tin (perfect for Spring; let's use that!) but I also pulled out a long skinny gold tin, thinking it would be fun to use for a future project. Well, I fought with the green tin just long enough to remember I had some new gold striped paper that might look really, really good with that second tin. The green tin got tossed aside, and Maximus the Magnificent the Strong Man was born. Maximus himself comes from an awesome collage sheet by Nichola Battilana (love her stuff!). I gave him some wings, a prize fighter belt, and a wee silver crown.

The three blocks I used in this piece are all vintage. I cut the red and white block Maximus stands on in half so it would fit inside the tin, and cut a wheel in half for the top. The sides and back of the tin are covered in patterned paper; the dots around the opening were done with Gesso. I used black and cream striped paper for the inside walls of the tin, some of the pennants in the background, and the belt. The belt buckle is actually a peanut butter label, intended for a dollhouse jar. Maximus' outfit needed a pop of red, and it was the perfect size and shape.

Maximus didn't start out wearing any headgear, but when I found that tiny crown and let him try it on, he refused to take it off. I think it suits him. 

Maximus has been looking for a nice place to live. Currently, he's residing in our keeping room, but he may move into the living room in the near future. You know how those circus folk like to travel.

Saturday, September 1, 2018

Teeny Tiny Halloween Shriney (x 3!)

It's the most wonderful time of the year: college football, and Halloween crafting. Yay! Today I present to you three out of the five adorable mini Halloween shrines just released from Alpha Stamps. The opening of each one measures just 2" by 2". The tallest one shown below is a little less than 6" tall. So cute! Here's what I did with mine...

For the Raven October Shrine, I painted the front with acrylics, and gave the raven a witch hat and a red rhinestone eye. The interior is lined with a very dark paper (with bats!) that is pretty much impossible to photograph due to the depth of the box. Please use your imagination.  Three tiny trick or treaters stand on a bed of moss and select from the available pumpkins. I considered printing out the "pumpkin patch" sign, but every pumpkin patch I've ever been to seems to sport a crudely painted sign, so I hand painted the sign in the interest of historical accuracy. Rickrack covers the tabs that show on the front when the box is assembled.

I love the orange polka dot paper that I used on the sides so much that I used it on all three of the shrines.

Here's a slightly better view of the inside.

I considered painting details on the top part of the Haunted House Shrine, but once I painted the back black, I really liked the plain silhouette, so I painted the front plain black as well. This shrine was lined with a dark purple paper with a bed of moss on the floor. A full moon smiles at a black bat, as two little black rats explore the graveyard. Black and white baker's twine hides the tabs on this one.

There's that orange polka dot paper again!

The interior. The rats were actually tiny white mice, but a little black paint made them look more sinister and rat like.

And, the cat. I gotta be honest: I am not a cat lover by any means. However, there was something about this cat that I just couldn't resist. This shrine is similar to the others, so it comes with the 2" by 2" square opening, but I gave my kitty a mouth. And teeth. I cut a piece of shirt cardboard just big enough to attach to the front, and painted a nose and mouth. Once the paint dried, I cut out the interior of the mouth, and it was the perfect size to catch a big ole black rat. The cat looked so happy, that I felt it needed a Halloween party hat.

And yes, the cat got the orange paper sides as well. Kitty better watch out, or that rat's going to get away!

There are two other shrines in this set: a cat sitting on a pumpkin, and a cat in front of a full moon. I might get around to constructing those soon, but I'm working on a different Halloween project for next week first. Meanwhile, if you want to make some of these tiny shrines, click here for a complete supply list.

Monday, January 22, 2018

Small Shrine

For some reason, I have been all about saints and religious art lately. I had a great image from an Alpha Stamps collage sheet, and decided it to make a little shrine. The top of a mini Altoids tin was the perfect size for the image, and I had tons of little metal pieces and some rosary chain that went together well. The rays behind the figures are Dresden trim.

 Sweet and tiny.

Wednesday, September 6, 2017

The Magic of Christmas

Last time we visited my brother-in-law, he gave me the cutest picture ever of my two and a half year old husband visiting Santa. I don't think I can adequately convey how much I love that photo. I needed a way to display it each year, and this is what I came up with. See how Santa is instructing him not to reveal the secrets of Christmas? It's the cutest!

The box is a wooden cigar box. It seemed the perfect size. I covered the back and sides with paper, and ran some red ribbon around the edge of the front. The Tim Holtz tag reads "believe in the magic of Christmas". Perfect! I planted three bottle brush trees at the bottom, added a vintage dancing Santa to the top, and strung up some miniature Christmas lights.

I toyed with the idea of covering the back, but it won't usually show, and I like the fact that it's stamped with information about the cigars, one of my husband's infrequent guilty pleasures.

The hubby wasn't sure about the disk with "24" on it, but that's when Santa arrives: on Christmas eve! I'll enjoy using this as one of my Christmas decorations this year. Ho ho ho!

Saturday, July 15, 2017

Lucky Stars

Did you ever wish upon a star, or thank your lucky stars? Well, then you're going to want to meet this little pixie, who sits up near the moon and collects those stars, making them available to those of us who need them. I made this tiny shadowbox using a Matchbox Cabinet from Alpha Stamps. Here's the little pixie, perched on a shelf, removing stars from the sky. He'll fill that bottle and store it below with previously harvested stars.

In the photo below, you can see that the frame and the moon cutout in the top half of the shadowbox are raised to give the sky dimension. The bottom frame is flush to the back to provide more room for the tiny cigar box and jars of stars. The half circle on top of the shadowbox is an old wooden wheel from a set of block, cut in half.

That's a big jar for a pixie to fill! Luckily, there are plenty of stars in the sky.

Here are a few details. There's already one star in the jar, and our little friend is getting ready to add another.

And here's his collection: some wishing stars, one very special lucky star, and a bottle of dreams with a star stopper. There's also a box of large stars for those who need them most.

The jars and box are very tiny!

A few notes on construction: here's the tiny box before assembly. I found it easiest to cover the pieces with paper before gluing them together. It might be easier yet to assemble and then paint. Using a lightweight paper really helps, because those pieces are really, really small, and folding a heavy paper over the edges would be difficult.

Here you see the box with only one side and the bottom attached. The upper frame is elevated from the back of the box using two adhesive foam squares to raise the frame. The moon was attached with one foam square.

A hanger for the back, and a photo of how the top star is adhered. Because that star is actually a bead, there's a hole through the middle. I adhered a long head pin to the back of the wooden piece, and bent it up and over. I dropped the star down onto the pin, and put a little dab of glue on the two points of the star that sit on the block. Now it's nice and secure.

Keep reaching for the stars. For a complete list of supplies, click here!
 

Related Posts Plugin for WordPress, Blogger...