Design team member of Alpha Stamps, lover of ephemera and junk.

Welcome! Grab a cold one, kick off your shoes, and have a look around.

Saturday, February 29, 2020

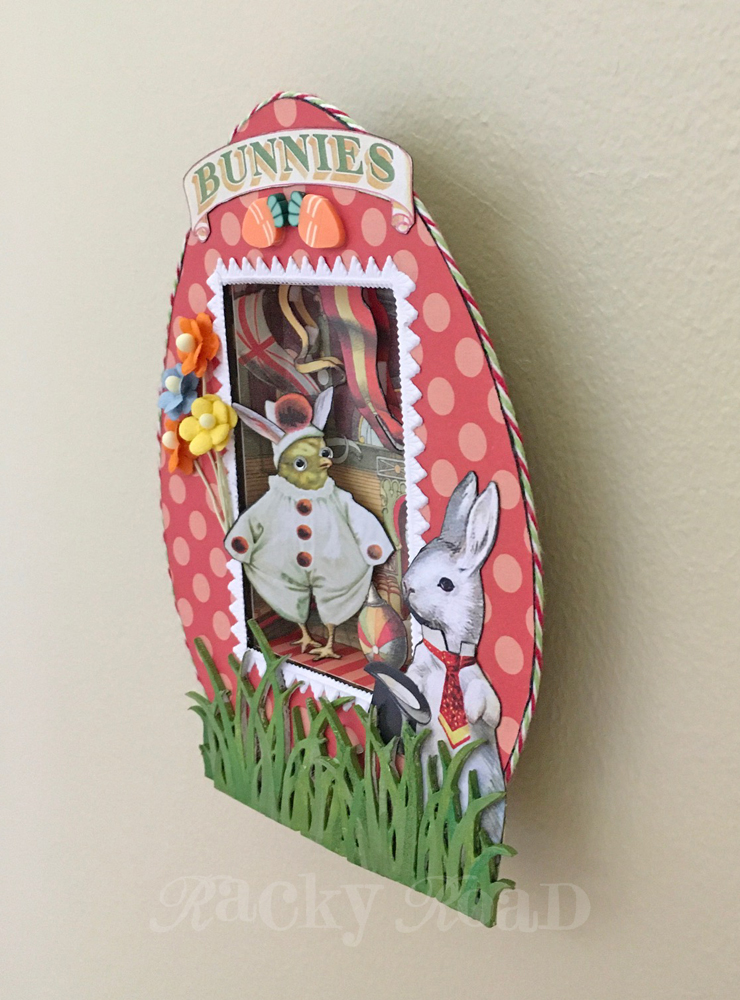
The Bunny Circus Eggstravaganza

The March kit from Alpha Stamps is here! So many chicks and bunnies; spring is on the way, which means Easter is not far behind. I love some Easter art, but I found a collage sheet entitled "Circus Chicks", and you sure can't go wrong with that! I made my Little Niche Egg shrine into a tiny springtime circus, because why not?

I fell in love with the little chick in its clown costume, and decided to work around him. Sure, he's not a bunny, but he is, at least, now sporting the bunny ears. For the background, I found the perfect circus image from the Big Top Circus collage sheet, and made it the background of my niche. I used two copies of the circus collage sheet so I could cut out the flags and banners and attach them with foam tape for added dimension. I also cut out the ball, and attached it with two layers of foam tape to bring it to the forefront.

Every circus needs a ringmaster, but the rabbit image I wanted to use had his head facing away from the action. I cut out the body of that rabbit and used the head from a different rabbit from the same collage sheet. Now he's paying attention!

The chick on the collage sheet appears to be wearing an eye patch, so I colored the patch yellow to match his head, and added a couple of crazy eyes. The eyes I used are designed for fishing flies; they were the perfect size for this crazy little clown chick. Because the eyes are plastic, it was easy to trim his left eye so it looks like it sits behind his beak. I also gave him some bunny ears, cut from the original head of the ringmaster bunny. Now he fits in with the other rabbit performers.

Here are a few photos of how this project came together. I first chose the image of the chick, and the circus background, and then the perfect piece of scrapbook paper from the Echo Dot Summer Dots and Stripes 6x6 pad that coordinated with those colors. The dotted paper was glued to the egg, and then carefully trimmed with an x-acto knife. Some baker's twine was glued around the outer edge. The circus image was adhered to the back and sides of the cardboard niche, which was then glued together with white glue. Clothespins work great for holding things together while the glue dries.

The niche was put in place and the flaps glued to the back of the egg. Masking tape held down the flaps during drying time. The hanger was also glued on at this time.

White Dresden trim around the opening reminds me of those sugar eggs with the scene in them that I used to love as a kid. I tried it out to make sure I liked it before gluing it down. In the photo below, the flags in the circus background have not yet been doubled up. That was my next step.

See how the flags pop, now that there's an extra layer? After the egg was put together, the outside was decorated with all the elements. The chipboard grass was greened up with a combo of paint and colored pencils. I used three clusters to make the Easter grass that the egg sits in.
Thanks for visiting the bunny circus! For a complete list of supplies, click here.

Thursday, February 20, 2020

Teeny Tiny Circus Shriney

I had the smallest of jeweler's tins sitting around for the longest time, and decided to make a tiny shrine out of it. Luckily, I found a teeny tiny image of an elephant, so of course I made a circus shrine. It sits on a bead cap, and features some miniscule sequined stars. Here it is, with a penny for scale.

Not much else to say about this one. 😀

Saturday, February 1, 2020

KCTV, Altered Tin, with Tutorial

It's February,  and who's ready for some valentines? Me and Alpha Stamps, that's who! Let's tune in to KCTV (KittyCat TV, of course) for some good old-fashioned Valentine's Day fun. I love the vintage charm of these cheerful kittens; they remind me of my elementary school days, and valentines from my classmates.


The new retro tv, designed for use with Altoids sized tins, is perfect for this sweet kitty scene. And these cats know how to celebrate! Some happy sprinkles make this Valentine's party extra festive. I pulled a few hearts out of the sprinkles for little dimensional accents behind the kitten's heads, and on the front of the television.

Even the back of the tv is full of feline love.

Here's how KCTV was built. After deciding the theme of the program, I first decorated the tin. The cats were all cut out, then layered with foam tape to give dimension. A thick layer of glue was applied to the bottom of the tin, which was then sprinkled with... sprinkles! In the photo below, you can see the speaker vents in the upper corner of the tv. I wanted to preserve those, so I colored that area with a red marker so they will match the red paper that will be used on the front.

To cut the paper where the vents will show through, I traced the tv on the wrong side of the paper, and used a pencil to mark where the vents are. I then used an x-acto knife to cut out one hole for the vent area.  I used a red marker to draw around the opening. This will help this area blend in with the red paper. Then, the front of the tv was glued down and cut out along the edges with the x-acto.

Below you can see the finished front of the tv, and the back of the back. I did not put paper on the entirety of the insides of the tv, as the back of each piece won't show once it's fully constructed. The "brass" bottoms of the legs were painted with gold metallic paint, and a silver Sharpie was used for the antenna. A grey Copic marker was used on the red legs to make them look like they're set back a bit from the tv cabinet. I used a red Copic marker around the lip of the tin, in case any showed through once the tv facade was attached. A little bit of the turquoise paper is glued behind the speaker.

Here's how to make sure your tv is sturdy: glue the tin to the front of the tv first. Once that's good and dry, put lots of glue on the back of the tin and sandwich the two parts together. While the glue is wet, use some blocks (or whatever you have handy that will work) to make sure the back and front are exactly lined up. Let dry.

Once it's completely dry, you can add the antennas, paint the knobs and add any other embellishments to the front and call it a day. I did want to add some sides, though. A 12" long piece of the same red scrapbook paper is just enough to go from the outside of one leg, all around the top and other side of the tin, to the outside of the other leg. Cut the paper to the width of the side. I cut a notch in the paper to accommodate the antenna, so I glued the paper at the top of the tv first. Then one side at a time, I glued the paper around the curves. Be patient and hold that paper in place for a bit while it dries! You'll have to trim the paper a bit when it gets to the legs. I went ahead and cut another piece to finish the bottom. That piece was notched for the legs as shown below.

Now sit back and enjoy the show! 💕 For a complete list of supplies, click here.

Friday, January 17, 2020

Vintage Santa Altered Tin

Three years ago, I found a bunch of delightfully creepy vintage Santas at a flea market. They had a whole bowl of them available, but I thought they were a little pricey at $5 apiece. Now of course, I wish I had taken them all. But, I picked out two of the best (worst?) ones to use in craft projects. One, I used immediately, and the other has been hanging around on my desk since. Until now. I finally realized that all he really needed was an Altoids tin.

His outfit probably used to be bright red, but it has really faded out through the years. I was glad I had some Christmas papers with muted colors.

I didn't want to permanently attach him in any way, so I stuck a pin through the background paper and he's just impaled there, much like the way you would display a bug. A little tart tin makes a great base for this piece.

I'm glad I finally gave him a home. He seems happier now. As for his buddy, he still enjoys ringing Christmas in every year on his sleigh.

Wednesday, January 8, 2020

Gnomes and Other Woodland Friends

Happy 2020! Here are my first few projects of the new year, and they can definitely be described as "cute", largely in part to the awesome wooden woodland cutouts I just got from Alpha Stamps. Some of the details are wood burned, so they're super easy to paint if you get yourself a tiny brush.

I loved the way that little gnome fit perfectly into an old jewelry box. Using a background cut from scrapbook paper and some mushrooms I painted, I created a little world for him to live in.

He seems pretty comfortable there. Now if I could only get that glass to not reflect/hide the color when taking photos...

Next, I painted the set of four gnomes. I gave each of them a bright color and some fun polka dots and stripes. From the base to the tip of their hats, these little fellows are about 2" tall.


They needed somewhere to be, so I cut out a background of black scrapbook paper and added a moon from a Cosmos Bark paper. The base of the gnomes was painted black and grey to blend in with the background. These little gnomes can stand on their own, so they may end up just living on my desk as is, but I might add them to the front of a book or box. No matter where they end up, I think they're adorable.

I couldn't stop without using one of the adorable hedgehogs. I used a large jeweler's tin for the base of this project. An image from the Lucky Mushrooms collage sheet makes the perfect background, and then I just added a little forest floor, a 3D mushroom, and a tiny ladybug to complete the scene.

A small leaf garland and crepe ribbon wrap the outside, and it's all tied up with a bow. This was a fun, quick little piece. Bonus: I still have squirrels, acorns, leaves, and another hedgehog to play with later!
For a complete list of supplies, click here.

Tuesday, December 17, 2019

Flashback: Cute Gift Bag Tutorial

Here's a tutorial for cute, eco-friendly gift bags. This tutorial was first posted on Craftster in 2009, well before I had a blog, and well before we renovated our kitchen and got rid of that fruity wall paper! Sadly, the parent company that owns Craftster is no longer supporting the forum, so I decided to move this tutorial over here.

It's easy to make these little gift bags out of newspaper. Plus, it's a great way to recycle! Pick a good section of your paper (the comics are always fun), or use a foreign language paper for added interest. If you're wrapping a small housewarming gift, it would be fun to use the real estate section of the paper. Here are a couple of examples I made:


And here is how they're made.
Supplies needed:

PVA glue. This is a bookmaker's glue and can be found at most art supply stores. Elmer's will work as well.
Newspaper. For the example bags above, I used a Japanese paper that measured (when folded) 11 1/2" wide and 15" tall, and the comics of my regular paper, which were folded and cut down to 11" by 11".
A hole punch and a grommet setter or a Clikit tool. I found my Clikit tool at a discount store. If you google "Clikit" there are several entries.
Grommets
Ribbon or string

Here's how they're made. For this example, I used the Japanese paper:

1. Take the folded paper and fold the already folded side down about 1".


2. Run a line of glue on the top of that folded area and fold down again. This will make a sturdier base for the grommets so the bag won't tear when filled. This folded side is the TOP of your bag.


3. Next, glue down one SIDE of the bag. You are going to open out the two layers on the opposite side and insert this glued side in, making a paper tube of sorts. Glue and insert about 1" so it will be sturdy. Make sure you insert the side so it's straight. Glue this both inside and outside.


4. Fold your tube flat, using the glued side as a guide. The glued side should be straight down on your fold.

5. Now we'll make gussets on the narrow sides of the bag. Determine how wide you want your gussets to be. They can be as wide or as narrow as you wish. Once you determine how wide you want them to be, fold the bag flat again and crease the second side of your gusset. (The gusset will be the area between your folds.) When you open your bag up, it should be box-like.
6. Bring both edges of each gusset together and crease so the bag will be able to fold flat. 
Once you have done this step, your bag should look like this:
7. Measure how wide your gusset is, and fold the BOTTOM of the bag up that same measurement. Remember, the bottom is the side that is NOT folded. On the bag shown, the gusset is 2" wide, so I have folded the bottom up 2". After you fold it once, turn the bag over and fold it up the other side as well so you get a good crease there.

8. Now you're going to create the bottom of your bag. Fold both of the gussets in as if you were wrapping a box. Use your previously made fold lines as guidelines.


9. Glue the flaps well. Put one of your hands into the bag to give you something to fold against, and fold each glued flap in to form a square bottom.


10. Here's a Clikit tool. It's great for punching holes and setting grommets. If you don't have one of these, though, you can punch holes with a hole punch and then set your grommets with a regular setter.


11. After your grommets are set, thread a coordinating ribbon through and tie knots on each end. String, yarn, or raffia would work as well. Done! Now you have a cute little gift bag.


The final product:
Wasn't that easy?

Wednesday, December 11, 2019

Quick and Easy Ornaments, with quick and easy tutorials

Need more ornaments? These wood ornaments from Alpha Stamps are so quick and easy to decorate! I'm going to use mine for gift tags, so it will be like giving two gifts in one!

For the first snowman couple, paint the ornament holder silver, then cover the circular part with scrapbook paper and an image from the Silly Snowman collage sheet. Layer on a "Merry Christmas" greeting from the same collage sheet. Glue a beaded trim around the edge. Add some holly, some tiny snowflakes, and a pretty ribbon, and you're done!

The second snowman couple is made in the same way, just using a bit of a different palette.  Its Christmas greeting came from the Small Retro Xmas Tags & Labels collage sheet.

I love this mitten! Covered it with a patterned scrapbook paper, with red paper at the top and bottom. Use a grey Copic marker to draw ribbing around the cuff. Glue on a loop of pretty red ribbon and a paper rose, and you're done. Easy peasy!
For a complete list of supplies, click here!
Related Posts Plugin for WordPress, Blogger...