Design team member of Alpha Stamps, lover of ephemera and junk.

Welcome! Grab a cold one, kick off your shoes, and have a look around.

Wednesday, May 20, 2020

Secret Garden Altoids Tin

We're still sheltering at home and only going out for essentials; my great escape is working in my yard. Consequently, my yard is probably looking better than it has in years. Which leads me to my next project: A secret garden within an Altoids tin. For this project I used Stamperia's Oriental Garden Paper, plus some other fun supplies from Alpha Stamps. I am in love with this paper!

At the outside, only a door. Welcome to the garden.

I mounted the welcome sign and the stones around the door onto thin cardboard to give them a little depth. The door itself is attached to the surface of the tin. These Stamperia papers mix and match so beautifully. I'm such a fan of turquoise and red.

When opened, you can see the beautiful garden scene. It's spring, so buds are beginning to open and the leaves are starting to appear on the trees. The paper on the lid (left) was actually a cream color; I used a combination of Copic Markers, ink, and a white colored pencil to match the background color of the paper on the right. The butterflies wings were folded and only the bodies are glued down, which makes them 3D.
The Gothic Tree insert fits just under the lip of the tin, so the tree and fence make a beautiful frame around the scene. 

That paper! Even the back of the tin is gorgeous.

A few notes on construction: After the tin was covered in paper, the decorating began. The tree insert (top) was painted around the border to match the background paper, while the iron fence was painted black and given "highlights" with a white colored pencil. I glazed the fence to make it shiny. The tree was left the chipboard color, and details were added with colored pencils. Laser Cut Miniature Ivy was painted green and glued onto the fence. Tiny plastic plants were cut apart and glued to the back of the tree branches.
Above, the image of the woman was adhered to the back of the tin with foam tape. Rose buds, moss, and a couple of small bushes were then glued into place.

To attach the rosebuds, I used pliers to bend the wire stem into a little base. That base was just dipped into white glue and attached to the bottom of the tin.

Once the flowers were all set, the insert was put into place. I trimmed a hair off the top and bottom of the insert, because I kept putting it in the tin and pulling it out to check the position of the foliage. Having it be just a little smaller made it easier to manipulate, and it still fits snugly inside.

I hope you enjoy my secret garden. For a complete list of Alpha Stamps supplies, click here.


Wednesday, April 15, 2020

Covid-19, A Little Journal

Like most of the world, I have been sheltering in place for the last 34 days (yes, I'm keeping count). Crafting has been great entertainment, and one might even say, therapy. Making this Covid-19 journal certainly was that for me.

I cut up a lot of newspaper in the making of this book; the background paper for all the pages was created by gluing articles about the virus to the covers (made from a House Shaped ATC Frame set), and each of the pages, which are thin cardboard cut to size. I gave each page a thin layer of acrylic paint, a little ink, and some paint details. The type fades into the background, but if you look closely, you can still see lots of what it says. Anyway, enough chatter, let's look at photos.
The front cover. Hopefully this conveys the feeling of being stuck inside. I started out with just the "metal" bars, but then added the red arch to make it seem more restrictive. Even that didn't seem enough, so I added the "call again" emergency tape. Part of the beauty of having tons of collage sheets is finding something that just works. That emergency tape is actually a small cigar band image from the Mini Cigar Box Trims collage sheet.  Like all of the type throughout the book, with the exception of the snarky captions, the "COVID-19" title and the "shelter-in-place" type were also cut from the paper.

The expression on this face is everything.  All she needed was a mask, which I drew with colored pencils on a piece of typing paper, then cut out and glued down. My light table came in handy to show the shape of her face and and enable me to make the mask fit properly.

The bars on the inside started out as a decorative gate; I just cut off all the ornamental part, shortened them up a bit and painted them grey. Jail cell!

I don't know about you, but my husband and I are definitely enjoying some special snacks during this time, including Cheez doodles and peanut M&Ms. We are taking care not to overdo it, though, unlike this poor woman, who is obviously lacking a bit of self control.  Definitely a "state of emergency". I found this image of Cheez Doodles online, and sized it to fit. The tiny doodles on the left hand page were drawn with colored pencils.

As someone who really doesn't mind spending a lot of time at home (when it's by choice!), I did note that other than not having the option of going out, some things hadn't really changed. I did, however, quit using a hairdryer and wearing makeup and jewelry, and we do seem to go through the alcohol faster than usual.

It can be hard to be isolated with family members for long periods of time. I think this page is self-explanatory. Not to worry, though, so far no one here has needed severe "correction". This knife was drawn with a silver Sharpie.

And the back cover. I'm sure you agree. For a complete list of supplies, click here.
*I hope that neither you nor any of your friends or family has been infected with this terrible virus. Please know that this book is not meant in any way to make light of this serious pandemic. My family has been very strict in socially isolating, and this is just my way of coping a bit. Stay safe out there!*

Wednesday, April 8, 2020

Let Us Crown Him Triptych

Here's a quick little 3" tall triptych I put together recently. The image is from one of my favorite collage sheets: Saints and Sinners. So many great images to play with! The triptych is covered with "heavenly" paper, and the edges are painted with a gold metallic paint. The "Let Us Crown Him" caption was cut from an old hymnal. I painted over it a bit to make it blend into the background, and then went over the letters with a fine black pen. Gold sequin stars and a golden halo complete the heavenly look.

The back is finished in more of that lovely paper. For a complete list of supplies, click here!


Thursday, April 2, 2020

Lotsa Rabbits, an Altered Tin

Here's a little project I just threw together while social distancing. I have always loved the alphabet scrapbook paper I used, and wanted to do something with it. I found another nice paper with lots of letters on it that looks pretty good with it, so this little tin came together pretty easily. Once I had it covered, I used images from Alpha Stamp's Vintage Toys collage sheet. (If you purchase the digital version, you can resize the images as necessary.)

Look at all the bunnies!

Here's the inside, currently filled with miniature carrots. How apropos!

I should go through some of my other old scrapbook paper and decorate a few other tins. Alpha Stamps has blank tins for decorating, plus the collage sheet and baby carrots. Click here if you need supplies.

Saturday, March 21, 2020

Five Shrines

I love the bright colors of Mexican folk art, and I love making little shrines, so these little matchbox shrine facades that just came out at Alpha Stamps make me so happy. For the past week or two, I have been busy making shrines. All the bright colors! The fronts are chipboard, while the little niches are matchboxes. (I have so many extra matches now!)

The first shrine I did was all about Cosmopolitan martinis, so I painted the exterior a bright pink with a red border. It's embellished with polymer clay limes and pink leaves, and the niche features a miniature Cosmo drink (a tutorial for making the tiny Cosmo can be found here). The small metal saint is painted in Cosmo colors, and she's offering up a slice of lime! This shrine will be the perfect addition to the Cosmo shelf in my kitchen. 

My next shrine was made before the Corona virus threat got real, but in light of all the news of the hour, I'm calling this one the "I See Coronavirus" shrine. I used a small loteria card for the niche, and a bright red eyeball at the top. The eye sits on a round filigree setting. I painted the tiny flowers on the filigree to match the colors of the shrine border. The perfect black lines are Dazzles Thin Line stickers.


On this next shrine, I first painted the facade a bright turquoise and then searching for an image to feature in the niche. I found the perfect one on the Loteria Matchbox Shrines collage sheet. The saint was painted in the same light turquoise used for the interior of the niche. A bronze metal flower makes the perfect halo for the saint. Metal roses on the sides, along with polymer clay leaves give a bright pop of color.

Oh no, it's the devil! This is another shrine where I chose the color first, and then the image. The flames were painted on chipboard, then cut out and glued to the front. I could not resist making a few tiny demons suffer in those flames.

This image of the Madonna is just so beautiful. It was the first thing I chose for this shrine. I then picked the paint colors to coordinate with the image. Gold Dresden trim and halos work perfectly with this heavenly theme.

All these bright colors look so fun together. I think I'm going to need another set of facades so I can make more.
For a list of supplies, click here.


Saturday, February 29, 2020

The Bunny Circus Eggstravaganza

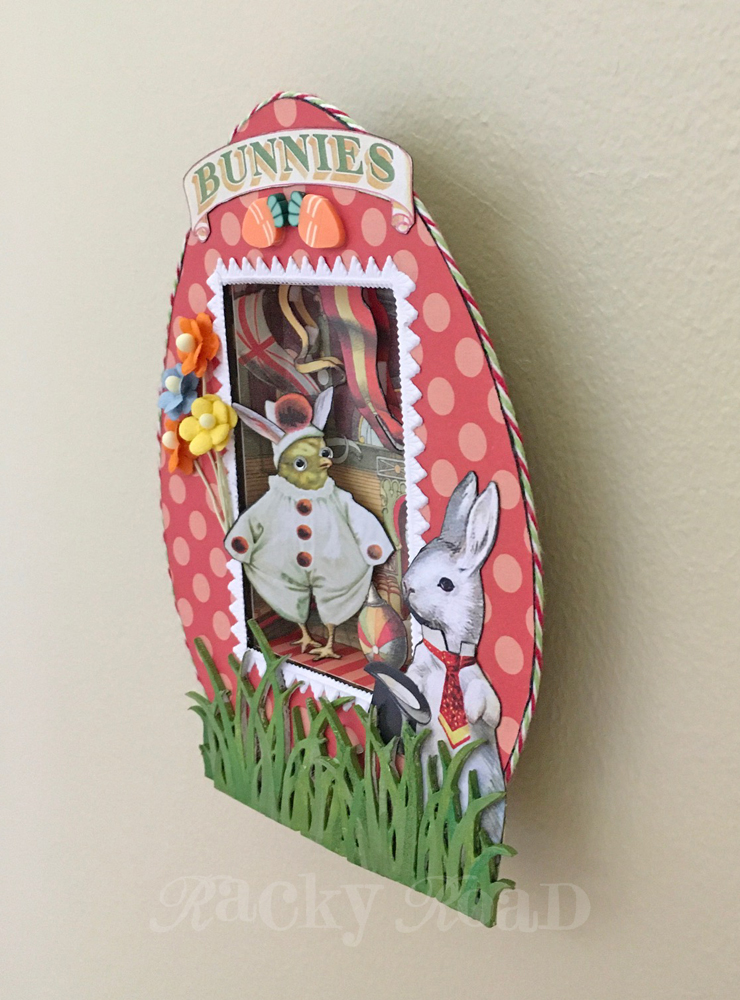
The March kit from Alpha Stamps is here! So many chicks and bunnies; spring is on the way, which means Easter is not far behind. I love some Easter art, but I found a collage sheet entitled "Circus Chicks", and you sure can't go wrong with that! I made my Little Niche Egg shrine into a tiny springtime circus, because why not?

I fell in love with the little chick in its clown costume, and decided to work around him. Sure, he's not a bunny, but he is, at least, now sporting the bunny ears. For the background, I found the perfect circus image from the Big Top Circus collage sheet, and made it the background of my niche. I used two copies of the circus collage sheet so I could cut out the flags and banners and attach them with foam tape for added dimension. I also cut out the ball, and attached it with two layers of foam tape to bring it to the forefront.

Every circus needs a ringmaster, but the rabbit image I wanted to use had his head facing away from the action. I cut out the body of that rabbit and used the head from a different rabbit from the same collage sheet. Now he's paying attention!

The chick on the collage sheet appears to be wearing an eye patch, so I colored the patch yellow to match his head, and added a couple of crazy eyes. The eyes I used are designed for fishing flies; they were the perfect size for this crazy little clown chick. Because the eyes are plastic, it was easy to trim his left eye so it looks like it sits behind his beak. I also gave him some bunny ears, cut from the original head of the ringmaster bunny. Now he fits in with the other rabbit performers.

Here are a few photos of how this project came together. I first chose the image of the chick, and the circus background, and then the perfect piece of scrapbook paper from the Echo Dot Summer Dots and Stripes 6x6 pad that coordinated with those colors. The dotted paper was glued to the egg, and then carefully trimmed with an x-acto knife. Some baker's twine was glued around the outer edge. The circus image was adhered to the back and sides of the cardboard niche, which was then glued together with white glue. Clothespins work great for holding things together while the glue dries.

The niche was put in place and the flaps glued to the back of the egg. Masking tape held down the flaps during drying time. The hanger was also glued on at this time.

White Dresden trim around the opening reminds me of those sugar eggs with the scene in them that I used to love as a kid. I tried it out to make sure I liked it before gluing it down. In the photo below, the flags in the circus background have not yet been doubled up. That was my next step.

See how the flags pop, now that there's an extra layer? After the egg was put together, the outside was decorated with all the elements. The chipboard grass was greened up with a combo of paint and colored pencils. I used three clusters to make the Easter grass that the egg sits in.
Thanks for visiting the bunny circus! For a complete list of supplies, click here.

Thursday, February 20, 2020

Teeny Tiny Circus Shriney

I had the smallest of jeweler's tins sitting around for the longest time, and decided to make a tiny shrine out of it. Luckily, I found a teeny tiny image of an elephant, so of course I made a circus shrine. It sits on a bead cap, and features some miniscule sequined stars. Here it is, with a penny for scale.

Not much else to say about this one. 😀
Related Posts Plugin for WordPress, Blogger...