I just realized I never got back to you on the reproduction ticket holder I recently purchased. The first thing I noticed about it was that it looked brand new, so I took some sandpaper to it to rough it up a bit. I also banged out some of the sharp edges with a hammer. When I finished beating it up, it looked like this:
Then for the fun part~ I gathered some of my favorite ephemera, including a letter written in the early 1900's, an old flashcard, a blotter, an art tag, an old receipt, a soap coupon, a milk cap, some dairy coupons, a couple of old stamps, and the photograph we found in my furniture I mentioned here.
The thing I love about this is the fact that it can be constantly changed. I think I'll change it up for major holidays like Halloween and Christmas.
Design team member of Alpha Stamps, lover of ephemera and junk.
Welcome! Grab a cold one, kick off your shoes, and have a look around.
Thursday, June 23, 2011
Sunday, June 19, 2011
Thieves Market
I was driving around in nowhereville, SC, with my two daughters, when we passed a large building with the intriguing name "Thieves Market" on it. The outside was surrounded with equal parts treasure and junk. Even though we were running a little late to our destination, we found it impossible to resist. We did a quick U-turn and went back to check it out.
That place was chock full to the brim with all sorts of interesting items; I found several old yellowed dictionaries and other old books. My favorite find, though, was a shelf of giant Ziploc bags filled with old wooden toys. I bought three bags, and now I can't wait to see how they will find themselves in new assemblages.
Here are a few of my favorite goodies. This is just a small portion of the total haul.
That place was chock full to the brim with all sorts of interesting items; I found several old yellowed dictionaries and other old books. My favorite find, though, was a shelf of giant Ziploc bags filled with old wooden toys. I bought three bags, and now I can't wait to see how they will find themselves in new assemblages.
Here are a few of my favorite goodies. This is just a small portion of the total haul.
I'm definitely glad we stopped.
Labels:
New toys
Thursday, June 16, 2011
Tiny Circus Parade
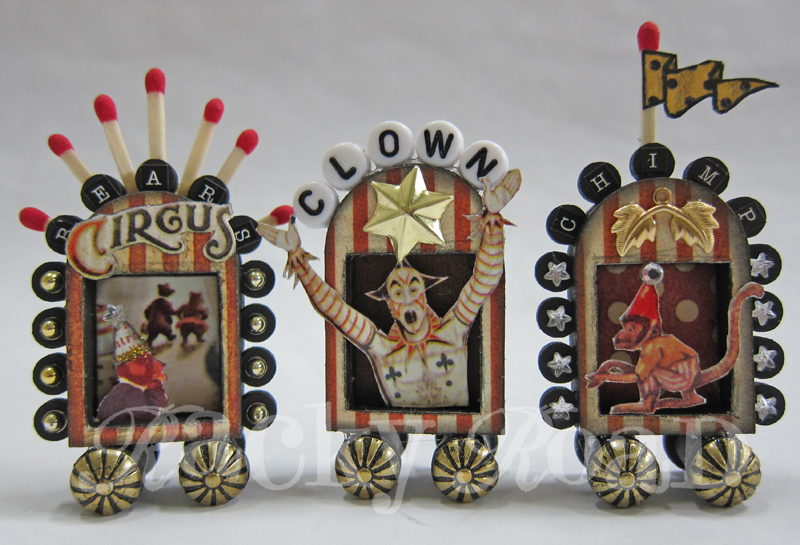
Keeping along with the circus theme...here's a tiny circus parade coming your way! I took three small masonite shrines and transformed them (with a little help from Alpha Stamps supplies and G45 paper) into a wagon train of circus performers. I love the bright colors and the tiny size. Beware: lots of photos ahead.
Depending on your monitor size, you're probably seeing this at just about actual size. The flag on the chimp wagon flies a little less than 2 3/4" high. Here are the backs, with a quarter for scale:
Here are some closeup pics of each car:
I have several more tiny shrines left, just waiting to be altered. They're so much fun!
Depending on your monitor size, you're probably seeing this at just about actual size. The flag on the chimp wagon flies a little less than 2 3/4" high. Here are the backs, with a quarter for scale:
Here are some closeup pics of each car:
I have several more tiny shrines left, just waiting to be altered. They're so much fun!
Labels:
circus
Sunday, June 12, 2011
Circus Wagon Altered Tin
I think this is my favorite tin to date. This masonite frame, available at Alpha Stamps, was the perfect size for turning a plain Altoid tin into a festive circus wagon! I painted the frame with red and gold paint, and accented it with glitter, metal studs, and shiny star sequins. The banner stands on a toothpick and is topped with a couple of beads. The wheels are painted wooden spools with carpet tack spokes. The horse has real feathers attached to his tiny baker's twine bridle.
The wagon includes the usual cast of circus characters: lions, monkeys, clowns, and even a cat.
Are you getting tired of circus art? I hope not; I'm working on another circus parade, this one made with small masonite shrines. I'll post it later this week.
The wagon includes the usual cast of circus characters: lions, monkeys, clowns, and even a cat.
Are you getting tired of circus art? I hope not; I'm working on another circus parade, this one made with small masonite shrines. I'll post it later this week.
Labels:
altered tin,
circus
Saturday, June 11, 2011
Circus Print Canvas Frame How-To
I fell in love with this 4" by 4" circus tent art print by elgerboart on Etsy, and ordered it last week. It arrived in the mail yesterday, and it's gorgeous! I want to sit it on a table top, but didn't want to just stick it in a boring frame, so I thought I'd mount it on a canvas instead.
I painted a 5" by 5" chunky canvas black, and then lightly painted the front edges with the green, red, and yellow found in the print. Here's one of the advantages to hoarding scrapbook paper: I found some great striped paper with the perfect colors to match the print in my stash. For the sides of the frame, I cut three pieces about 1/4" smaller than the area to be covered, and then edged them with black ink. I glued them down with a little tacky glue, and then gave the entire frame a once over with Mod Podge to seal it and make it a bit shiny. I added a decorative knob (Tim Holtz) on top, and used four bead caps (found in the jewelry section of Michaels) for little feet. I love how this turned out!
The photo is attached to the canvas with clear photo corners. The corners are sticky, but I added a little dab of E6000 glue to the back to assure they won't fall off. I also used a few removable glue dots on the print itself to help keep it from buckling. I like knowing that I can remove the photo and re-frame it if I ever get tired of it displayed this way. Here's a view of the side:
And, I always feel it's important to make the backs of my art pretty, even if it's likely that no one will ever see that part. It just gives things a more finished look. For this canvas, I glued the same striped paper to a piece of shirt cardboard, inked the edges, and then glued it to the back. I've made frames for photos of my family before, and have glued a little surprise there, like a fortune cookie from a Chinese restaurant, which I think is fun. This one I left plain for now.
If I ever find the perfect fortune, I'll add it later.
These frames make great gifts if you need a little quickie homemade gift idea. I put this one together in a little under two hours this morning. Maybe you should make one for your Dad for Father's Day!
Friday, June 10, 2011
Mermaids!
Woo-wee, it's hot. All the heat makes me think of the beach, so I was inspired to do a beachy tin. I had this great mermaid collage sheet from Alpha Stamps that happened to coordinate beautifully with one of my favorite Graphic45 paper patterns (I love the swirls and that gorgeous turquoise color!), so I put the two together with some glitter, shells, faux pearls, funky yarn, and a couple of gold charms, and here's the result:
Isn't that tiny seahorse charm just the cutest? You can find both it and the swallow charm at Alpha Stamps. The mermaid in the foreground is attached with foam tape, so it's got some dimension.
Here's the back, with a small reproduction of a vintage souvenir postcard:
I wish I could say looking at these cool blues and greens makes the heat more tolerable, but I'm afraid it's going to take more than that. Meanwhile, I'll turn on the fan.
Labels:
altered tin,
beach
Wednesday, June 8, 2011
More Clowny Mayhem
You know I love me some clowns. And some Altoid tins. Here's my latest tin, fresh off the drawing board. I love using the vintage clown picks on the top of the tins, and nothing says circus like stars and sparkly glitter. I used G45 paper for the stripey tent effect, and clown images from an Alpha Stamps collage sheet. If you don't like clowns, look away!
I like to decorate the sides and the back as well:
If you don't like clowns, here's some good news: I'm working on a beach theme next.
I like to decorate the sides and the back as well:
If you don't like clowns, here's some good news: I'm working on a beach theme next.
Labels:
altered tin,
circus
Subscribe to:
Posts (Atom)