Pretty much everyone in my family carries Altoids in their car. (My family is my best source of empty tins!) The other day, my Dad called and asked me to decorate the outside of a tin for his travel Altoids. He didn't have a preferred theme, but I know he loves to travel, and he loves old cars. While I was pondering what to do, I thought about how dependent I am upon my GPS, and how he and my Mom still prefer using a map. I have a terrible sense of direction, so I have tons of maps left over from my pre-GPS existence. Perfect! A map tin!
The top is part of the map showing where my parents and siblings live, with "road trip!" spelled out in tiny stickers. I used 7Gypsies rubdowns for the pointy hand and the vintage truck.
Around the side, their home state, South Carolina. The bottom of the tin includes the area I live in. You could almost use this map to get to my house, but you'd have to fill in some of the gaps between the top and the bottom!
Because this tin will be used for mints, I didn't decorate the inside. Here it is, filled with tasty Altoids mints. The paper sleeve that came with this tin says, "Open Your Mint Hole". Nice.
I put several extra coats of Mod Podge on this tin, since it will be used often. I hope my folks enjoy it every time they're in the car.
Design team member of Alpha Stamps, lover of ephemera and junk.
Welcome! Grab a cold one, kick off your shoes, and have a look around.
Welcome! Grab a cold one, kick off your shoes, and have a look around.
Saturday, April 28, 2012
Thursday, April 26, 2012
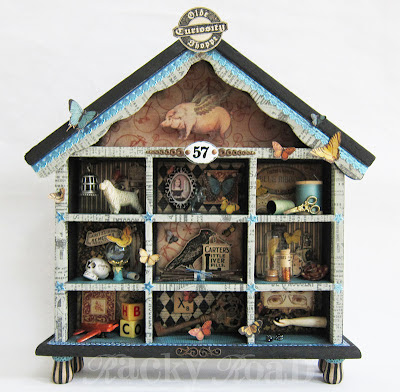
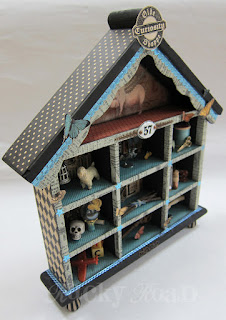
Olde Curiosity Shoppe + Tutorial
I think it's no secret that I'm a huge fan of Graphic45 papers, so when Leslie, of Alpha Stamps, asked if I would do a tutorial using their new "Olde Curiosity Shoppe" line, I was more than happy to comply. I had this rather shoddy little house with cubbies that I found at the thrift store for 79 cents (bargain!) and here's what I came up with:
Here's how it was done:
 Find a
good object to alter. I had a lucky day at the thrift store and found this
little house with cubbies for only 79 cents. Gather your supplies. For this project, I used an 8" by 8" pad of Graphic 45 "Olde Curiosity Shoppe" paper, plus a few of their bigger sheets. Also, lots of fun little toys and trinkets, many available from Alpha Stamps.
  Paint
the entire item black, and choose several coordinating papers for the
background of each box. Cut to size, and ink around the edges.
  Using
Tim Holtz paper tape, cover the edges of each partition. Trim the tape at
each intersection, and fold the edges down to wrap the edges of the walls.
  Choose
a different paper for the floors of each box, and cut to fit. Ink around
the edges, and glue into place.
  Cut
design elements from the papers and begin to arrange them in the boxes.
When you are sure you know where you want each element to go, attach them
to the back with foam tape to add dimension. I used some of the G45 stamps designed to go with these papers for extra elements. In this photo, the crow in the center and
the Olde Curiosity Shoppe sign were stamped onto heavy cardstock and cut
out for use. Now it’s time to start playing around with things you might
want to include in each box: old wooden spools, doll arms, game pieces,
etc.
  If
you’re going to add feet, paint them in colors to match your project. The
feet used here are wooden candle cups. I striped them, and then painted
the lip turquoise with black polka dots for a little whimsy. Attach to the
bottom woth E6000 glue.
  Keep
working with your elements! If you’re like me, you’re going to want to
move things around quite a bit before you’re happy with placement. Some things may not make the cut, no matter how much you love them. Add
some Dresden trim and some metal embellishments. Cover the back, sides and roof with
papers. Ink the edges before adhering.
  Begin
gluing down your 3D elements using E6000 glue. Cut out several
butterflies. Fold each one in half, put a thin line of glue along the body
of the butterfly, and adhere randomly, making sure the wings stay folded
for a 3D effect.
  And
you’re done! I filled each box with things I already had. Chances are
you’ve got a good stash like this in your craft room.
Here's a close-up of all the cubbies. I love things like this because there's always so much to look at.
Labels:
Alpha Stamps,
altered,
tutorial
Thursday, April 12, 2012
Jenna
Some of the moderators on Craftster decided to do a pet swap, where we each sent each other one or two small items for, or relating to, our pets. I was assigned to send something to Connie, who lives with the sweetest girl, Jenna.
Here she is. Isn't she so cute?
Connie mentioned on her wishlist that she'd like something with Jenna's image on it, so I grabbed another of those 4" by 4" blocks of wood I have, and painted her portrait. Once the block was done, I tried beading a hanger for it, but it just didn't look right to me, so I added some bead caps for feet. It still needed something, so I grabbed this giant glass heart bead that's been floating around my craft room forever and attached it to the top. Here she is:
I'm so happy with the way this came out. The sendouts for the swap aren't until May 1st, but I just couldn't stand it, so I mailed it early this week, and it arrived today.
Here's the side. I like the way the red ribbon looks around the sides, but the ugly truth is that I put the it there to hide the holes where the wire hanger used to be. Shhh!
Labels:
art,
pet portrait
Sunday, April 1, 2012
Dancing Elephants
I love it when I get custom orders on Etsy. I just made a set of three ballerina elephants for someone whose niece is expecting twin girls. She ordered an extra one for herself in hopes that some day she'll have a granddaughter.
I wish her good luck!
I wish her good luck!
Subscribe to:
Comments (Atom)


