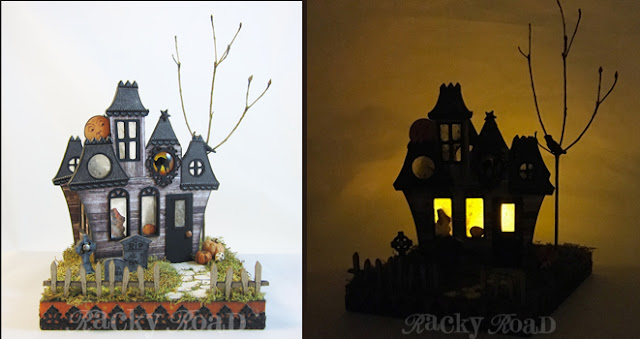
I covered the sides of the house with a wood plank scrapbook paper, and the roofs with spiderwebs. Dresden trim accents the roof lines.
The "stone" path in the front is cut from a cardboard egg carton. It's got the perfect texture for pavers.
Tombstones litter the front yard. The kit comes with four; I chose to use three. Buried in the front yard are "Al B. Bach" and "Ima Goner". Sadly, no one knows who lies beneath the cross. I have created a tutorial for how I made the tombstones, and you can find it at the bottom of this post.
The windows in this little house are actually thin sheets of mica. Here in the front, I put the image of the child behind the mica, so it looks like she's inside. The pumpkin is in front of the mica so it looks like it's outside, sitting on the windowsill.
Here you can see the back of the house. I wanted the inside to be as light as possible when the tea light is lit, so I did not paint the walls or floor. You can also see all the mica in the windows. Believe it or not, it's really easy to cut the mica to size with just a regular pair of scissors. (But not your good paper cutting scissors; use the cheap pair!) I used a little white glue to adhere the mica to the back of the house.
The tree is made from a branch of an azalea bush. Perfect! I punched a little hole in the base and just fed the bottom of the branch in. The crow sitting in that tree used to be a bluejay. I filed down the tuft on his head and painted him black. He prefers life as a crow.
Next to the door are a couple of tiny pumpkins and a skull. Although the house is designed with three windows across the front, I decided to include a door. It's just a piece of painted cardboard, with a window cut into it so the light can shine through. The doorknob is a brad.
The sides of the house are solid. I used some window frames backed with mica to make it look like there were windows there.
I had so much fun making this haunted house! I love that it looks good both in the daytime and at night.
For a complete list of supplies I used, click here! And now, the tombstone tutorial:
(I put together this tutorial after this house was complete, so these are not the tombstones seen above. The tombstones shown here are larger and from another set, but the same process was used.)
Items needed:
Chipboard tombstones
Ratty old paintbrush
Black, white, and grey paint
Straight edge (optional)
Very fine black pen. I used .1 and .05 Copic Multiliner pens (above)
N4 Grey Copic Marker (not shown above)
Dip your paintbrush into each of your three colors and dab it onto the tombstone at random. It's best to use an old stiff brush that's pretty wrecked already.
Keep dabbing on the mixed paints until you are happy with the results. Once I get the mottled look I like, I often dip the brush in just the white paint for some contrast.
Make sure you also paint the back and sides of each piece. If you're making a little graveyard, it's nice if some of the stones are lighter than the others.
Using a straight edge and a .1 black pen, draw thin lines to give the tombstone a 3D effect. If you have a steady hand (or you need to go around a curve, like the stone at top below, just freehand it.)
Use the .05 pen to draw tiny cracks in the tombstones. I also used a grey Copic marker (N4) to give some shadows and dimension. For the tombstones in the haunted house project above, I hand lettered the gravestones, but for these two, I found some odd bits of rub on type that added detail. Either way works great. Now that I've got some new tombstones to play with, I need to do another Halloween project. Hmm....
For a complete list of supplies I used in the Haunted house, click here, and for the set of tombstones used in the tutorial, click here. Happy haunting!


Love this!! It's so cute! Makes me want to try doing my own!
ReplyDeleteWhat an incredible piece! Definitely has a 'haunted' effect. As I have some of the tombstones on order, I am very thankful for the tutorial. And the use of egg carton for the paving stones was brilliant! Love learning new things!
ReplyDelete