Design team member of Alpha Stamps, lover of ephemera and junk.

Welcome! Grab a cold one, kick off your shoes, and have a look around.

Saturday, July 31, 2021

Halloween Scary Book

It's never too early to start up on Halloween crafting! I used some Solid Moon Book Pages from Alpha Stamps to make a spooky Halloween book. A Haunted House overlay was the basis for the perfect cover art for the book. I painted the overlay black, and added scrapbook papers plus a moon and pumpkins from collage sheets to set the spooky scene. You can just see the tiny skeletons peaking through the windows. This book was bound with a Zutter Bind-It-All.

It was fun to mix and match Halloween papers to make each page different. Once each page was covered, I used lots of individual images from collage sheets to fill the space. I kept moving everything around until I was happy with the layout. For the really busy pages, it helped to take a photo before removing everything for gluing.  


The first page is a clowder of cats. Black cats, to be specific. I love the vintage look of these frightful  felines.

Next up, some jack o'lanterns. That background paper has to be my favorite.


Witch, please! It's so nice that this coven got together for a group photo. Better look behind you, witches.

These shady fellows are obviously up to no good. Are those the ghosts of past victims of this poison dealer?

The penultimate page features happy trick-or-treaters. Witch better have my candy!

I found the perfect image for the final page. It fits beautifully, and it makes me laugh to think that of all the scary things featured in this book, Medusa seems to finds the fun loving children on the adjacent page to be the most horrifying.


For a list of supplies, click here!

Wednesday, July 14, 2021

Tiny Circus Wagon

The tiniest of circuses is coming to town, and they've purchased a shiny new wagon to bring in their prize polar bear. This project is made from an Altoids Smalls tin, so it's pretty teeny; the wheels are only 3/4" tall. I covered the tin with some chilly blue circus stripes and stars, and added shiny gold filigree.  The wagon may be small, but it's fancy! 


There are four bits of filigree around the edges of the wagon: one large one at the top, two on the bottom of the sides, and one, a Symmetrical Raw Brass Flourish, at the top of the sides that I cut in half with some sharp shears. The filigree was attached using E6000 glue (super toxic; use it sparingly and outside!) A paper medallion sits at the top of the wagon. A tutorial on how to make paper medallions can be found here.


The wheels were silver, but I painted them with a gold paint pen to better match the filigree. Attaching the wheels was a little tricky; I used a toothpick for the axle, but the tin is only about 1/2" wide, so I had to cut the toothpick down and whittled the cut end to a point to fit in the hole in the wheels. Don't force the wheel on; they are pretty fragile. (Don't ask me how I know!) I did break the center out of one, but I ended up gluing the wheels to the tin anyway and put that one on the backside, so you can't really tell, except for the couple of missing spokes. Oops!  


And there they go, off to the circus parade! For a list of supplies, click here

Wednesday, May 26, 2021

Bird Watcher

This month's kit from Alpha Stamps kit inspired me to make a little hanging ornament. It looks like a little birdhouse, so it's perfect for housing an avid bird watcher. This guy's really into it; he's got his shiny new binoculars and has evidently been talking lots of notes on his findings. He's even found a nest of bright blue robin's eggs. Luckily, he knows enough to leave it alone; soon he'll be able to view baby birds.

The house is covered with beautiful papers from Bird Watcher 8 x 8 collection. I covered the inside and outside of the house with a sweet floral print, and then used parts of a couple of the other papers to embellish the outsides. Both the sides of the house feature bird stamps found on paper from the collection.

The back of the house has a giant floral pattern, which was also cut out from the Bird Watcher collection. You may wonder what's up with the wooden blue bird in this photo. Well, funny story. He was part of the first version of this project.

Here's how the Bird Watcher started out: as The Birdy House. I used a bird from an old wooden ornament, plus a resin nest and some speckled eggs. I liked it, but I didn't love it. If you're a fan of this Birdy House, though, you can click here for a supply list.  The resin nest and speckled eggs are super cute; I'm sure I'll use them in the future. But this time around, I just wasn't crazy about the interior of my little house, so I removed all the innards and went with the Bird Watcher.


A little about constructing the house itself: you could glue all the parts together and then cover it your house with papers, but I chose to cover each side and the roof before construction. Here are the pieces ready to put together. If you do choose to do it this way, it's important to note that in some places (any wall or floor that will be on the inside of the house), the paper should not cover the chipboard tabs. But in the outside walls, the paper does cover the tabs. I didn't bother covering the back of the front facade, because it doesn't show. The roof has slots in it that need to remain open, so I cut the paper to fit as shown below.  Leave the whole channel where the slot is free so that the roof will better attach to the top of the house. The hole for hanging it optional. If you prefer a free standing shrine, just cover the hole when decorating the roof.

I hope you have fun with your bird house! For a list of supplies for making the Bird Watcher, click here

Saturday, April 17, 2021

Down The Rabbit Hole with the Red Queen

I titled this latest Alpha Stamps project "Down The Rabbit Hole" because this little tyrant actually took me there. I had planned to use her as a book cover, in which I would use two of the cutouts to make the covers. Alas, though, this little queen would not let go of her heart shaped staff, nor would she not quit pointing in such a rude manner. I would have had to make a pretty thick book in order to assure that it could open correctly. I decided to just start painting Her Majesty and see what would become of her. Here's the story of our journey together.

I used an image from "The Red Queen" collage sheet as a reference for color, etc. and started painting just the shoulders and head of the queen. At this point, my plan was to use her as a back cover and make a tiny rectangular cover in front. Look how tiny she is! Once I got that top part painted, it felt weird not to have the rest painted, too, so I penciled it in and got to work. My solution: just keep painting and worry about construction later. Most times this works out for me. The queen, though, had a different plan. 


Once I got the entire queen painted, plus the front cover, so her the dress would still be complete with the cover closed, I glued a strip of card stock to the back of our queen, making sure there was room for the front cover to close under her right hand. Wow, great idea. Now, if you make a little book, it's going to cover up all that work I did painting her dress. Plus, there's no way the book will close, because the spine isn't thick enough to allow it. Luckily, I had the foresight to leave the strip of card stock long. Perhaps I could use what used to be the front cover to finish out the back of her dress, and then make a book on the backside. Genius! (*note: I painted the card stock brown because I did not prime the cardboard figure before painting it. If I had painted on the lighter card stock, the colors wouldn't match.) Alas, I had the same problem with the back of the "book" than I did with the front. It just would not close with pages in it. On to plan C.


After the step above, I attached a piece of cardboard to the non painted side of the card stock so I could continue on with the front of the dress. Here's Her Majesty at this point, completely painted: 

OK, now we're getting somewhere. I decided to just make a little scene from Alice in Wonderland and use that weird shape as well as I could. I put the Cheshire cat up in a tree, and used the Queen's pointing hand as a signpost to Wonderland. It's an odd little project, but at least something was made of it!

She is small, but mighty. And she definitely has a mind of her own. For supplies, click here.

Saturday, March 20, 2021

Cheers, Marie! Altered Altoids Tin

I'm not sure if anyone was drinking Cosmopolitans back in Marie Antionnette's day, but I'm pretty sure that if they were, Marie would have been a huge Cosmo fan. I know I am! In fact, we've made a dedicated Cosmo party shelf in our kitchen, where our martini glasses, the shaker, and a little container of  rim sugar are kept. It also includes some Cosmo artwork; some by me, some by my friends. When I got this month's kit from Alpha Stamps, all the pink reminded me of that shelf, and I decided to let Marie enjoy a Cosmo, at long last. Cheers, Marie!

I removed the cover of the tin, and covered the inside with some gorgeous pink floral paper, plus some black and white harlequin paper from my stash. I found a gold dollhouse frame which was the perfect size to frame a quote featured on some of that kit paper, which reads, "Life is nothing without passion". Ain't that the truth?

The outsides of the tin are also covered harlequin paper, and then adorned with some gold Dresden trim. A string of little red beads sits atop the rim. In the photo below, you can see that Marie's yellow overdress overlaps her pink skirt a bit. I used two French Ballet Costumes collage sheets to achieve this look. I cut the yellow overdress at the "v" of the bodice and glued it only at the waistline of a full image of Marie. A couple of foam tape squares were inserted between the overdress and the skirt to separate the layers. Marie is adhered to the tin with 4 layers of foam tape, so she really stands out.


A gold crown brad was the perfect little topper for the tin. The prongs were easy to fold flat into the base of the crown. A large flat-backed crystal fit perfectly inside the crown and hid the folded prongs. At the angle of the next photo, you can see the stacks of foam tape helping keep Marie front and center.
 

 A few tips on construction:

The Marie from the collage sheet has her arms spread out as if she is dancing. It's a beautiful pose, but it's not conducive to enjoying a drink, nor did her arms allow her to fit inside the tin. Here's how to change her position. In the top half of the image below, there are two identical images of Marie. The left image is the one that will be used in the tin. Her right arm is cut off at the elbow, and her left arm is cut at the shoulder. The duplicate image at the right has already had the overskirt removed. Both its arms are cut at the shoulder. Her wand is removed from the right hand, and her hand is removed from the left arm. When her left arm is hanging down, that hand is not in the correct position. Therefore, I used another image from the same collage sheet, and Marie was given a hand transplant.  When you position this new left arm on Marie, there is a little gap at the shoulder. It's easy to fill that in with a little piece of one of the unused arms. You'll just have to trim it to fit.


The beads aren't tough to adhere to the edge of the tin, but they do require some patience. You will have to really babysit them while the glue dries. It's best to glue only 2 or 3 inches at a time. I use Aleene's Tacky glue. I put it on fairly goopy, but it's invisible when it dries.

While it is drying, you'll need to hold it in place. Those beads are going to want to fall off the lip of that tin. One thing that helped me keep my sanity during this step was to lean the side of the tin up against a flat surface. You'll still have to keep checking it until it's fully dry, but it helps keep the beads in place. Make sure you stop and start your beaded strand in on one of the sides, not at the corners.

For a complete list of supplies, click here! And now, how about a little bonus photo of that Cosmo shelf? Yes, it has party lights.

Saturday, February 20, 2021

Five Tiny Tins: Fairies, Mary, and Alice

How sweet are these little 1" by 2" tins? I made a couple shrines with the ones I had, and then begged Leslie at Alpha Stamps to send me at least 5 more. The tins come with a sliding lid, and I still plan to try a design incorporating the lid, but for now: tiny shrines. I started out making little fairy shrines. The backs of the tins are covered in scrapbook paper. Tiny wings from a collage sheet are added to create fairies, who dance on beds of moss amongst the smallest of mushrooms, made from floral stamens.

Here's a quick photo for scale. Adorable! 


All the fairies are attached with small pieces of foam tape to add dimension. This first fairy is friends with a lucky ladybug. Her crown is made from a sequin star, cut in half and glued together points up. For link to the supplies used for this tin, click here. A full list of supplies for all the tins is at the end of this post. 


Several of the tins have half-round toppers on them. I used a wide pair of pliers to gently bend round medallions in half. The pieces I used were very easy to bend. Just grip the medallion where you want to bend it, and push to fold. The flat side can then be glued to the top of the tin with E6000 glue. 


The ballerina fairy has caught a falling star. Make a wish! The word "wish" was cut from an old dictionary. I found a picture of a tiny flower and cut out two petals to glue on her back for wings. Supplies can be found here

 
I didn't want to use only half of the star for this next shrine, so I used some Apoxie Sculpt to adhere it to the top of the tin. Extra sequin stars add a little sparkle. This gentleman's supplies can be found here
 
 
Of course I also needed to make a shrine for Mary. After gluing the paper to the back of the tin, I covered the sides with beautiful glass glitter, plus some more sequin stars. I used two images of Mary for this shrine; the entire image is glued to the back of the tin, and then Mary alone was cut from the second image, and stuck on with foam tape. I did not like the way the medallion on top of this tin had a hole in it (see picture above where it's getting bent with pliers) so I added a metal rose to cover the hole. Mary deserves a little extra bling anyway. Here's your supply link

 
I have had this adorable White Rabbit charm (from Alice in Wonderland) for a while. I finally found the perfect home for him! I removed his hanging loop with wire snippers. Using some Alice themed scrapbook paper, I covered the back and the sides of this tin. Then all that was needed was a little moss, some polymer clay playing cards, and a tiny teacup on the top. The heart was painted on with a small detail brush and acrylic paints. Supplies for this tin (including that rabbit!) can be found here.
 
 
I really enjoyed making these little tins. The projects were quick and relatively easy. Placing the stamen mushrooms was a little tricky, but once you cut them to the desired height and run the stems through some glue, they stick easily. I often used a toothpick to straighten them up once they were inserted into the moss; it can be difficult to stick a finger in such a little space! Finished tins can be hung up with removable mounting putty or glued to small magnets. They don't stand on their own, but it would be easy to mount them on a medallion or small block of wood if you want to display them on a flat surface.
 
For a list of supplies used on all the tiny tins, click here

Wednesday, January 20, 2021

Tiny Bakery Box and Book

This month's new Alpha Stamps kit contains the cutest little bakery box you have ever seen! At 2.5" x 2.5", it fits perfectly in the palm of your hand. (I can't help thinking that it would be the perfect size for an American Girl doll.) The box is easy to put together and fun to decorate. Who wants fresh baked donuts?


I gently removed the window cellophane on the box lid in order to trim the decorative paper added to the top of the box. Once that paper was trimmed, I replaced the cellophane and added a picture of yummy donuts so they'd show through the window. Mmm! Tiny polymer clay cake slices make a fun swirly design element for the box top.
 
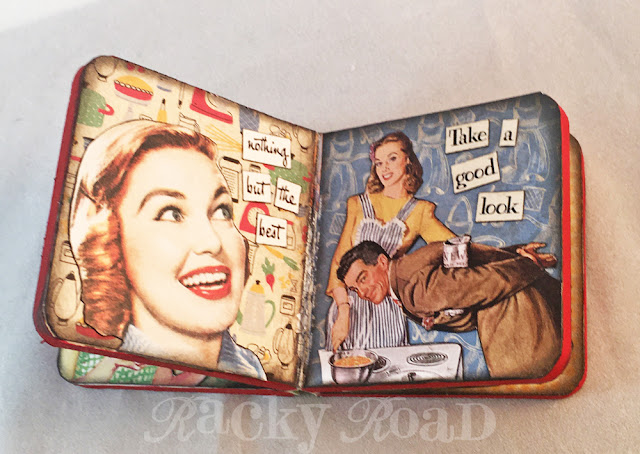
Polka dot paper on the inside top of the box hides the back of the donut photo. I just happened to have the perfect sized chunky book that fit in this little box, so I altered it with Delicious Scrapbook papers and vintage housewives.
 
The cover and the pages:
 
Before I glued anything down, I lightly sanded the glossy papers to help the glue adhere. I decided to paint the cardboard edges after I finished gluing everything down, but a wiser person would have painted those page edges before gluing. Next time I'll plan ahead.

Such fun background papers, and who doesn't love a happy housewife? The woman on the right seems to be silently contemplating smashing that poor fella's head into the pot.
 
 Hey fellas, look at all that tasty grub. Someone's been working hard in the kitchen today.

What will go in your tiny box? For a complete list of supplies (minus the chunky book) click here!

Related Posts Plugin for WordPress, Blogger...