One thing I thought would be fun is that they can be arranged in many
different ways. I hope my the recipient enjoys playing with them!
Design team member of Alpha Stamps, lover of ephemera and junk.
Welcome! Grab a cold one, kick off your shoes, and have a look around.
Wednesday, September 30, 2015
Halloween Peg Doll with Boo Blocks
One of my favorite swaps on Craftster this time of year is the One Tiny Thing October Holiday
swap. My partner mentioned she loves peg dolls, so I decided to make her a couple, along
with some little Boo blocks. The only rule of the OTT swap is that your
swap item has to be under 4". These blocks are 3/4" square, and the
little cat is 1" tall, for reference. Depending on your monitor, you're probably seeing them actual size.
Saturday, September 12, 2015
Halloween Tic Tac Toe
There are two things in this crafty world that I really love: Halloween, and toys. Oh, and peg dolls, so make it three. This month at Alpha Stamps, we're doing haunted houses, and after my adventure in making a box last month for my Zombie Cars, I thought it would be fun this month to try my hand at a box that holds a game of tic tac toe.
The lid of the box is the haunted house part, which can be used as a decoration if you don't feel like playing the game. I kept the top relatively flat, but it does have some fun dimension, like the cat eye on the turret, the fuzzy felt bats, and the acrylic black cat on metal fence at the front. The fence is attached with some foam tape so it stands away from the house a bit.
Who's that looking through the window? Looks like a tiny vampire.
Here's what you'll find when the haunted lid is removed: the "Boo Crew", a set of five wrapped up zombies and five crazy vampire bats.
The bat on the far right is the one that was peeking through that window. He sits a little taller in the box so he can see out. Isn't that Boo Crew sign cute? It's a sticker that came with the set of scrapbook paper I used for this project.
The mummies were painted white and then wrapped with thin strips of cotton fabric. I used some light grey markers to help define the edges of each strip. The bats were given tiny ears made using Apoxie Sculpt. Their wings are made from the felt bat stickers. I removed the sticky part from the back of the sticker, cut off their heads (sorry!) and glued the front of the sticker onto the back of the bats so that the detail shows.
The tic tac toe letters on the back of the haunted house were cut from scrapbook paper using a Silhouette Cameo. The cat in the pumpkin and the spooky words are stickers that came with the scrapbook paper. The bottom of the box is the game board. I used some spiderweb paper and a painted chipboard skeleton to jazz it up a bit.
Let's have a game! It looks like the vampire bats will be victorious in this round. Tricky little buggers.
The hardest part of this entire project for me was the box insert. I wanted each piece to have the same amount of space in the box, but the bats are much bigger than the mummies and demanded more room. After lots of ciphering, I came up with this layout. Once the holes were cut, I glued cardboard pieces around each opening to keep the pieces from rolling around. I thought you might like to see how the flip side of the insert looked while in progress.
I painting the lid of the box (which is attached to the back of the house) black, which looks great behind the mummies, but the black bats needed a lighter background, so I glued orange paper with stars on it behind them. They're much happier now.
Stay tuned, there will be more Halloween to come in the following posts. Meanwhile, if you need supplies for a project similar to this one, or just need some cool stuff for haunted houses, click here!
The lid of the box is the haunted house part, which can be used as a decoration if you don't feel like playing the game. I kept the top relatively flat, but it does have some fun dimension, like the cat eye on the turret, the fuzzy felt bats, and the acrylic black cat on metal fence at the front. The fence is attached with some foam tape so it stands away from the house a bit.
Who's that looking through the window? Looks like a tiny vampire.
Here's what you'll find when the haunted lid is removed: the "Boo Crew", a set of five wrapped up zombies and five crazy vampire bats.
The bat on the far right is the one that was peeking through that window. He sits a little taller in the box so he can see out. Isn't that Boo Crew sign cute? It's a sticker that came with the set of scrapbook paper I used for this project.
The mummies were painted white and then wrapped with thin strips of cotton fabric. I used some light grey markers to help define the edges of each strip. The bats were given tiny ears made using Apoxie Sculpt. Their wings are made from the felt bat stickers. I removed the sticky part from the back of the sticker, cut off their heads (sorry!) and glued the front of the sticker onto the back of the bats so that the detail shows.
The tic tac toe letters on the back of the haunted house were cut from scrapbook paper using a Silhouette Cameo. The cat in the pumpkin and the spooky words are stickers that came with the scrapbook paper. The bottom of the box is the game board. I used some spiderweb paper and a painted chipboard skeleton to jazz it up a bit.
Let's have a game! It looks like the vampire bats will be victorious in this round. Tricky little buggers.
The hardest part of this entire project for me was the box insert. I wanted each piece to have the same amount of space in the box, but the bats are much bigger than the mummies and demanded more room. After lots of ciphering, I came up with this layout. Once the holes were cut, I glued cardboard pieces around each opening to keep the pieces from rolling around. I thought you might like to see how the flip side of the insert looked while in progress.
I painting the lid of the box (which is attached to the back of the house) black, which looks great behind the mummies, but the black bats needed a lighter background, so I glued orange paper with stars on it behind them. They're much happier now.
Stay tuned, there will be more Halloween to come in the following posts. Meanwhile, if you need supplies for a project similar to this one, or just need some cool stuff for haunted houses, click here!
Labels:
Alpha Stamps,
bat,
Halloween,
mummy,
peg doll
Monday, September 7, 2015
Tin of the Month Club, September
September is here and all the little kiddies are back in school. To celebrate, here's the September Tin of the Month. Not sure how happy this sweet little girl is to be back, but at least she's dressed for the occasion with her bright red hair bow! I love those tiny pencils...
Want to see the rest of the collection? Click on the tag "Tin of the Month Club".
Wednesday, September 2, 2015
Fruity Friends
More peg dolls! I was so inspired by all the tiny fruits they are carrying at Alpha Stamps now that I just had to make a few little fruity friends. Inspired by the color of the fruits, I painted four 1" pegs to match, and then sewed them little hats and capes.
Their hats and capes are removable, and sometimes, they get a kick out of switching things up.
As I was looking at all the fruit, I couldn't help but think of Carmen Miranda. With the help of a little Apoxie Sculpt and a glue gun, I layered lots of different fruits on her head. She loves this fruity hat!
Carmen and all her friends.
This little rabbit hopped on over, but he's not interested in the fruit. All he wants is carrots!
I can't get enough of those wooden peg dolls, or the adorable mini fruits and vegetables now available here at Alpha Stamps.
Their hats and capes are removable, and sometimes, they get a kick out of switching things up.
As I was looking at all the fruit, I couldn't help but think of Carmen Miranda. With the help of a little Apoxie Sculpt and a glue gun, I layered lots of different fruits on her head. She loves this fruity hat!
Carmen and all her friends.
This little rabbit hopped on over, but he's not interested in the fruit. All he wants is carrots!
I can't get enough of those wooden peg dolls, or the adorable mini fruits and vegetables now available here at Alpha Stamps.
Labels:
Alpha Stamps,
peg doll,
rabbit
Saturday, August 22, 2015
Zombie Cars: Scary Fun!
Do you ever just get a weird idea right out of nowhere? It happened to me for this last project for Alpha Stamps. When I saw these paper maché coffin boxes and rubber zombie finger puppets, for some crazy reason, I immediately thought "soapbox derby cars with dead drivers!" When I told Leslie (fearless leader of Alpha Stamps) my idea, she found me the perfect 1 1/2" spoked wheels for these vehicles.
I removed the top of each coffin box to save for another project. With an x-acto knife, I cut out a window from the box bottom before painting each car. The number 8 car features painted flames and a scary black widow spider on the front. The orange car, number 31, has skeleton arms and some red headlights shining through the eyes of the skull on the front. (There's a view of the underside of this car showing how those lights were installed at the bottom of this post.)
Where would one find a set of zombie cars? Why, nestled in a collector's box in an old creepy toy store, of course! I recovered the top of an old game box with some red cardstock and a new label. I added some tape to the sides, because we always ended up having to tape up the corners of our game boxes when I was a kid.
The cars are safely nestled within the box. I used shirt cardboard to construct the box insert (gotta keep those cars from moving around in there!). It seemed a little plain, so I covered the top of the insert with stripey scrapbook paper for more scary fun.
On the underside of the lid is a cemetery backdrop which makes the perfect little playset for the cars. The zombies seem right at home there.
Wanna see the car backs? Car 31 features more bones and a "rancid" license plate. Car number 8 sports some fangy black fins and a pair of scary taillights (or are they eyes?!?) above a "poison" tag. The zombie finger puppets are stuck down in the opening created by the window cutout.
I'm still a huge newbie at Photoshop, so I was very excited to be able to put together the box top using an image of children from a vintage game of "Winner Spinner" (minus the giant spinner that used to be there) and actual photos of the cars themselves.
As promised, here's a shot of the underneath of car 31. I placed the skull on the front and punched out holes for the lights. Once the lights were inserted from the inside of the car, Apoxie Sculpt was used to keep them securely in place. Apoxie Sculpt also adhered the battery to the top of the car, and the light switch to the side, where it's easily accessible. You can see some masking tape and tiny o-rings on the axle, which keep the wheels from sliding side to side. The zombie driver is simply smashed in there. He's easily removable and repositionable.
Hope you had some scary fun with the zombie cars! Want to make your own? Click here for a full list of supplies.
I removed the top of each coffin box to save for another project. With an x-acto knife, I cut out a window from the box bottom before painting each car. The number 8 car features painted flames and a scary black widow spider on the front. The orange car, number 31, has skeleton arms and some red headlights shining through the eyes of the skull on the front. (There's a view of the underside of this car showing how those lights were installed at the bottom of this post.)
Where would one find a set of zombie cars? Why, nestled in a collector's box in an old creepy toy store, of course! I recovered the top of an old game box with some red cardstock and a new label. I added some tape to the sides, because we always ended up having to tape up the corners of our game boxes when I was a kid.
The cars are safely nestled within the box. I used shirt cardboard to construct the box insert (gotta keep those cars from moving around in there!). It seemed a little plain, so I covered the top of the insert with stripey scrapbook paper for more scary fun.
On the underside of the lid is a cemetery backdrop which makes the perfect little playset for the cars. The zombies seem right at home there.
Wanna see the car backs? Car 31 features more bones and a "rancid" license plate. Car number 8 sports some fangy black fins and a pair of scary taillights (or are they eyes?!?) above a "poison" tag. The zombie finger puppets are stuck down in the opening created by the window cutout.
I'm still a huge newbie at Photoshop, so I was very excited to be able to put together the box top using an image of children from a vintage game of "Winner Spinner" (minus the giant spinner that used to be there) and actual photos of the cars themselves.
Hope you had some scary fun with the zombie cars! Want to make your own? Click here for a full list of supplies.
Labels:
Halloween,
scary toys,
zombie
Wednesday, August 19, 2015
Black Cat
My favorite swaps to do on Craftster are always the Halloween swaps, and especially the Vintage Halloween swap. I can't resist doing those just about every year. Here's what I made for my swap partner this year. It's about 8" tall, made from paperclay on a foil armature. The star stand is the bottom of a paper maché box.
My partner mentioned on the signup form that she like black cats, bats, and pumpkins, so I got in all three. The ruffle around his neck was originally white, so I colored it with a Copic marker.
The back:
And a little closeup of his face, just for fun.
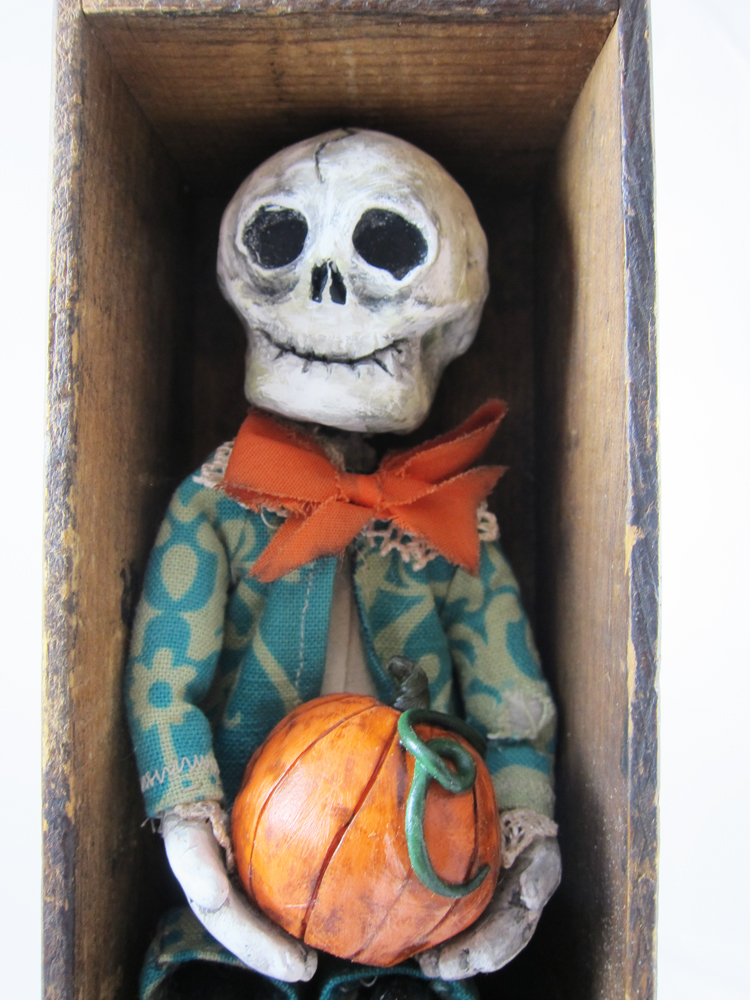
Want to see what my partner sent to me? This awesome seated skeleton, nestled in an old cheese box:
Detail:
That pretty much sums up why I love the Vintage Halloween swap over on Craftster!
My partner mentioned on the signup form that she like black cats, bats, and pumpkins, so I got in all three. The ruffle around his neck was originally white, so I colored it with a Copic marker.
The back:
And a little closeup of his face, just for fun.
Want to see what my partner sent to me? This awesome seated skeleton, nestled in an old cheese box:
Detail:
That pretty much sums up why I love the Vintage Halloween swap over on Craftster!
Monday, August 3, 2015
Tin of the Month Club, August
August already?
Each month this year, I'm altering a small tin and posting it. This month's tin is hot, just like the August sun. Warm colors, an
awesome vintage image, and some tiny shells. Just about sums up the
month, yeah?
If you'd like to see the rest of the tins I've done so far this year, click here.
Subscribe to:
Posts (Atom)